Updated May 16, 2024

Table of Content
- What is the IF Statement in Power BI?
- DAX IF Statement
- How to Use DAX IF Statement in Power BI?
- Power Query IF Statement
- Things to Remember
What is the IF Statement in Power BI?
The Power BI IF statement is a function that makes decisions and returns a value after checking if the given condition is true or false. It allows you to specify a condition; if that condition is true, a specific action or calculation is performed. If the condition is false, a different action can be performed. It also enables adding new columns based on specific criteria.
For example, imagine a business that wants to give a free coupon to any customer who purchases above $500. They can use the Power BI IF statement, to check if “purchase > $500”. If the condition is true, the customer is eligible, so Power BI will display “Eligible”; if not, Power BI will display “Not Eligible”.
In Power BI, we can use the IF function in two ways: with the DAX function and in the Power Query tool. DAX is a special language that we can use if we want to perform calculations on any data. For example, adding a set of numbers, finding the average of a group of values, etc. On the other hand, Power Query is a powerful tool that simplifies the task of sorting, organizing, and presenting data in a structured manner. For instance, we can use Power Query to sort our sales data according to the year.
DAX IF Statement in Power BI (Definition & Syntax)
The DAX IF statement allows us to create a new column in the Power BI desktop, where the data in the new column is based on whether a given condition is true or false.
Syntax of the DAX IF statement in Power BI:
In this syntax:
- The LogicalTest is an expression or condition that evaluates to either true or false.
- The function returns one value, i.e., ResultIfTrue, if the condition is TRUE, and another value, i.e., ResultIfFalse, if the condition is FALSE.
How to Use DAX IF Statement in Power BI?
Here is a simple step-by-step process of how to use the IF statement in Power BI
- Start by selecting the column where you want to apply the IF statement.
- Start by typing “IF()” to open the IF function.
- Inside the parentheses, define the logical condition you wish to evaluate, ie., the condition you want to check.
- Then, include a comma and specify the value to be returned if the condition is true.
- Add another comma and mention the value you want the function to return if the logical test is false.
Example of DAX IF Statement
Let’s consider the below data of the list of individuals and their ages for voting. Here, we want to create a new column with the below condition:
If the “Age” is greater than “18”, then they are “Eligible” for voting, or else “Not Eligible”.

Solution:
Step #1: Import Data
Firstly, make sure you have installed Power BI in your system. Now, to import this data from Excel to Power BI, follow the below steps:
- Open Power BI -> Go to the “Home” tab -> select “Excel workbook”.
- Select the Excel File -> click on “Load”. (The selection will appear on the extreme right side of the Power BI desktop window.)
- Select the column you want to import to Power BI -> drag it to the center.
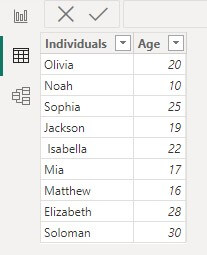
The data will appear as shown below. We have successfully imported the data.
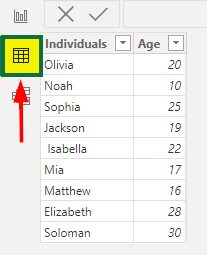
If the table does not appear in the above format, click on the “Data” option to view it in a table format (highlighted in the image below).
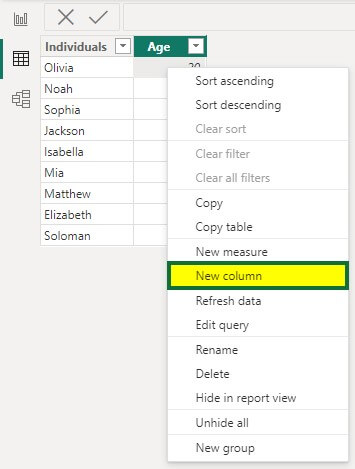
Step #2: Create a Column with Condition
Right-click on the table and select “New column”, as shown below.
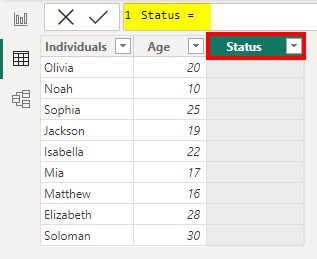
A new column is created in the table. See the below image.

Step #3: Apply the condition to the column
Now, let’s change the column’s name and apply our condition.
- Enter the Column name as “Status” in the formula bar, as shown below.
- Write “IF”. The DAX IF function statement will open.
Here we are going to break the formula and add the condition and results one by one. The below image shows the sections we must add for the IF statement. We will show the step-by-step process of writing each formula part using images.

- First, we must enter the first condition. To do this, type ‘Sheet2′[Age]>18 as shown in the image below.
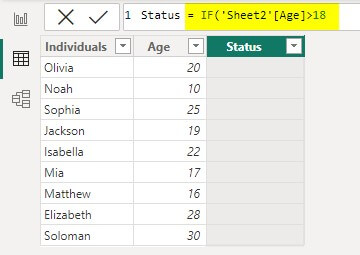
‘Sheet2′[Age]>18 condition, checks whether the number in the “Age” column of the “Sheet2” worksheet is greater than 18.
- Now, type “Eligible”.
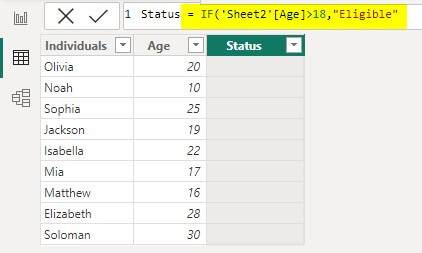
It is the “ResultIfTrue” expression. It means if the Logical Test is TRUE, display “Eligible”.
- Then type “Not Eligible“.
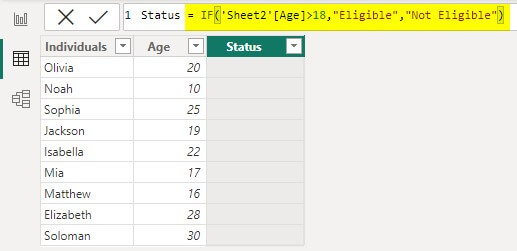
It is the “ResultIfFalse” expression. It means if the Logical Test is FALSE, display “Not Eligible”.
- Close the bracket and press “Enter”.
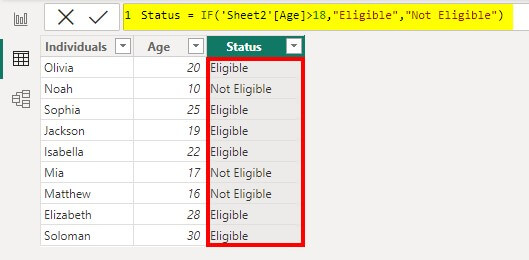
The formula will display the below result.
How to Write IF Statement in Power Query?
In Power Query, the “If” function can be used to add a new column with specific conditions.
Syntax of the IF Statement in Power Query:
In this syntax:
- The If statement is used with then and else
- The formula states that if the given condition is true, then display value_if_true or else value_if_false (if the condition is false).
Example #1: Single Condition
In this method, we will use the If condition in Power BI to add a new column with a specific condition. For this, we will use the “Conditional Column” feature of Power Query.
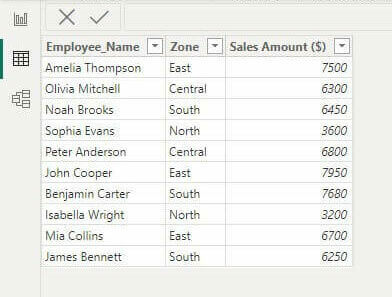
Consider the following sales data of employees in a company from different zones. Here, we need to add incentives based on certain conditions, like,
“If the sales value is > 6500 then incentive will be 300 or else incentive will be 200”.

Solution:
Step #1: Import Data
Follow Step #1 from Example #1 of the DAX IF statement to import data from Excel to Power BI.
Here, we have already imported the data.
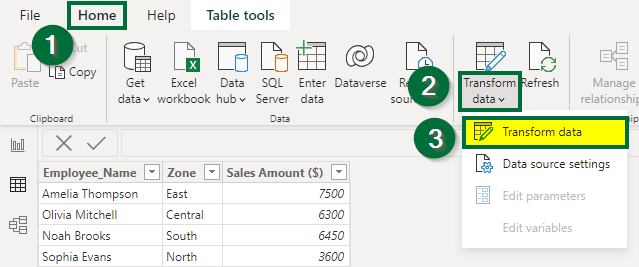
Step #2: Open the Data in Power Query Editor Window
We need to open this data in the “Power Query Editor” window to add a new column based on our conditions.
For that, Go to the “Home” tab -> click on “Transform data”, -> select “Transform data” from the drop-down list.
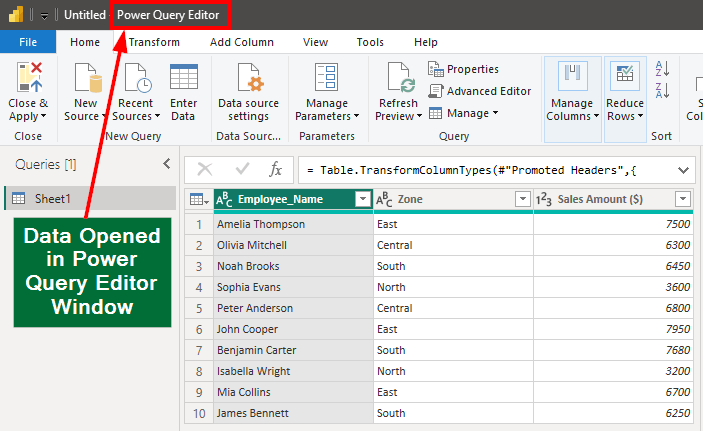
The data will open in the Power Query Editor Window, as shown below.
Step #3: Add a New Column
- Go to the “Add Column” tab and select “Conditional Column.
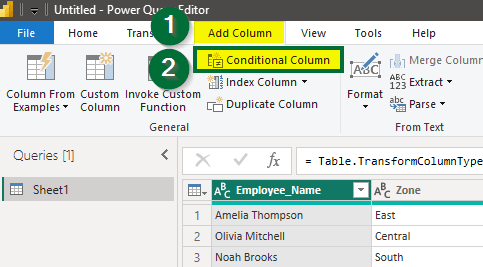
- A dialog box of “Add Conditional Column” will open, as shown below.
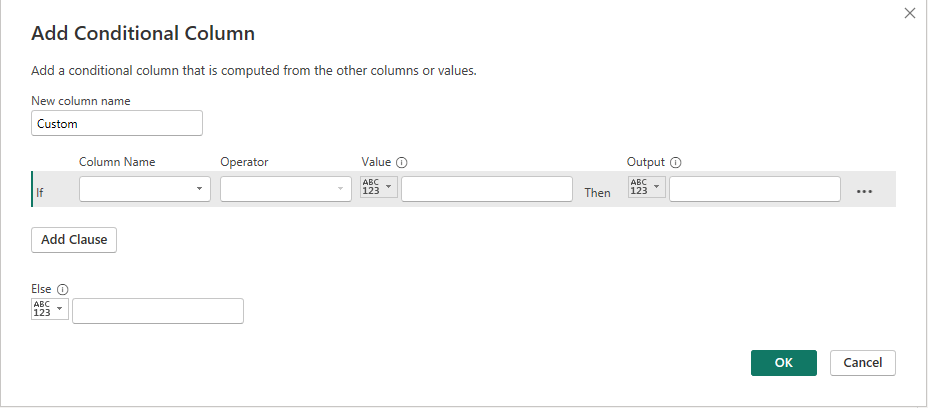
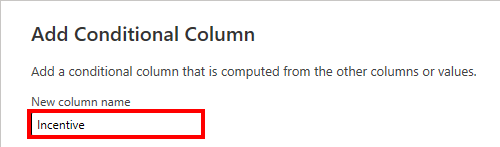
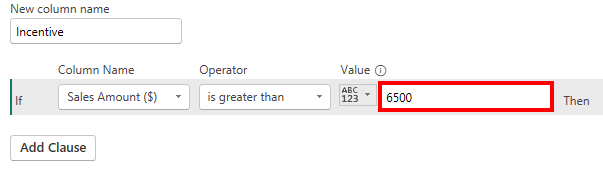
- First, enter a name for the new column, i.e., “Incentive”.
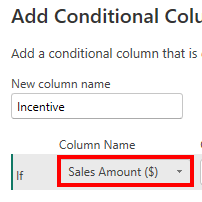
- Next, click on the “Column Name” drop-down and choose the “Sales Amount ($)” column.
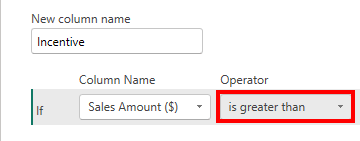
- Next, choose the operator “ is greater than”.
- Now mention the value as “6500”.
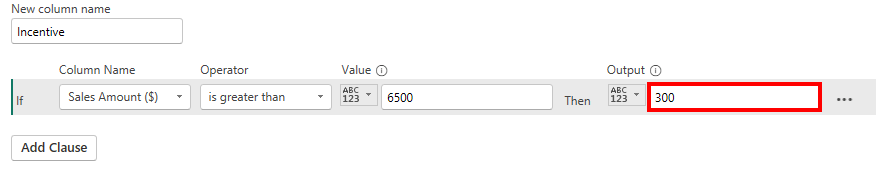
- Then add the incentive amount as 300, i.e., the value if the condition is true.
- In the else statement, add the incentive value as 200, i.e., the value if the condition is false.
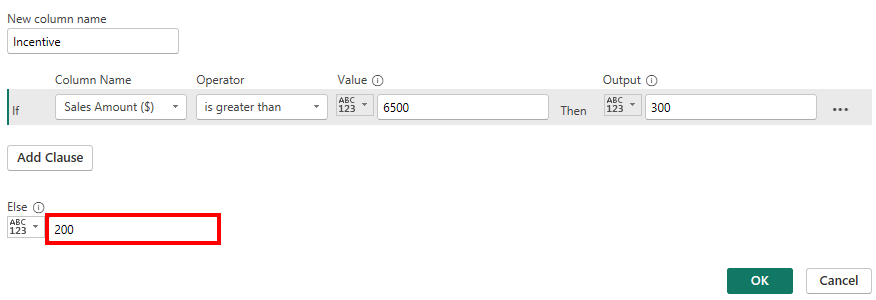
The above data represents the following:
If “Sales Amount($)” “is greater than” “6500,” then display “300” or else “200”.
- Click on the “OK” button.
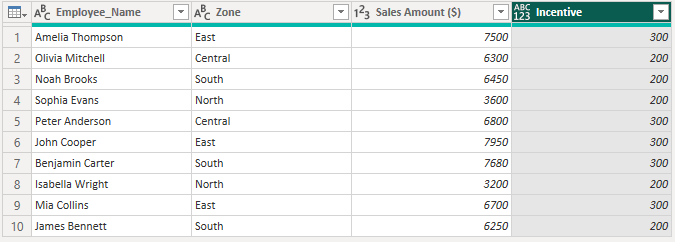
You will see a new column of “Incentive” created, as shown below.
Example #2: Multiple Conditions
In this method, you will learn how to add a new column with multiple conditions using the “Custom Column” features of Power Query.
Let’s consider the result of the above example. Now, we have to create another column based on multiple conditions.
Here, if the “Sales Amount” is greater than $6500 and the zone is “South”, the employee should get an incentive of $400. Otherwise, if the sales amount is greater than $6500, but the zone is not “South”, the incentive will be $300. Else, if neither condition is met, the incentive will be $200.
We have given the above condition in table format also.
| Condition | Incentive should be | Formula |
| If the sales value is greater than $6,500 and the region is “South”. | $400 | If [#”Sales Amount ($)”] > 6500 and [Zone] = “South” then 400 |
| If the sales value is greater than $6,500, but the region is not “South”. | $300 | else if [#”Sales Amount ($)”] > 6500 then 300 |
| If the sales value is not over 6500. | $200 | else 200. |
Solution:
Step #1: Add a column with multiple conditions.
- Go to the “Add Column” tab -> Click on “Custom Column”.

- A “Custom Column” dialog box will open up. It has two main text boxes: New column name and Custom column formula.

- Enter “Revised Incentive” under “New column name”.
- Add the below formula under “Custom column formula”.
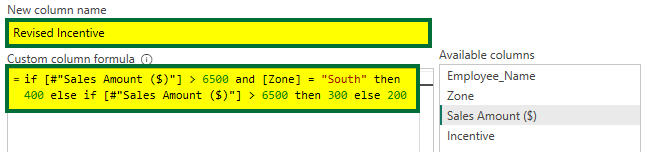
- Click on the “OK” button.
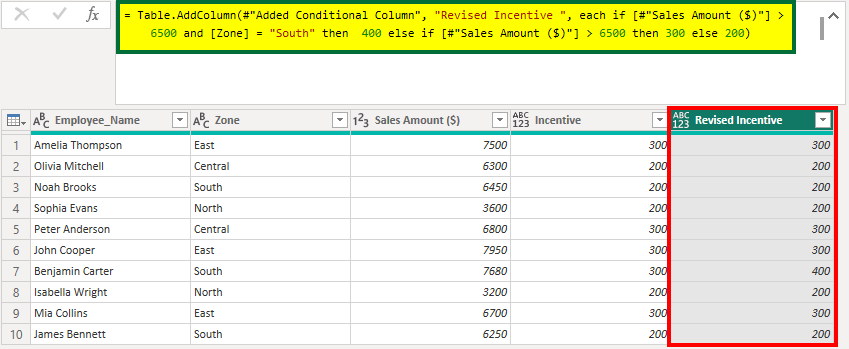
A new “Revised Incentive” column is added to the original data, as shown below.

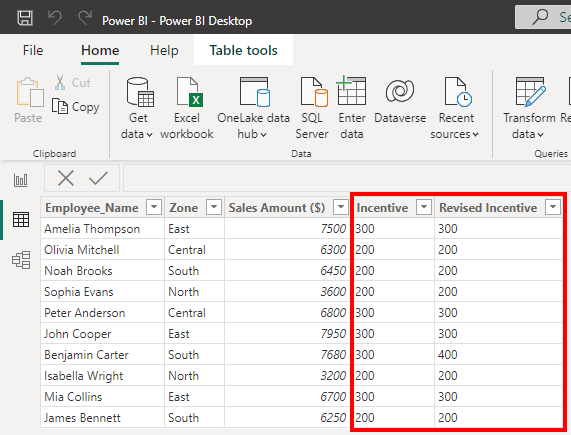
Step #3: Add this Custom Column to Power BI Window
Now, to add the new customized columns to the Power BI window,
- Select “Apply” from the “File” tab.

Therefore, the above examples show how to use the Power Bi IF statement in Power Query with single and multiple conditions.
Operators Used in Power BI IF Statement
The following are the various operators we can use in the IF statement. The table below describes each and gives a simple formula example to understand the operator’s use.
| Operator | Description | Using Operators in DAX IF Statements | Using Operators in Power Query IF Function |
| > | Checks if a value is greater than another value. | IF(‘Marks_Table’[Marks] > 75, “Outstanding”, “Average”) | If [#“Marks”] >75 then “Outstanding” else “Average” |
| < | Checks if a value is less than another value. | IF(‘Area_Table’[Temperature] < 0, “Freezing”, “Normal”) | If [#“Temperature”] < 0 then “Freezing” else “Normal” |
| = | Checks if two values are equal. | IF(‘Table_1’[Color] = “Red”, “Unsafe”, “Safe”) | If [Color]= ”Red” then “Unsafe” else “Safe” |
| AND | Checks if all the given conditions are true. | IF(‘Income_Table’[Age] > 18 AND [Income] > 25000, “Eligible”, “Not Eligible”) | If [#“Age”] >18 and [“Income”] > 25000 then “Eligible” else “Not Eligible” |
| OR | Checks if at least one of the given conditions is true. | IF(‘Table_2’[Gender] = “Male” OR [Gender] = “Female”, “Valid”, “Invalid”) | If [Gender] = “Male” or [Gender] = “Female” then “Valid” else “Invalid” |
Things to Remember While Using Power BI IF Statement
- The expression of the If function in Power Query is case-sensitive. This means that “HI” is not the same as “hi” and “Age” is not equal to “age”.
- The ResultIfTrue and ResultIfFalse of the DAX IF statement in Power BI should have the same data type. Otherwise, it will show an error. For example, if the ResultIfTrue is a text and the ResultIfFalse has a number, it will cause an error.
- If there are any mistakes in the formula, like missing parenthesis, nesting if statements incorrectly, or placing commas in the wrong location, they can lead to Expression.SyntaxError.
- The Expression.Error occurs when an expression encounters an error during evaluation. For example, if we use a value not present in the table, it can result in an expression error.
Recommended Articles
This article is a guide to Power BI IF Statement. Here we discuss definitions of DAX IF statements, If statement Power BI and Power Query, and how to add new columns with conditions along with practical examples. You may also look at the following articles to learn more.
