Updated September 16, 2023
With the introduction of ZBrush Digital Sculptiung software, it is not overemphasizing to believe a whole new age of renaissance has struck the world once again. But, this time, the artistic revolution has taken a digital form.
The best thing to mention about the ZBrush Digital Sculpting interface is its ability to make-believe the artist as he is working on a spontaneous and organic clay model, no matter he is working with the spheres of digital clay. The software took digital sculpting to the next level, which helps the artists around the world achieve sculpting results that are no less than anything that the sculpting masters did. With a stroke of the stylus, carving and sculpting can be achieved so precisely and spontaneously. No wonder to believe ZBrush is the best digital sculpting software.
Sculpting, whether you are doing it in the real world or on a digital platform, needs detailed observation about the anatomy and knowing the right purpose of the tools you will use. Many students learn the numerous set of tools in the ZBrush Digital Sculpting software, but they do not have an idea about where and how to make use of them. Equally, the chronology of methods we are going to employ is very much important to reduce the working time as digital sculpting is a tedious and time taking job. The post will introduce you to many tools and features that will help you understand digital sculpting in ZBrush.
However, to reach the level of ZBrush digital sculpting, one should have at least the basic information about the tools and workflow of the ZBrush digital sculpting software. In those terms, we can understand the following post is focused on intermediate level or for students who have finished learning the in and out of ZBrush. The writing is intended to briefly introduce the most common and essential methods used in digital sculpting in ZBrush.
ZBrush Digital Sculpting Interface
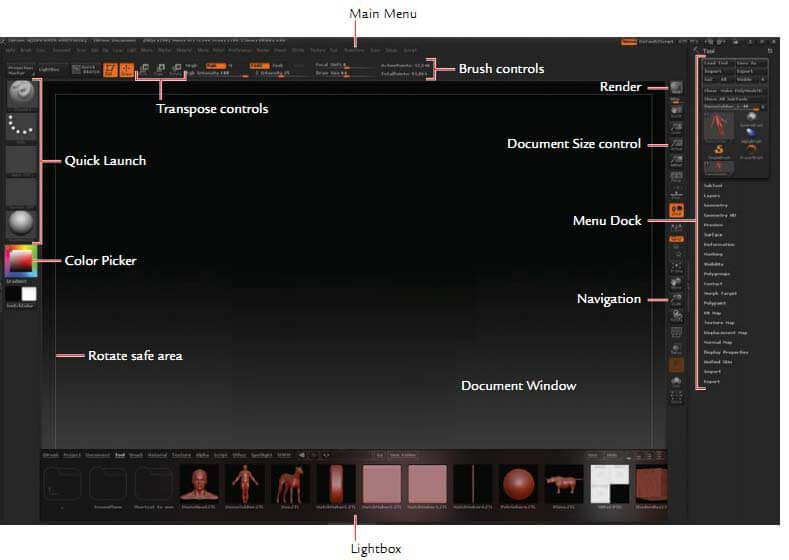
At the very first sight of the ZBrush interface, it looks quite challenging to learn it. However, if you are aware of any other 3D software as Maya or 3DS Max, you may feel it reasonably easy. Still, the number of tools you can see at the outer look can daunt you. The crucial point is, you are not going to use many of those tools that are visible. There are only a few set of tools that will help you sculpt. And it is with time, you will decide your favorite part of the software and which tools will you get along with.
- You may notice the two columns that have few quick links to other menus at the first look.
- The left column has Material Menus, Brush, Texture and stroke icons linked to it. You will also find a color picker which helps to select colors while painting.
- The right column has icons related to the navigation window, active tool display information.
- The menu bar on the top lets you change the aspects of the sculpting tool. It can be torn off and docked on the screen to access easier workflow.
- Right-clicking the mouse while working in the Edit mode will display a pop-up menu with ZIntensity, RGB Intensity, Focal shift settings and Draw size quickly.
Masking & Visibility Brushes:
With the masking and visibility brushes, you can make use of the stroke types as Rectangle, Curve, Circle, and Lasso. Hold shift while opening the Strokes menu to view the options.
The curve stroke brush can be used with the Mask curve brush. With the help of this brush, you can define one side of the curve as a part of the selection. You will see gradient forms while you are drawing the curve, which is the active side of the brush. You can also change the side of the brush by simply clicking the Alt before releasing the mouse button or the stylus.
2.5D Illustration:
Apart from the Three-dimensional objects, ZBrush also allows you to work on 2D documents. They are a mix between a painting and rendering. The document window has been overlooked by many artists who don’t use ZBrush for illustration or concept designing purposes.
But in reality, the document window offers unique aspects that can make painting handy for the artists. You can light and render the objects in 2-Dimension and even sculpt on Illustration.
Brush Menu
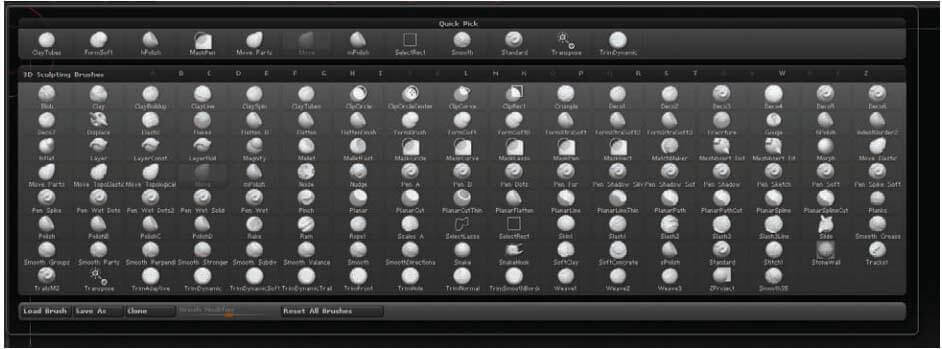
The Brush menu in ZBrush digital sculpting consists of every brush and real-time sculpting tool you will use while working on the document window. You may be easily muddled with the variety of brushes listed under the Tool menu, which also consists of Simple Brush. It is not a brush intended for sculpting purpose; instead, it is used for 2.5 dimension painting and not to be confused with 3D sculpting brushes.
Here we provide you with the complete list of sculpting brushes in ZBrush digital sculpting. Play around with each one of them; it is crucial to have a proper idea about the brushes for sculpting.
Standard brush, Move brush, Elastic brush, Displace brush, Inflate brush, Standard brush, Magnify brush, Blob brush, Pinch Brush, Flatten Brush, Clay Brush, Morph Brush, Layer Brush, Nudge Brush, Snake Hook brush, Z Project Brush, Smooth Brush, Mesh Insert Brush, Clip Brush, Masking Brush, Trim Brush, Planar brush, Polish brush, Select lasso brush, Move part, Move topological, Move elastic.
Modifier
ZBrush modifier submenu has a variety of modifiers to the brush stroke.
- Tilt – The modifier gives the effect as the brush is tilted in space as it touched the surface.
- Auto Smooth – It automatically smoothens the surface after every stroke you draw.
- Trail – Trail options works similar to the LazyMouse effect. But, the difference is that the modifier gives the effect without delay after your stroke. It creates multiple copies of the stroke and averages and evens out the brush stroke.
There are a whole lot of brush modifiers you will find in ZBrush digital sculpting, and everything is important in achieving the desired effect.
Saving Custom Brushes
Sometimes, how sophisticated maybe the software it falls back in providing the right tool you wanted to use. Thanks to the custom brushes that allow you to create your own brush so you can work seamlessly and achieve your desired effect in sculpting.
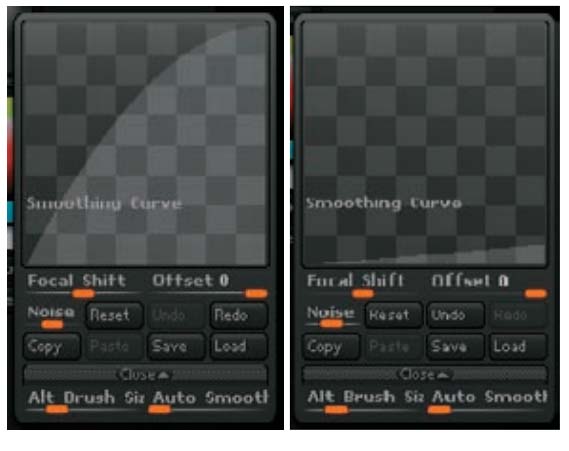
With the help of the brush manager, you can create your own custom brushes very simply. With a little adjustment in the smoothing curve and smooth brush settings, you can create brushes that can overpower your imagination.
How to create a brush
- Step 1: Select a smooth brush from the palette and set BrushMod to 0. To create a copy of the selected brush, click on the clone button.
- Step 2: Open the newly created brush in the Curve submenu. To alter the Brush curve, press the Shift key. While you hold the shift key, you can see the brush curve converts into a Smooth curve, giving easy access to alter the shape.
The left side point denotes the strength at the outmost ring, and the right side point denotes the strength at the center. Use the brush on a surface to check the smoothness and effect.
- Step 3: Once your adjustments are finished, click Save As and give the brush a new name. ZBrush will save your new brush and offers you every time you open the software. But, remember, you should save it in the Zstartup brush Presets folder to enable this feature.
Clay Brushes
ZBrush digital sculpting includes advanced brushes that allow you to quickly brush your sculpting requirements. The brushes work on the highest sub-divisional levels, which can reach counts above millions! The highest the polygon subdivision is, the highest in the quality these brushes can achieve.
Some of the brushes that fall into this category are Clay, Claytube, Snakehook and Rake.
Unlike the standard brush, layer and inflate brushes, the ability to sculpt live on a high poly object makes the clay brushes unique and special from the rest in the ZBrush. The brushes are designed in a way that artists literally feel they are working on clay due to the loose organic stroke model.
Polish, Planar and Trim Brushes
ZBrush digital sculpting comes with a number of effective tools to create hard-surface models. They also come in handy to analyze the planar analysis. Especially the Polish, Planar and Trim brushes are used to create tough metallic substances like armors, metal sheets, weapons etc.
Sculpting in ZBrush
Importing a Mesh
You can easily import a character or geometry from other 3D software applications like Maya, 3DS Max into ZBrush using .OBJ format. However, the 3D meshes will be soon converted into Ztools once they are imported into the software.
Ztools are a far more sophisticated model that saves more information of a mesh. Traditionally a .obj format can retain the polygon count, shape, and UV based information while it is exported. But, a Ztool has a higher capability to save excess information as multiple levels of subdivisions, high-res sculpting details, texture and painting information, alpha maps, layer info. Above that, Ztools is the default file format of the sculpted mesh in ZBrush software.
To enjoy the high-end sculpting using Ztools format, your computer’s physical memory plays an important role. Graphic cards are not the concern if you want to work on a high polygon mesh. It is your processor that allows you to move your object around the screen while you are working. The faster your processor, the faster your sculpting can be.
Optimize your mesh for ZBrush
You may face a lot of problems while you import a mesh into ZBrush from some other software. One of the major reasons for this problem is a poorly distributed mesh layout. If your original mesh has a denser and closer mesh (Which usually is an example of poorly spaced polygons), it ends up subdividing several times while you start to work on ZBrush, aggravating and worsening the problem, resulting in a bad shaped topology.
The best way to optimize your mesh to work on ZBrush topology tools is to create a sculpt ready object before you import it. Make sure the polygon spaces are even, and there are edges that are distributed clearly. It helps to cut down the crafting time while you are importing the mesh. So, you can directly start working on the mesh using the topology tools.
Alphas
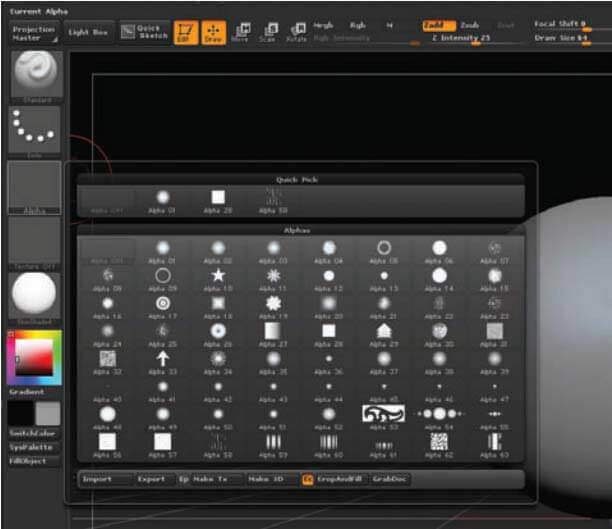
One of the most important tools you cannot ignore to master is the Alpha to achieve the finest sculpted characters. The grayscale images come to use in ZBrush in three important roles.
They can be used as Brush shapes, texture shapes and stencils.
Alpha menus can be accessed through the Alpha menu located on the top menu bar. Alpha also allows creating 3D objects in ZBrush by using the Make3D button in the Alpha Menu. You can easily import and export images through the Alpha menu and convert them into Alphas with a click. Once the images are loaded, you gain more control to manipulate them convert them into stencils, texture or even into geometry.
Few of the Alpha Menu tools that wannabe sculpting artists should master are Blur, Noise, Max, Midvalue, RF, Intensity, Contrast, Alpha Adjust, Flip H, Flip V, Rotate, Inverse, Mres, Mdep, Msm, Dbls, Make 3D, Make Tx, Make St, Make Modified Alpha.
Sculpting is a multi-layered process that involves various procedures from start to finish. The pipeline involves highly technical staff at every level of the process. It is virtually impossible to deal with every point and every tool that comes to use in the entire sculpting process. Hence, we discussed some of the most important tools that play a crucial role in the pipeline.
We hope the post helped you to find out the important points that will help you make an expert in ZBrush sculpting.
Recommended Articles
Here are some articles that will help you to get more detail about digital sculpting, so just go through the link.
