Updated October 3, 2023
What are Unix Commands?
Unix commands are like tools in your toolbox that we use to get things done on a Unix system. Each command performs a specific task, and by stringing multiple commands together, you can accomplish complex jobs.
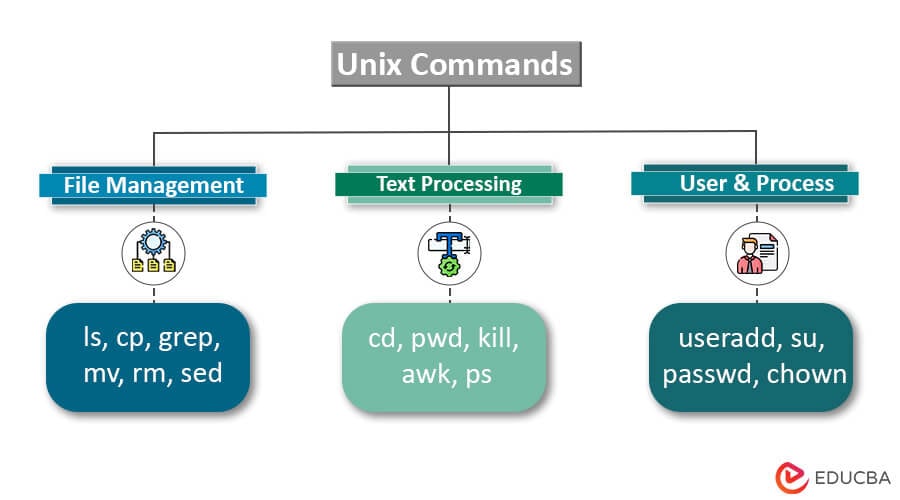
Table of Content
- What are Unix Commands?
- Key Takeaways
- File and Directory Manipulation
- File Operations
- File Compression
- Printing
- System Information
- Finding Things
- About Other People
- Network Management
- About Your (Electronic) Self
- Connecting to the Outside World
- Miscellaneous Tools
- Issues in Unix Commands
Key Takeaways
The most important things to know about Unix commands are:
- Unix commands are text-based instructions you type at the command line to get things done.
- Most Unix Commands have short, simple names that are easy to remember, like ls, cd, cp, mv, rm, cat, grep, chmod, and man.
- Commands often have options that start with a dash. For example, -l for a long listing.
- You can string Unix Commands together using pipes (|). This passes the output of one command as input to the next.
- Unix Commands can read from and write to files using < and >.
- Unix commands give you a lot of power and flexibility to automate tasks and manipulate files.
- Mastering basic commands like ls, cd, cp, and rm is the first step. Then learn more as you need them.
- Attention to detail is key – spelling, capitalization, and whitespace matter. Unix is literal!
- Understanding file permissions and ownership is crucial for using many commands properly.
- Learning to read command manuals (using man) is essential to using Unix commands effectively.
The simple yet powerful nature of Unix commands, their options and ability to be combined, and the importance of details like permissions and accurate usage make them a potent yet tricky tool to learn. But starting with the basics and learning as you go is the best approach.
File and Directory Manipulation
Here are some commonly used commands for file and directory manipulation:
ls: List files and directories
The ls command in Unix Commands is used to list files and directories. It shows the names of the files and directories in the current working directory or the directory you specify.
Example:
List all files in the current directory:
lsOutput:
![]()
And also we can list all files, including hidden files:
ls -aOutput:

List in long format with details:
ls -lOutput:

So, in summary, the ls command lists files and directories in the current working directory or the specified directory.
cd: Change directory
The cd command in Unix Commands is used to change the current working directory in UNIX. It allows you to navigate the file system hierarchy.
Some useful options for the cd command are:
- -L: Follow symbolic links (default)
- -P: Do not follow symbolic links
Go to the previous working directory
- ~: Go to the home directory
- . : Refer to the current directory
- ..: Refer to the parent directory
Example:
cd file1Changes to the Documents directory
Output:

We Changed to the parent directory of the current directory
cd –Output:
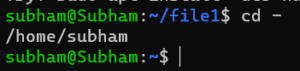
pwd: Print working directory
The pwd command prints the absolute path of the current working directory. It stands for “print working directory”.
Example:
If your current working directory is:
/home/subham
Running pwd will print:
/home/subham
If you then change to another directory by using :
cd file2Your current working directory becomes:
/home/subham/file2
Running pwd again will print:
![]()
The above pwd command in Unix Commands simply prints the full absolute path of the current working directory. It allows you to easily see where you are currently located in the file system hierarchy.
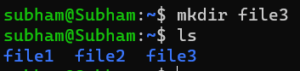
mkdir: Make a directory
The mkdir command is used to create directories (also called folders) in Linux and other Unix-like operating systems.
Syntax:
mkdir [option] directory_nameExample:
mkdir file3Output:
rm: Remove files or directories
The rm command deletes files and folders from your Linux system.
The basic syntax is:
rm [options] files_or_foldersTo delete a single file, just type its name:
rm file1This will remove file1, which was created by using mkdir.
Example:
rm -d file1
To remove multiple files at once, use wildcards:
rm *.txtThis will remove all .txt files in the current folder.
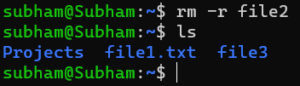
If we need to remove a folder with files inside, use:
rm -r file2The -r option tells rm to remove the folder and all its contents recursively.
Output:
Other useful options are:
- -f: Force removal without asking for confirmation. Use with caution!
- -i: Ask for confirmation before removing each file.
So rm lets you delete single files, multiple files at once, and folders (empty or not). The -r and -i options give you more control over how folders and their contents are removed.
In general, be careful using rm -f to force removals without confirmation, as this could accidentally delete important files. Using -i is safer.
cp: Copy files and directories
The cp command is used to copy files and directories in Unix-like systems.
To copy a single file:
cp filename.txt newcopy.txtOutput:
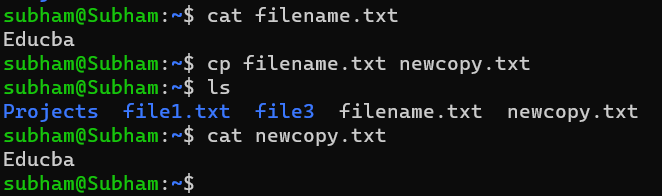
This will create a copy of filename.txt called newcopy.txt in the current directory.
To copy a file to a different directory:
cp filename.txt /path/to/other/dir we can also create like this :
This will copy filename.txt to the specified directory.
mv: Move or rename files and directories
The mv command allows you to move or rename files and directories in Unix.
The basic syntax is:
mv [options] source targetWhere:
- source – The file or directory to move/rename
- target – The new location or new name
To rename a file:
mv file1.txt file2.txtOutput:

This renames file1.txt to file2.txt.
To move a file to a directory:
mv file1.txt documents/Output:
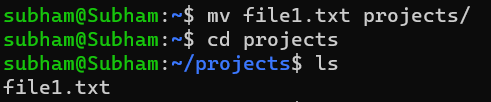
This moves file1.txt into the documents/ directory.
Useful options for mv are:
- -f: Force move, overwriting existing files without prompting
- -i: … Prompt before overwriting existing files
- -u: Only overwrite existing files if the source is newer
For example:
mv -i *.txt backup/This will move all .txt files into the backup/ directory, prompting before overwriting any existing files.
So, in summary, the mv command in Unix Commands allows you to either:
- Rename files by specifying a new name as the target
- Move files to a new directory by specifying the directory path as the target
The -f, -i, and -u options … give you control over how existing files are handled during the move operation.
File Operations
Here are some common Unix commands for file operations:
more: View file contents
The more command allows you to view the contents of a text file, one page at a time. It’s useful for viewing longer files without having the entire contents displayed on your screen at once.
Syntax:
more [options] filenameExample :
more file2.txtOutput:

It will show one page of a file; after clicking the space bar, it will show another page of data which already stored in file2.txt.

Where the filename is the path to the text file you want to view. And Press ‘b’ to go back one page
Type ‘q’ to quit
Some useful options are:
- -d: Ignore whitespace at the start of lines
- -s: Suppress repeated empty lines
- -u: Display non-printable characters
To view a file, simply run:
For example:
more -s file2.txtemacs: Text editor for creating and editing files
The basic syntax to open a file in Emacs is:
emacs [options] filenameWhere options allow you to specify things like:
- -nw: Open in terminal mode
- -q: Don’t load the init file
- +n: Go to line number n
For example:
emacs sample.txtWill open the sample.txt file in the graphical Emacs editor.
Once open, you can:
- Type to insert text
- Use commands like Ctrl + a / Ctrl + e fo the r beginning/end of the line
- Use Ctrl + k to delete a line
- Save using Ctrl + x Ctrl + s
- Quit using Ctrl + x Ctrl + c
mv: Move or rename files
The mv command allows you to move or rename files and directories in Linux.
To rename a file:
mv old_name.txt new_name.txtThis renames old_name.txt to new_name.txt.
To move a file to another directory:
mv file1.txt documents/This moves file1.txt into the documents/ directory.
To move a directory:
mv documents/ backup/This moves the documents/ directory into the backup/ directory.
Useful options:
- -f: Force move, overwriting existing files without prompting
- -i: Prompt before overwriting existing files
- -u: Only overwrite existing files if the source is newer
Example:
mv -i *.txt backup/This will move all .txt files into the backup/ directory, prompting before overwriting any existing files. So overall, the mv command allows you to either:
Rename files by specifying a new name as the target.
Move files to a new directory by specifying the directory path as the target.
The options give you control over how existing files are handled during the move operation.
cp: Copy files
The cp command copies the source file to the destination. Some common options are:
- -a: Copy all file attributes, including permissions, ownership, and timestamps
- -f: Force copy and overwrite existing files without prompting
- -i: Prompt before overwriting existing files
- -r or -R: Copy directories recursively
- -u: Copy only when the source file is newer than the destination
Examples:
Copy a single file:
cp file1.txt file2.txtCopy and overwrite without prompting:
cp -f file1.txt file2.txtCopy a directory recursively:
cp -r dir1/ dir2/Copy and preserve attributes:
cp -a file1.txt dir2/rm: Remove files
The rm command is used to remove files in Linux. The basic syntax is:
rm [options] file1 file2 file3 ...To remove a single file, use:
rm filenameTo remove multiple files:
rm filename1 filename2 filename3To remove all files in the current directory with a specific extension, use a wildcard:
rm *.txtThis will remove all files ending in .txt
Some useful options with rm are:
- -i: Interactive prompts before removing each file
- -f: Force, removes without prompting
- -r: Remove directories and their contents recursively
- -d: Remove empty directories
Examples:
Remove a file:
rm test.txtRemove multiple files:
rm file1.txt file2.txt file3.txtRemove all .txt files:
rm *.txtRemove a directory and contents:
rm -r mydirForce remove a file without prompting:
rm -f test.txtdiff: Compare files
some examples of using the diff command in Unix Commands to compare files and directories in Linux:
- diff file1 file2 – Compare two files file1 and file2
- diff -c file1 file2 – Compare files in context mode, showing lines of context around differences
- diff -u file1 file2 – Compare files in unified mode, showing a compact unified output
- diff -r dir1 dir2 – Recursively compare two directories dir1 and dir2
- diff -i file1 file2 – Compare files ignoring case differences
- diff -b file1 file2 – Ignore whitespace when comparing files
- diff -w file1 file2 – Ignore all whitespace when comparing files
- diff -q file1 file2 – Only report if files differ, don’t show details
- diff -y file1 file2 – Show a side-by-side comparison of files
For example:
Compare two files:
diff file1 file2Compare files in context mode:
diff -c file1 file2Compare files in unified mode:
diff -u file1 file2Compare directories recursively:
diff -r dir1 dir2wc: Count lines, words, and characters in a file
some examples of using the wc (word count) command in Linux to count lines, words, and characters in a file:
- wc file – Count lines, words, and characters in the file
- wc -l file – Count only lines in the file
- wc -w file – Count only words in the file
- wc -c file – Count only bytes/characters in file
For example:
Count all lines, words, and characters in a file:
wc sample.txt
10   20  100 sample.txt
Count only lines in a file:
wc -l sample.txt
10 sample.txt
Count only words in a file:
wc -w sample.txt
20 sample.txt
Count only characters in a file:
wc -c sample.txt
100 sample.txt
You can also use wc to count multiple files:
wc file1 file2 file3
30   60  300 total
File Compression
Unix-like operating systems offer various commands and tools to compress files, reducing their size for storage or easy transfer over a network. Here are some commonly used ones:
gzip: Compress files
The gzip command is used to compress files in Linux and other Unix-like operating systems. The basic syntax is:
gzip [options] file1 [file2 ...]Where options are optional command line arguments and file1, file2 etc are the files to compress.
Some Examples are:
Compress a single file:
gzip sample.txtThis will create a compressed file sample.txt.gz and delete the original file.
Compress multiple files:
gzip sample1.txt sample2.txt sample3.txtThis will create compressed files sample1.txt.gz, sample2.txt.gz and sample3.txt.gz.
Compress all files in a directory:
gzip *.txtThis will compress all .txt files in the current directory.
Decompress a file:
gzip -d sample.txt.gzThis will decompress the file sample.txt.gz and create the original file sample.txt
Other useful options are:
- -r: Compress all files in a directory recursively
- -k: Keep original files after compression
- -f: Force compression even if output files already exist
- -l: List compressed file details
- -v: Verbose mode
Here are some examples of using the gzip command to compress files in Linux:
# Compress a single file
gzip filename.ext
# This will create filename.ext.gz
# Compress multiple files
gzip *.txt
# This will compress all .txt files in the current directory
# Decompress a compressed file
gzip -d filename.ext.gz
# This will decompress the file and create a filename.ext
# Compress all files in a directory recursively
gzip -r directory/
# Keep original files after compression
gzip -k filename.ext
# Force compression even if output files already exist
gzip -f filename.ext
# List compressed file details
gzip -l filename.ext.gz
# Verbose mode
gzip -v filename.ext
For example:
# Compress a file
gzip sample.txt
# This creates sample.txt.gz
# Decompress the file
gzip -d sample.txt.gz
# This creates sample.txt
# Compress all .txt files in the current directory
gzip *.txt
# Creates filename.txt.gz for each .txt file
gunzip: Uncompress files
The gunzip command in Unix Commands is used to decompress or uncompress files that have been compressed using gzip. Some key points:
gunzip removes the .gz extension from the compressed file and creates the original uncompressed file.
The basic syntax is:
gunzip [options] filename.ext.gzWhere options are optional command line arguments, and filename.ext.gz is the gzip compressed file.
Common options include:
- -c: Uncompress to standard output instead of a file
- -d: Delete the input compressed file after successful decompression
- -f: Force decompression even if the output file already exists
- -k: Keep (don’t delete) the input compressed file
- -l: List some information about the compressed file
- -v: Verbose mode, show compression information
gunzip can uncompress both single files and multiple files at once using wildcards. For example:
gunzip *.gzWill uncompress all .gz files in the current directory.
gunzip can also uncompress files to a specific directory using the -C option:
gunzip -C documents/ sample.txt.gzWill uncompress sample.txt.gz and create sample.txt in the documents/ directory.
So, in short, gunzip is the counterpart to gzip and allows you to decompress files that have been compressed using gzip.
Printing Unix Commands
lpr: Print files
The lpr command is used to print text files in Linux.
The basic syntax is:
lpr [options] filenameWhere options are optional command line arguments, and filename is the file to print.
Some examples:
Print a single file:
lpr sample.txtPrint multiple files:
lpr file1.txt file2.txtPrint all .txt files in a directory:
lpr *.txtCommon options include:
- -P printer: Specify printer name
- -n: Number of copies to print
- -h: Print file in landscape mode
- -o landscape: Same as -h
- -o portrait: Print file in portrait mode
- -o page-left/right/top/bottom: Set page margins
- -o number-up=2: Print 2 pages on 1 sheet
For example:
Print 2 copies of a file on printer HP:
lpr -P HP -n 2 sample.txtPrint 3 files with landscape orientation:
lpr -o landscape file1.txt file2.txt file3.txtPrint all .txt files with 2 pages per sheet:
lpr -o number-up=2 *.txtSo, in summary, the lpr command allows you to print text files from the Linux command line. You can specify the printer, number of copies, page orientation, margins, and more using various options.
lpq: Check printer queue
The lpq command is used to view the status of print jobs currently waiting in the printer queue.
The basic syntax is:
lpq [options]With no options, lpq will list all print jobs currently waiting to be printed. It will show information like:
Job ID
User name
File name being printed
Size of the print job (pages)
Current status (like printing, paused, held, etc.)
Some useful options are:
- -P printer: Check the queue for a specific printer
- -l : Show more details about each print job
- -a : Show jobs for all users, not just the current user
- -o : Show the owner name of each print job
- -r : Remove completed jobs from the queue after printing
For example:
Check the default printer queue:
lpqCheck queue for printer HP:
lpq -P HPShow details of all print jobs:
lpq -lShow the owner name of all print jobs:
lpq -oRemove completed jobs from the queue:
lpq -rSo, in summary, the lpq command allows you to view the status of print jobs currently waiting to be printed. You can check for a specific printer queue, see details of each print job, and remove completed jobs from the queue using various options.
This allows you to monitor the printer queue and ensure print jobs are printing as expected.
lprm: Remove print jobs
The lprm command is used to remove print jobs from the printer queue in Linux.
The basic syntax is:
lprm [options] job_IDWhere job_ID is the ID of the print job to remove, as shown by the lpq command.
Some useful options are:
-P printer – Remove a job from a specific printer queue
Remove all jobs for the current user
-a – Remove all jobs for all users
Remove all jobs with a specific filename
You can get the job ID from the output of lpq.
For example:
lpqjob-server 1 root 3288 Thu Aug 18 09:27
Here the job ID is 1.
So to remove this print job, you would run:
lprm 1You can also use wildcards to match multiple jobs:
lprm 2* – Remove all jobs with ID starting with 2
lprm – sample.txt – Remove all jobs printing sample.txt
lprm -a – Remove all print jobs for all users
Some examples:
Remove print job with ID 5:
lprm 5Remove all jobs printing file sample.txt:
lprm - sample.txtRemove all jobs for user john:
lprm - johnRemove all jobs in the HP printer queue:
lprm -P HPSo, in summary, the lprm command allows you to cancel print jobs that are waiting in the printer queue. You specify the job ID, printer queue, username, or filename to match the jobs you want to remove.
This gives you control over the print jobs and ensures only what you want printed will actually print.
System Information
uname: Print system information
The uname command is used to print system information about the machine.
The basic syntax is:
uname [options]With no options, uname will print the following information:
- Kernel name
- Node name
- Release
- Version
- Machine hardware name
For Example:
unameLinux
hostname
5.4.0-91-generic
#98~20.04.1-Ubuntu SMP Fri Apr 30 12:07:50 UTC 2021
x86_64
Some useful options are:
-a: Print all information in the following order:
kernel name, node name, release, version, machine hardware name
-s: Print only the kernel name
-n: Print only the node name
-r: Print only the kernel release
-v: Print only the kernel version
-m: Print only the machine hardware name
For example:
uname -sLinux
uname -nhostname
uname -r5.4.0-91-generic
uname -v#98~20.04.1-Ubuntu SMP Fri Apr 30 12:07:50 UTC 2021
uname -mx86_64
So in summary, the uname command prints basic system information about the Linux kernel and hardware. It’s useful for quickly identifying what operating system and hardware you’re running.
uptime: Show system uptime
The uptime command shows how long the system has been running and the current load averages.
The basic syntax is:
uptimeThe output will show:
- The current time
- How long the system has been running
- The load averages for 1, 5, and 15 minutes
For example:
uptime10:37:12 up 1 day, 3:21, 2 users, load average: 0.12, 0.16, 0.13
This means:
- The current time is 10:37 AM
- The system has been up (running) for 1 day and 3 hours 21 minutes
- There are currently 2 users logged in
- The 1 minute load average is 0.12
- The 5 minute load average is 0.16
- The 15 minute load average is 0.13
The load average indicates how busy the system is. Higher numbers mean the system is under more load.
You can also use uptime to see how long the system has been idle with no users:
uptime -s03:21
who: Display information about logged-in users
The who command displays information about users who are currently logged in to the system.
The basic syntax is:
whoThis will show:
- The username of logged-in users
- The terminal they’re logged in from
- The date and time they logged in
- Other information like IP address and IDLE time
For example:
who
clair ttys000 Aug 18 09:32
john pts/0 192.168.1.10 Aug 18 09:37
jane pts/1 192.168.1.11 Aug 18 09:40
This shows:
- clair is logged in from ttys000
- john is logged in from pts/0 from IP 192.168.1.10 since 9:37 AM
- jane is logged in from pts/1 from IP 192.168.1.11 since 9:40 AM
You can also use options to show more details:
who -u: Show only users currently logged in
who -H: Show IP addresses of logged-in users
who -a: Show all users, including those not currently logged in
who -r: Show last login and exit information
For example:
who -u
clair
john
jane
who -H
clair ttys000 192.168.1.1 Aug 18 09:32
So, in summary, the who command displays information about users currently logged into the system. It’s useful for identifying who is currently using the system and from where they’re logged in.
df: Report file system disk space usage
The df command is used to display free disk space and … usage information on all mounted file systems.
The basic syntax is:
dfThis will show information about all mounted file systems.
Some useful options are:
-h: Show sizes in human-readable format (e.g. 1K 243M 2G)
-i: Show … inodes instead of blocks
-t: Show only file systems of a specified type (e.g. -t ext4, -t xfs)
-x: Exclude file systems of specified type
For example:
df -hShows … space in a human-readable format:
Filesystem Size Used Avail Use% Mounted on
/dev/sda1 30G 20G 8.8G 70% /
df -iShows inode usage instead of block usage:
Filesystem Inodes IUsed … Free IUse% Mounted on
/dev/sda1 5120000 320050 4791950 7% /
free: Display available system memory
The free command displays the total amount of free and used physical and swap memory in the system, as well as the buffers and caches used by the kernel.
The basic syntax is:
freeThis will show a summary of memory usage.
Some useful options are:
-b: Show output in bytes
-k: Show output in kilobytes (default)
-m: Show output in megabytes
-g: Show output in gigabytes
For example:
free -mWill show output in megabytes.
The output displays:
Total RAM
Used RAM
Free RAM
Used/Total swap space
Cached Memory
Buffers
So free gives you an overview of how system memory is being used, which is useful for monitoring performance and troubleshooting memory issues.
Finding Things
ff: Find files anywhere on the system
The find command allows you to search for files and directories on the entire filesystem.
The basic syntax is:
find path options expressionsWhere:
- path is the directory to start searching from. . means the current directory.
- options modify how find works
- expressions specify what to search for
Some common examples:
find . -name “*.txt” – Find all files ending in .txt in the current directory and below
find / -user root – Find all files owned by the root user
find /etc -mtime -1 – Find all files in /etc modified within the last day
find / -size +100M – Find all files larger than 100MB
find / -exec rm {} \; – Find all files and remove them (use with caution!)
grep: Search for patterns in files
The grep command allows you to search for patterns within files.
The basic syntax is:
grep [options] 'pattern' filesWhere:
- options modify how grep works
- ‘pattern’ is the text or regex pattern to search for
- files are the files to search within
Some common options:
-i: Ignore case
-v: Invert match
-c: Only count matches
-l: Only show filenames with matches
-n: Show line numbers
-r: Recursively search directories
For example:
grep -i 'error' *Search for ‘error’ case-insensitively in all files in current directory
grep -c 'function' *.cCount number of ‘function’ matches in all .c files
grep -r 'string' .Recursively search current directory … that match the given pattern.
About Other People
w: List logged-in users and their activities
The df command reports disk space usage for file systems.
The basic syntax is:
dfThis will show all mounted file systems and their:
Filesystem – name of filesystem
Size – Total size
Used – How much space is used
Available – How much space is available
Use% – Percentage of space used
You can also specify a file system to get details only for that filesystem:
df /home – Shows details for /home filesystem
df -h – Shows sizes in human-readable format (MB, GB etc)
df -i – Shows inode usage instead of block usage
df -T – Shows filesystem type (ext4, xfs, etc)
So a full command might be:
df -hT /homewho: List logged-in users and their locations
The df command reports file system disk space usage. It shows how much total space is available and how much of that space is in use or free.
The basic syntax is:
dfThis will show information about all mounted file systems.
An example output:
Filesystem 1K-blocks Used Available Use% Mounted on
/dev/sda1 1024000 500000 400000 54% /
/dev/sda2 2048000 1000000 600000 60% /home
/dev/sda3 512000 80000 300000 18% /var
This shows:
- The filesystem (device name)
- Total 1K blocks
- Used blocks
- Available blocks
- Percentage of use
- Where it’s mounted
You can specify a filesystem to get more details for that specific one:
df /homeYou can also use options to show different units:
df -h – Human readable units (MB, GB)
df -i – Show inodes instead of blocks
df -t <filesystem type> – Show only filesystems of certain type
So, in summary, the df command reports disk space usage for file systems, showing total space, used space, available space, and percentage used. This helps you monitor disk space and see when file systems are getting full.
Finger: Display information about a user
Here are the commands to get information about other users on a Linux system:
who – Shows who is currently logged in, when they logged in, and where from
w – Shows who is currently logged in, what they are running, and how long they have been idle
finger – Displays information about a specific user account. The basic syntax is:
finger usernameThis will show information like:
- Username
- Full name
- Home Directory
- Login shell
- Office location
- Login time and idle time
- Email address (if configured)
For example:
finger johnLogin: john Name: John Doe
Directory: /home/john Shell: /bin/bash
Office: Building 1, Room 101
On since Mon Aug 22 09:30 (PDT) on ttys000
2 minutes idle
So, in summary, the who, w, and finger commands can give you useful information about other users currently logged into the system or specific user account details.
last: Show user login history
The last command shows the login history for users on a Linux system.
The basic syntax is:
lastThis will show:
- Username
- Terminal they logged in from
- Login and logout time
- IP address they logged in from (if remote login)
For example:
lastjohn tty1 Fri Aug 18 09:37 still logged in
john pts/0 192.168.1.10 Fri Aug 18 09:37 – crash (00:12)
jane pts/1 192.168.1.11 Fri Aug 18 09:40 – crash (00:10)
You can also specify a username to show only that user’s login history:
last johnjohn tty1 Fri Aug 18 09:37 still logged in
john pts/0 192.168.1.10 Fri Aug 18 09:37 – crash (00:12)
So, in summary, the last command shows you when users have logged in and out of the system, which helps track system activity and identify any unauthorized logins.
Network Management
ifconfig: Configure and display network interfaces
ifconfig is a very useful command line tool that allows me to configure and view information about network interfaces on the system. Some of the main things I can do with ifconfig are:
- View the current IP address and subnet mask of an interface
- Enable or disable an interface
- Assign an IP address to an interface
- View hardware details like the MAC address of an interface
When I run ifconfig without any arguments, it lists all the interfaces on the system along with their current status and configuration. This gives me an overview of the network setup and allows me to check if an interface is functioning properly.
If I want to configure an interface, I can run ifconfig, followed by the interface name and the appropriate options. For example, to assign an IP address to eth0, I would run:
ifconfig eth0 192.168.1.100This would set the IP address of eth0 to 192.168.1.100. I can also specify a subnet mask and enable or disable the interface using ifconfig.
ping: Send ICMP Echo Request packets to network hosts
In UNIX-based operating systems, the “ping” command is used to check the availability and responsiveness of network hosts. It sends ICMP (Internet Control Message Protocol) Echo Request packets to the specified host and waits for ICMP Echo Reply packets in return. This simple yet powerful tool is widely used for network troubleshooting and testing network connectivity.
1. Syntax of the Ping Command:
The basic syntax of the ping command in UNIX is as follows:
ping [options] destination- “options” include various flags that modify the behavior of the ping command.
- “destination” refers to the IP address or domain name of the target host to which the ICMP Echo Request packets will be sent.
2. Key Features and Functionality:
ICMP Echo Request:
The ping command generates ICMP Echo Request packets and sends them to the target host.
These packets contain a unique identifier and a sequence number to help track and match the corresponding ICMP Echo Reply packets.
ICMP Echo Reply:
Upon receiving the ICMP Echo Request packets, the target host responds with ICMP Echo Reply packets.
These packets contain the same identifier and sequence number as the corresponding ICMP Echo Request packets.
Round-Trip Time (RTT) Calculation:
The ping command calculates the Round-Trip Time (RTT) between sending an ICMP Echo Request packet and receiving the corresponding ICMP Echo Reply packet.
It provides valuable information about the network latency and overall responsiveness of the target host.
Continuous Ping:
By default, the ping command sends a single ICMP Echo Request packet and waits for the corresponding ICMP Echo Reply packet.
However, it can also be used to continuously send ICMP Echo Request packets by specifying the “-c” option followed by the desired count.
TTL (Time-to-Live):
The ping command allows setting the Time-to-Live (TTL) value for the generated ICMP Echo Request packets.
The TTL value determines the maximum number of network hops the packets can traverse before being discarded.
Options and Flags:
The ping command supports several options and flags to modify its behavior.
Some commonly used options include “-c” (count), “-i” (interval), “-s” (packet size), and “-t” (TTL).
3. Usage Examples:
Basic Ping:
To perform a basic ping to a host, simply provide the target IP address or domain name as the destination.
For Example,
ping www.example.com or ping 192.168.0.1.Continuous Ping: To continuously ping a host, use the “-c” option followed by the desired count.
For Example,
ping -c 10 www.example.com
will send 10 ICMP Echo Request packets to the target host.
TTL Modification:
To modify the TTL value of the ICMP Echo Request packets, use the “-t” option followed by the desired TTL value.
For Example,
ping -t 64 www.example.com will set the TTL value to 64.
Overall The “ping” command in UNIX allows users to send ICMP Echo Request packets to network hosts, helping to troubleshoot and test network connectivity. By analyzing the Round-Trip Time (RTT) and receiving ICMP Echo Reply packets, users can determine the availability and responsiveness of the target host. With its various options and flags, the ping command provides flexibility and versatility in network testing and diagnostics.
netstat: Network connection monitoring
Using the netstat command to view network connections on a Linux system:
$ netstat
Active Internet connections (servers and established)
Proto Recv-Q Send-Q Local Address Foreign Address State
tcp 0 0 10.0.2.15:22 10.0.2.2:49154 ESTABLISHED
tcp 0 0 10.0.2.15:49153 10.0.2.1:22 ESTABLISHED
tcp 0 0 127.0.0.1:631 0.0.0.0:* LISTEN
tcp6 0 0 :::22 :::* LISTEN
This shows 4 active network connections:
An established TCP connection from 10.0.2.2 on port 49154 to this system on port 22. This is likely an SSH connection.
An established TCP connection from this system on port 49153 to 10.0.2.1 on port 22. Also likely an SSH connection.
A listening TCP connection on port 631, which is used for the CUPS print server. This means the print server is running and waiting for connections.
A listening TCP6 connection on port 22, also for SSH. This is listening for IPv6 connections.
We can see more details about each connection using the -n flag, which shows the numerical addresses instead of doing DNS lookups:
$ netstat -n
Active Internet connections (w/o links: IPv4)
Proto Recv-Q Send-Q Local Address Foreign Address State
tcp 0 0 10.0.2.15:22 10.0.2.2:49154 ESTABLISHED
tcp 0 0 10.0.2.15:49153 10.0.2.1:22 ESTABLISHED
tcp 0 0 127.0.0.1:631 0.0.0.0:* LISTEN
ssh: Secure shell remote login
SSH (Secure SHell) is a protocol that provides encrypted connections and remote login functionality. It is most commonly used for remote login from one Linux/Unix computer to another. Here’s how SSH works at a high level:
An SSH client (the computer you’re logging in from) connects to an SSH server (the remote computer) on port 22, which is the default port for SSH.
The SSH server authenticates the client, typically using a username and password or SSH key.
Once authenticated, the SSH server and client negotiate an encryption algorithm and cryptographic keys to encrypt all communication over the SSH session.
The SSH client then initiates a remote shell session, which acts like a terminal for the remote computer. Any commands you run and their output are encrypted over the network.
The SSH session remains active until you log out or the connection is terminated.
Here’s an example of using SSH to remotely login to a Linux server with IP address 192.168.1.100:
$ ssh [email protected]
[email protected]’s password:
Last login: Tue Aug 16 12:31:34 2022 from 192.168.1.1
Linux server 4.15.0-147-generic #148-Ubuntu SMP Tue Jun 23 12:03:36 UTC 2020
$
This logs you into the remote server, where you can then run commands as if you were sitting at that computer locally. All communication over this SSH session is encrypted using the negotiated encryption algorithm.
Some of the main benefits of SSH are:
Encrypted communication – Data is encrypted in transit, protecting sensitive information.
Remote command execution – Ability to run commands on the remote server.
Remote file editing – SSH can forward ports, allowing you to edit remote files.
Remote terminal access – You get a shell session on the remote server.
Key-based authentication – More secure than passwords.
scp: Securely copy files between hosts
SCP stands for Secure Copy, a Unix commands for securely transferring files between hosts on a network. It works similarly to the cp command but transfers files over SSH. Here’s how it works:
SCP connects to the remote host over SSH, just like when logging in with SSH. It requires SSH to be set up between the two hosts.
You authenticate to the remote host, either with a password or SSH key.
SCP copies the specified files from the local machine to the remote host or vice versa.
All data transferred over the SCP session is encrypted using the SSH encryption.
Here’s an example of using SCP to copy a file from the local machine to a remote host:
$ scp local_file.txt username@remote_host.com:~/
username@remote_host.com's password:
local_file.txt                            100%  816     0.8KB/s   00:00
This will copy the local_file.txt on the local machine to the home directory (~) of the username account on remote_host.com.
To copy a file from a remote host to the local machine:
$ scp username@remote_host.com:~/remote_file.txt .
username@remote_host.com's password:
remote_file.txt                            100% 1124     1.1KB/s   00:00
This will download remote_file.txt from the remote host’s home directory and save it to the current local directory (.).
The main benefits of using SCP over regular file transfer methods are:
Encrypted data transfer – Files are encrypted in transit using SSH.
Secure authentication – Uses SSH keys or passwords to authenticate.
Works over SSH – Leverages the SSH network to connect to remote hosts.
Familiar syntax – Similar to the cp command, making it easy to use.
About Your (Electronic) Self
whoami: Display your username
Syntax:
whoamiExample:
$ whoami claudeThis will display the username of the current user, in this case ‘claude’.
pwd: Print working directory
Syntax:
pwdExample:
$ pwd /home/claudeThis will print the full absolute path of the current working directory. In this case, the current working directory is /home/claude.
ls: List directory contents
Syntax:
ls [options] [directory]Example:
$ ls file1.txt file2.txtThis will list all files and directories in the current working directory. You can also list specific directories:
$ ls /homecat: Concatenate files and print on the standard output
Syntax:
cat [options] [file1] [file2]Example:
$ cat file1.txt This is the content of file1.txtThis will print the contents of file1.txt to the terminal. You can cat multiple files to concatenate them:
$ cat file1.txt file2.txt > all.txtThis will concatenate file1.txt and file2.txt and save the result to all.txt.
passwd: Change your password
The passwd command is used to change the password of the current user in Unix-like systems.
Syntax:
passwdWhen you run the passwd command, it will prompt you for the current password and then the new password:
$ passwd
Changing password for claude.
(current) UNIX password:
Enter new UNIX password:
Retype new UNIX password:
It will first ask for the current password to verify your identity. Then it will prompt for the new password twice to confirm that you typed it correctly.
You can also change another user’s password by running passwd username as a superuser:
$ sudo passwd john
Changing password for user john.
(current) UNIX password:
Enter new UNIX password:
Retype new UNIX password:
This will change the password for the user john. It will require the superuser password to authorize the change.
The passwd command will enforce password complexity requirements set in the system’s configuration. For example, it may require:
A minimum length (e.g. 8 characters)
Both uppercase and lowercase letters
At least one number
Special characters
This helps ensure users choose strong passwords that are difficult to guess or crack.
The passwd command is a simple but effective way to change or reset user passwords in Unix systems. It ensures the new password meets the system’s security policies before completing the change.
ps: List your processes
The ps command in Unix Commands is used to list the currently running processes associated with your user and the system.
Syntax:
ps [options]Basic usage:
$ psThis will show all the processes associated with your user.
Example Output:
PID TTY TIME CMD 2234 pts/0 00:00:00 bash 3456 pts/0 00:00:00 psThis shows two processes – my bash shell (PID 2234) and the ps command itself (PID 3456).
You can use various options with ps to filter and sort the results. Some useful options are:
ps aux: Show all processes associated with all users.
ps -ef: Show all processes, including PID, PPID, user, etc.
ps -C name: Show only processes that match ‘name’.
ps -u username: Show only processes owned by ‘username’.
ps -o: Customize the output columns.
ps -T: Show the process’s CPU time.
ps -H: Show the process’s hierarchy and command line.
Example:
$ ps -ef | grep apacheThis will show all processes with “apache” in their command line.
The ps command gives you a snapshot of the processes currently running on your system. This can be useful for:
- Troubleshooting issues
- Monitoring system activity
- Checking for intrusions
kill: Terminate processes
The kill command is used to terminate running processes in Unix-like systems.
Syntax:
kill [options] <PID>Where <PID> is the Process ID of the process you want to terminate. You can get the PID of a process using the ps command.
Basic usage:
$ kill <PID>This will send a TERM (terminate) signal to the process with the given PID, asking it to terminate gracefully.
Example:
$ kill 1234To forcefully terminate a process, use the -9 option. This sends a KILL signal:
$ kill -9 1234This will unconditionally terminate the process without giving it a chance to cleanup.
You can also kill processes by name using the -s option:
$ killall -s SIGTERM firefoxThis will terminate all firefox processes running on the system.
The -l option lists all available signal names:
$ kill -lSIGINT 1
SIGQUIT 3
SIGTERM 15
…
You can send any signal to a process using the -s option:
$ kill -s SIGINT 1234This will send the SIGINT (interrupt) signal to PID 1234.
The kill command gives you a way to terminate unresponsive or unwanted processes programmatically. It is useful for:
- Restarting services
- Ending unresponsive applications
- Stopping processes during troubleshooting
Connecting to the Outside World using Unix Commands
nn: Read news
The nn command can be used to read Usenet news in Unix systems. Usenet is a worldwide distributed discussion system where people can post public messages to various newsgroups.
To use nn, you first need to configure it with the details of your news server. Then you can run it to read and post news.
Here’s an example of using nn:
$ nnconfig
Server name: news.example.com
Username: myusername
Password: ******
$ nn
Welcome to the NNTP reader.
Type ? for help.
nn> list
alt.test
comp.test
misc.test
nn> read comp.test
From: John Doe <[email protected]>
Subject: Test message
...
Message body here
This does the following:
Runs nnconfig to configure nn with your news server details – the server name, username, and password.
Runs nn to start the newsreader.
Uses the list command to see available newsgroups.
Uses the read command to read messages from the comp.test newsgroup. This displays the headers and body of the first available message.
You can then use commands like next, prev, and post to navigate messages and post new messages.
Type quit or exit to exit the newsreader.
The main benefits of nn are:
- Simple command-line interface
- Configurable news servers
- Read and post Usenet news
- Filter news by subject, author, etc.
rlogin: Connect to a remote host
The rlogin command is used to connect to and login to a remote Unix host. It provides an interactive shell session on the remote host.
The basic syntax is:
rlogin hostnameThis will prompt you for a username and password:
$ rlogin remotehost
remotehost login: username
Password:
Last login: Mon Aug 15 14:27:04 on ttys000
Linux remotehost 4.15.0-147-generic #148-Ubuntu SMP Tue Jun 23 12:03:36 UTC 2020
$
Once authenticated, you get an interactive shell session on the remote host, where you can run commands as if you were sitting at that computer locally.
You can also specify the username when connecting:
rlogin remotehost -l usernameSome benefits of rlogin over SSH are:
Simple to use – Just requires a hostname
Interactive shell session – You get a remote terminal
Familiar Unix commands – If SSH is not available
However, rlogin has major security issues since the connection is not encrypted:
Password is sent in cleartext
All communication is unencrypted
So it is strongly recommended to use SSH instead of rlogin for secure remote connections.
Here’s an example of connecting to the same remote host using SSH:
ssh username@remotehostYou will get the same interactive shell session, but the connection will be encrypted.
telnet: Connect to a remote host
The telnet command is used to connect to remote hosts running telnet servers. It allows you to interact with the remote host through a terminal-like interface.
The basic syntax is:
telnet hostname portWhere hostname is the remote host’s name or IP address, and port is the port number of the telnet service, typically 23.
For example, to connect to a remote host running a telnet server on port 23:
$ telnet ... remotehost 23You will be prompted for a username and password for the remote host:
remotehost login: username
Password:
Once authenticated, you will have an interactive terminal session on the remote host, where you can run commands and interact with its system.
Some benefits of using telnet are:
Simple command … – Just requires a hostname and port
Interactive terminal session – You get a remote shell
Familiar Unix commands
However, telnet has major security issues since the connection and data transfer is not encrypted:
Password is sent in cleartext
All communication is unencrypted
So it is strongly recommended to use SSH instead of telnet for secure remote connections.
ftp: Transfer files to/from a remote host
The FTP (File Transfer Protocol) command is used to transfer files between a local system and a remote system with an FTP server.
The basic syntax is:
ftp hostnameThis will connect you to the FTP server running on the remote host. You will be prompted for a username and password:
$ ftp remotehost
Connected to remotehost.
220 FTP server ready.
Name (remotehost:yourname): username
331 Password required for username.
Password:
230 User username logged in.
Remote system type is UNIX.
Once connected, you can upload and download files using FTP commands:
- get filename – Download filename from remote to local
- put filename – Upload filename from local to remote
- ls – List remote directory contents
- cd directory – Change remote working directory
- quit – Exit FTP session
For example, to upload a local file to the remote host:
put localfile.txtTo download a remote file:
get remotfile.txtFTP provides a simple and easy way to transfer files between systems, but it is not secure since passwords are sent in cleartext, and data is not encrypted.
It is recommended to use SFTP or SCP for secure file transfers, … which use SSH encryption.
lynx: Browse the web from the terminal
Here is an example of using lynx to browse Wikipedia:
lynx https://wikipedia.orgYou will see the Wikipedia homepage rendered in plain text. You can then use the arrow keys to navigate links and press l to follow a link.
For Example:
lynx https://wikipedia.org
Welcome to Wikipedia,
the free encyclopedia that anyone can edit.
5,998,837 articles in English
[Technology]
[History]
[Arts]
[Mathematics]
Use arrow keys to navigate, 'l' to follow link, 'h' for help.
Pressing the down arrow key will highlight the [Technology] link. Pressing l will follow that link and load the Technology Wikipedia page.
You can then use lynx commands to navigate Wikipedia:
b – Go back a page
h – Get help
q – Quit lynx
Miscellaneous Tools
webster: Look up words in the dictionary
whoami: Display your username
Syntax: whoami
Example:
$ whoami
john
passwd: Change your password
Syntax: passwd
Example:
$ passwd
(Enter current password)
(Enter new password)
(Re-enter new password)
ps: List your processes
Syntax: ps [options]
Example:
$ ps -aux
Lists all processes along with their owner
kill: Terminate processes
Syntax: kill [options] <PID>
Example:
$ kill -9 1234
Terminates process with PID 1234 using SIGKILL signal
nn: Read news
Syntax: nn [options]
Example:
$ nn
Reads news from a news server
rlogin: Connect to a remote host
Syntax: rlogin <hostname>
Example:
$ rlogin remotehost.com
Connects to remotehost.com
telnet: Connect to a remote host
Syntax: telnet <hostname> <port>
Example:
$ telnet mailserver.com 25
Connects to mailserver port 25 (SMTP)
ftp: Transfer files to/from a remote host
Syntax: ftp <hostname>
Example:
$ ftp remote.com
ftp> get filename.txt
Downloads filename.txt from remote host
lynx: Browse the web from the terminal
Syntax: lynx <url>
Example:
$ lynx google.com
Opens Google in the Lynx text browser
webster: Look up words in the dictionary
Syntax: webster <word>
Example:
$ webster hello
Looks up the word “hello” in the dictionary
date: Display the current date and time
Here’s how you can use the date command in Unix/Linux to display the current date and time:
$ date
Thu Aug 5 14:26:12 UTC 2021
$ date +%F   # Show date in YYYY-MM-DD format
2021-08-05
$ date +%r   # Show time in 12-hour format
02:26:12 PM
$ date +%T   # Show time in 24-hour format
14:26:12
$ date -u    # Show UTC time
Thu Aug  5 10:26:12 UTC 2021
You can use format specifiers with the date command to display the output in different formats. Some common ones are:
%F – YYYY-MM-DD
%r – 12-hour time format
%T – 24-hour time format
%u – Day of week (1-7)
%v – Week number of the year
So, in short, the date command simply displays the current date and time, but you can format the output using the + options and format specifiers.
cal: Display a calendar
Here is an example usage of the cal command in Unix/Linux to display a calendar:
$ calJuly 2023
Su Mo Tu We Th Fr Sa
1 2 3
4 5 6 7 8 9 10
11 12 13 14 15 16 17
18 19 20 21 22 23 24
25 26 27 28 29 30 31
By default, it displays the current month’s calendar. You can specify a month and year using:
$ cal 7 2023July 2023
Su Mo Tu We Th Fr Sa
1 2 3
4 5 6 7 8 9 10
11 12 13 14 15 16 17
18 19 20 21 22 23 24
25 26 27 28 29 30 31
This displays the calendar for July 2023. You can also output 12 months at once using:
$ cal 2023January 2023
Su Mo Tu We Th Fr Sa
1 2 3
4 5 6 7 8 9 10
11 12 13 14 15 16 17
18 19 20 21 22 23 24
25 26 27 28 29 30 31
February 2023
Su Mo Tu We Th Fr Sa
1 2 3
4 5 6 7 8 9 10
11 12 13 14 15 16 17
18 19 20 21 22 23 24
25 26 27 28
Issues in Unix Commands
When using Unix commands, several possible issues can arise. Syntax errors are common if the command needs to be formatted correctly or missing required arguments. If the user doesn’t have the necessary access rights, permission problems may occur. If the command isn’t in the system’s PATH, it may result in a “command not found” error. Input/output errors may occur due to insufficient disk space or hardware malfunctions. Lastly, unexpected behavior can happen because of bugs specific to certain commands or incompatibilities between different versions or distributions of Unix.
Conclusion -Unix Commands
To summarize, Unix commands serve as the foundation of Unix-like operating systems. They provide crucial tools for managing files, processing text, administering the system, and other tasks. Their versatility and strength make them a must-have for anyone working with Unix-based systems, allowing for efficient and effective control over numerous operations.
Recommended Articles
We hope that this EDUCBA information on “Unix Commands” was beneficial to you. You can view EDUCBA’s recommended articles for more information.
