Updated March 24, 2023
Introduction to PowerShell Set-Content
In the computer many times we needed to write some contents on the file, here contents can be a string or any numerical values. So to do so we can open a file and write our required contents. But PowerShell gives us the power to write our contents on the file without opening the file. That means we can write content by command line. So Set-Content is the command which helps us to write our contents on any file system. If you are aware of Linux then in Linux it has a command called echo to write contents on the file. PowerShell Set-Content is not limited to writing content on the file it can append new contents, replace older contents, etc. Real-Time use of this command is, suppose you have a very large file and you wanted to replace some words in the whole file then you can directly write command of one line and words will be replaced.
Syntax and Parameters of PowerShell Set-Content
Following are the syntax of PowerShell Set-Content:
Syntax #1: Syntax without -Literalpath
Set-Content

[-Path] <array of strings are allowed in path>

[-Value] <Objects will be used here>

[-PassThru(return current content object which is holding it)]
[-Filter <filter string for which we are going to write for filter conditions>]
[-Include <any string that need to include in this operation>]
[-Exclude <any string that need to exclude in this operation>]
[-Force(file is busy or read only still it will allow to write contents)]
[-WhatIf(describe what will happen is command will execute)]
[-Confirm(asking before execution of command)]
[-NoNewline(without new line and space concatenation of string)]
[-Encoding <here we can define types of contents>]
[<CommonParameters>]
Syntax #2: Syntax with -LiteralPath
Set-Content

[-Value] <Objects will be used here>

-LiteralPath <mention exact location>

[-PassThru(return current content object which is holding it)]
[-Include <any string that need to include in this operation>]
[-Exclude <any string that need to exclude in this operation>]
[-Force(file is busy or read only still it will allow to write contents)]
[-Credential ]
[-WhatIf(describe what will happen is command will execute)]
[-Confirm(asking before execution of command)]
[-NoNewline(without new line and space concatenation of string)]
[-Encoding <here we can define types of contents>]
[<CommonParameters>]
Parameters:
Following are the top 12 parameters of PowerShell Set-Content:
- -Confirm: Display a confirmation message before executing the Set-Content command. These commands are always advisable to use, to avoid any big mistakes.
- -Encoding: It allows us to mention the type of encoding for the target file. It accepts ASCII, BigEndingUnicode, OEM, Unicode, UTF7, UTF8, etc.
- -Exclude: At the time of setting content to target file contents, specific strings can be excluded. We can use wildcard characters with (*).
- -Filter: You can define filter before content writing. It allowed wildcard also(*).
- -Force: Force commands are used when we need to write something any target file even the file is the read-only condition.
- -Include: Here we can specify string needs to include in Set-Content operation, In this operation, we can also use a wildcard (*).
- -LiteralPath: This command will be used if you have an exact path because it does not allow wildcard or matching attributes.
- -NoNewline: We can directly concat string without any new line, without any space. Basically new line will be added at the end of the output string.
- -PassThru: Display the object which holds the contents. It will not return anything by default.
- -Path: It defines the item’s path of receiving content. You can use wildcard characters here.
- -WhatIf: It shows details of command, or simply consequences after the execution of the program. If you want to see the output or purpose of the message then you can use it.
- -Value: Any new content which we are going to write on the target file.
Examples to Implement PowerShell Remove-Item
Below are the examples to implement PowerShell Remove-Item:
Example #1
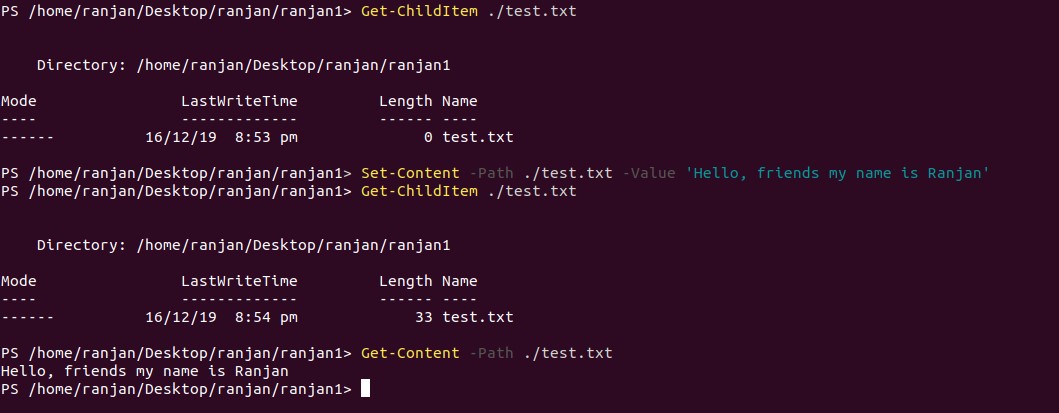
This is a very simple example for Set-Content, Here we are adding a string to an existing file. We can see in the example that we are passing -Value as “Hello, Friend my name is Ranjan”.It simply appends this string value.
Example of practical execution can be seen in the image given below.
Set-Content -Path ./test.txt -Value “Hello ,friends my name is Ranjan”

Get-Content -Path ./test.txt
Output:
Example #2
Here we are going to write content to the non-existing file, which means we will create a new file and then append the string message. Please refer to the image and example given below. You can try the same command with the existing file to see the difference in output.
Set-Content -Path .\todatsDate.txt -Value (Get-Date)

Get-Content -Path ./todatsDate.txt
Output:

Example #3
Now let’s take an example of replacing the string with another. In the example below you can see first we tried to replace “Ranjan” with “Ajay” and it failed as our string contains “Ranjan” not “Ranjan”, which means case sensitive. And again when we tried to replace “Ranjan” with “Ajay”, it worked as “Ranjan” is there in our existing string. Please refer to the example and screen given below.
(Get-Content ./test.txt).replace('Ranjan', 'ajay') | Set-Content ./test.txt
Output:

Example #4
We learned how to append string on a file in PowerShell, now let’s take an example where we want to append multiple strings to multiple files. In the below example we are appending ‘Hello friend this content will be on all three files’ to all files with name containing the test. In the directories, there were three file test1.txt, test2.txt, test3.txt, and all the files got the same string. Please refer to the example screen below.
Set-Content -Path .\test*.txt -Value 'Hello friend this content will be on all three file'

Get-Content -Path .\test*.txt
Output:

Conclusion
I am hoping that this tutorial was good enough to give a brief to Set-Content. In this tutorial, we understand how we can add replace the string on any target file or files. It reduces our effort to do too many manual works to perform any repetitive work on a file system by just writing a single command to replace or write content on one or many files on one execution.
Recommended Articles
This is a guide to PowerShell Set-Content. Here we discuss the syntax, parameters, and different examples to implement Remove-Item. You may also look at the following articles to learn more-
- Comparison Operators in PowerShell
- PowerShell vs Command Prompt
- How To Install PowerShell
- PowerShell Interview Questions
- Complete Guide to PowerShell Format Table
- Overview and Top Different PowerShell Tools
- PowerShell Get-Location | Syntax | Parameters | Implementation
- PowerShell Get-Date | Examples
- Guide to PowerShell Get-Content
