Updated August 10, 2023

Introduction to Virtual Host
In its initial days, a virtual host started to host more than the website (e.g., website1.example.com, website2.example.com, etc.) on a single machine. That would also mean sharing single machine resources such as memory and CPU. The resources are shared and utilized so that maximum efficiency is achieved.
With the invention of cloud computing, virtual now serves more purposes than ever, such as solutions like virtual application hosting, virtual server hosting, virtual storage hosting, and sometimes virtual/entire data center hosting.
Working of a Virtual Host
There are many ways to configure a virtual host, and most of the ways that are used today are given below:
- IP Based
- Port-Based
- Name Based
1. IP Based
Among the three methods, it is one of the simplest ways to apply different directives based on the IP address. In IP-based virtual hosting, we use different IPs for each domain.
The multiple IPs will point to the server’s unique domains, with only one IP for each server. To achieve virtual hosting, a single server can be assigned multiple IP addresses.
2. Port-Based
Port-based virtual hosting is also similar to IP-based virtual hosting; the difference is – Instead of using a different IP address for each virtual host, we use different ports in which the servers are configured to respond to multiple websites dependent on the port of the server.
3. Name Based
Name-based virtual hosts are today’s most commonly and frequently used virtual hosting technique. The name-based Virtual host will use a single IP address for all the domains on the given server. When the browser tries to connect to the server, it will send a message informing the server about the domain name to which it is trying to connect. When the domain name is provided, the server checks the host configuration and returns the request with the correct website.
How to Create a Virtual Host/ Examples and Illustration?
For the purpose of our illustration, we will be using the Apache server to set up the Apache hosts over the Ubuntu Operating System. One reason for selecting Apache is that it is one of the most trusted and reliable servers to set up Iy.
Prerequisites
It would help if you had an Ubuntu OS and an Apache installation.
If Apache is not installed, please install it with the help of the following commands:
sudo apt-get update

sudo apt-get install apache2
As for our tutorial, we will be creating the virtual host for the domains:
- Test1.com
- Test2.com
Step 1: Create a Directory Structure
The first step is to create a directory structure to store the site data that we will serve to site visitors or accept data from visitors.
So we are going to make the directories structure as follows under our document root ( /var/www directory)
sudo mkdir -p /var/www/test1.com/public_html

sudo mkdir -p /var/www/test2.com/public_html

Step 2: Permissions
We have seen that the root user owns the directory structure we created. So if you want to change it to modify the files in the web directories, we can do it by the following:
sudo chown -R $USER:$YOUR_USER_NAME /var/www/test1.com /public_html

sudo chown -R $USER:$ YOUR_USER_NAME /var/www/test2.com /public_html
Step 3: Create Sample (Demo) Pages for Each of the Virtual Hosts
Let us first create the sample/test page for test1.com.
Open it with a vi editor or any editor you choose and do some HTML things!
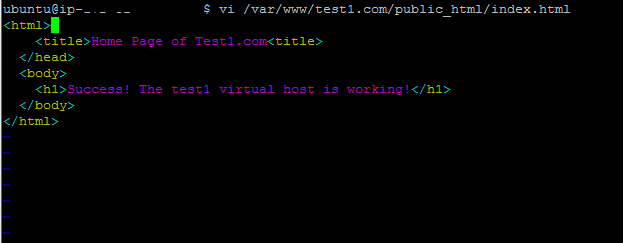
vi /var/www/test1.com/public_html/index.html
Once it opens, please write some basic HTML code, save the editor, and close it.
<html>

<head>

<title>Home Page of Test1.com<title>

</head>

<body>

<h1>Success! The test1 virtual host is working!</h1>

</body>

</html>
Similarly, we can create the HTML page for the other website, i.e., test.com.
vi /var/www/test2.com/public_html/index.html
Once it opens, please write some basic HTML code, save the editor, and close it.
<html>

<head>

<title>Home Page of Test2.com<title>

</head>

<body>

<h1>Success! The test2 virtual host is working!</h1>

</body>

</html>
Step 4: To \Ccreate the New Files for Virtual Host
These are the files that have the actual configuration of our hosts. As we have already installed Apache, it comes with a default virtual host file known as 000-default.conf, which we will use.
Let us first copy that Apache conf file to our first domain:
sudo cp /etc/apache2/sites-available/000-default.conf /etc/apache2/sitesavailable/test1.conf
When this is done, please open it with your favorite editor.
It should look something like the below:
<VirtualHost *:80>

ServerAdmin webmaster@localhost

DocumentRoot /var/www/html

ErrorLog ${APACHE_LOG_DIR}/error.log

CustomLog ${APACHE_LOG_DIR}/access.log combined

</VirtualHost>
Here we need to change the email to replace it with the email of the server admin.
ServerAdmin [email protected]
The next thing is to add 2 directives: ServerName (This should be your domain) and ServerAlias. It is achieved as:
ServerName test1.com

ServerAlias www.test2.com
Finally, please change the location of the document root of our domain.
It can be achieved through:
DocumentRoot /var/www/test1.com/public_html.
Similarly, please follow the above procedures for our second domain as well.
Step 5: To Enable Files of the Virtual Host
We have set up our virtual files and need to enable them.
This can be done via the below command:
sudo a2ensite test1.com.conf

sudo a2ensite test2.com.conf
Once it is done, please restart our Apache server:
sudo service apache2 restart
Step 6: Test your Results
Now it is time to test your results.
Open up a web browser and fire up the domain name of your websites one by one, and you should see pages like the below:


Conclusion
This article begins with an introduction to virtual hosts, covering the fundamentals. It then explores various methods of configuring hosts.
Finally, we also had a practical demo of how to set it up using Apache as our web server and Linux as our OS.
Recommended Articles
This has been a guide to What is a Virtual Host. Here we discuss the concept, working, steps to create with illustrations, and Examples. You can also go through our other Suggested Articles to learn more –

