Updated March 27, 2023
Introduction to Tkinter Scrollbar
Tkinter Scrollbar widget basically provides the slide controller, which is used to implement the vertical scrolling widgets like the Listbox, Canvas, and the Text. Using the Tkinter scrollbar widget, one can also try creating the horizontal scrollbar on the entry widgets. Tkinter scrollbar is used to roll through the content to see the whole content vertically when the scrollbar is set to vertical. A horizontal scrollbar is used to scroll over the content horizontally. Scrollbar() syntax will be used to get a scrollbar with the attributes: master and the option/options.
Syntax:
w=scrollbar( master, option/options, … )Attributes:
- Master: This master attribute of the Tkinter scrollbar represents only the parent window
- Option/options: The option/options attribute of the Tkinter scrollbar will have the list of option which are commonly used for the scrollbar widget. These option/options mainly are used as the key-value pairs, which are separated by the commas.
Tkinter Scrollbar Widget
The most commonly used list of options for the widget are:
- activebackground: The “activebackground” option of the Tkinter scrollbar is used to color the slider/scrollbar/arrowhead/ arrowheads/cursor symbols when the mouse/cursor point is on the scrollbar/slider.
- Bg: The “bg” option of the Tkinter scrollbar is very much helpful in changing the background of the scroll bar/arrowheads/cursor points when the mouse/cursor point is actually not on the scroll bar/slider.
- bd: The “bd” option of the Tkinter scrollbar is used to set the width of the 3d border around the whole trough’s perimeter and also the 3d effects’ width on the slider and the mouse point/arrowhead/cursor point. By default, there will be no borders around/beside at every corner of the trough. Along with that border which is having 2 pixels that are all around the slider and the arrowheads/cursor points.
- command: The “command” option of the Tkinter scrollbar/slider is the procedure that is also to be called every time when the scrollbar/slider is moved as needed.
- cursor: The “cursor” option of the Tkinter scrollbar widget is to make the cursor to appear when the scrollbar is below the mouse/the cursor point.
- elementborderwidth: The “elementborderwidth” option of the Tkinter scrollbar widget helps to adjust the border width around the slider and the arrowheads/cursor points. By default, the elementborderwidth is with the value “1”. You can add any border width using the elementborderwidth option as we needed/required.
- highlightbackground: The “highlightbackground” option of the Tkinter scrollbar widget helps highlight color’s whenever the scrollbar/slider doesn’t have any focus.
- highlightcolor: The”highlightcolor” option of the Tkinter scrollbar widget is used for the focus color of the highlight when the mouse point/scrollbar/slider has the focus.
- highlightthickness: The “highlightthickness” option of the scrollbar widget is useful for setting the highlight’s thickness, but by default, the highlight thickness value is set to 1. You can set to the value 0 in order to suppress the focus highlight’s display.
- jump: The “jump” option of the Tkinter scrolling widget controls what to happen when the user drag/drags the slider. By default, 0 value of the jump option causes the callback command for every small slider drag. If the jump option value is set to value 1, the callback is not called if the user doesn’t release the mouse/cursor button.
- orient: The “orient” option helps to set the orientation as horizontal/vertical. It is like orient=HORIZONTAL OR orient =VERTICAL .
- repeatDelay: The “repeatDelay” option helps us to control how much time button 1 is to be held down in the trough before slider moves in the specific direction repeatedly. By default, the repeating delay (repeatdelay=300) is 300, and the units are of milliseconds.
- repeatInterval: The “repeatInterval” option is for repeating the interval of the slider.
- takefocus: The “takefocus” option is for tabbing the focus through the scrollbar widget, but one can set it with the value 0 if you don’t want this feature/behavior.
- troughcolor: The “troughcolor” option is for changing the color of the trough.
- width: The “width” option is to set the scrollbar/slider’s width ( x dimension is for vertical and y dimension is for horizontal). By default the width value is 16 (width=16).
Methods of Tkinter Scrollbar
These are the methods that are used with the Tkinter Scrollbar Objects:
- get(): The get() method returns 2 numbers, a and b, which is used to describe the slider’s current position. The get() value gives the exact position of the edge of the slider (left or right) and also for the vertical and the horizontal scrollbars, respectively, but the b’s value is for the right edge’s or the bottom edge’s position.
- set ( first1, last1 ): The set() method is to connect the scroll bar/ slider to another widget “w”. set w’s yscrollcommand or the yscrollcommand to slider/scrollbar’s set () method. These arguments have the same/similar meaning as all the values which is returned by the get() method.
- Pack(): This method is useful to set the alignment of the slider/sidebar.
Example
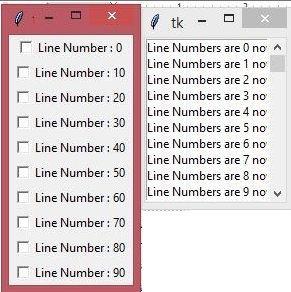
The below example is about implementing the Tkinter scroll bar ( vertical scrollbar with the Right Alignment) with some functions and the for loop to print some text 100 times from 0-99 and the check buttons when loop values exactly divide by the value 10. Here at first, we are importing all the Tkinter functions using the import * function from the python library. Then the “master1” and “top1” variables are created as the first step to make the scrollbar and also the checkbuttons when needed. Now the scrollbar1 variable is created with the “Scrollbar()” syntax with the master attribute as “master1” and the option attribute “bg”.
Option attributes and variables can be changed based on our requirements from the list of all the options available. Then for the sake of the alignment pack() method is used just like the usage in the Tkinter checkbutton. The pavanlist1 variable is created to set the alignment to the right and scrollbar using “side=RIGHT” in the pack() method. Then the Listbox() widget came with the master and option attribute for the set method’s sake. Listbox() is helpful to display the list of items/others as needed/required. Listbox() items are stored in the mylist1 variable. Now the loop with the range of 100 came into existence to get the values from 0-99 by running the For loop 100 times. The text below the loop, which runs 100 times, will be listed in the “pavanlist1” variable and also prints the checkbuttons when the loop number/value is exactly divided by 10. Then the condition will be checked to print the Tkinter checkbutton when the loop values are exactly divided by the value 10. The config method is then used with the scrollbar’s widgets to access the object’s attributes after the initialization from the other variable etc..in order to modify the text whenever you want during the program’s runtime process.
Code:
from tkinter import *
import tkinter
top1 = tkinter.Tk()
CheckVar11 = IntVar()
master1 = Tk()
scrollbar1 = Scrollbar(master1, bg="green")
scrollbar1.pack( side = RIGHT, fill = Y )
pavanlist1 = Listbox(master1, yscrollcommand = scrollbar1.set )
for pavanline1 in range(100):
	pavanlist1.insert(END, "Line Numbers are " + str(pavanline1) + " now in online ")
	if pavanline1%10==0:
		C11 = Checkbutton(top1,text="Line Number : " + str(pavanline1),variable = CheckVar11)
		C11.pack()
pavanlist1.pack( side = LEFT, fill = BOTH )
scrollbar1.config( command = pavanlist1.yview )
mainloop()
top1.mainloop()
Output:
Recommended Articles
This is a guide to Tkinter Scrollbar. Here we discuss a brief overview of the Tkinter Scrollbar Widget, attributes, and examples to demonstrate the Tkinter Scrollbar’s working. You can also go through our other suggested articles to learn more –
