Updated June 23, 2023
Introduction to Python Tkinter Canvas
Python Tkinter is a standard package in which canvas is a class that helps someone create different shapes with the help of many functions available. Here, shapes can be from simple widgets and text boxes to complex layouts. Tkinter helps in the easy and powerful building of GUI applications. The flexible attributes like coordinates, colors, width, etc., help create any item easily.
Syntax:
Below is the syntax to create any widget:
w = Canvas ( Master, option=value, ... )- Master: “Master” is the parent window where the widget needs to be imbibed.
- Option: “Option” is the various parameter related to the widget used.
Examples of Python Tkinter Canvas
Following are the different examples of Python Tkinter Canvas.
Example #1
Code:
import tkinter
top = tkinter.Tk()
Can = tkinter.Canvas(top, bg="red", height=300, width=300)
coord = 100, 100, 300, 200
arc = Can.create_arc(coord, start=0, extent=150, fill="grey")
Can.pack()
top.mainloop()
Output:
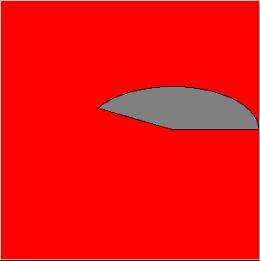
Explanation: One can see how the canvas is used first to create a rectangular box. This canvas has a property set like a background color, height, and width of the canvas. Since we have a background set, we put any widget on it like here we have put arc. Arc has been set with certain properties like color and coordinates. Here x1,y1 are (100,100) & x2,y2 are (300,200). Similarly, we can create any widget over the same kind of canvas.
Example #2
Code:
import tkinter
top = tkinter.Tk()
Can = tkinter.Canvas(top, bg="red", height=300, width=300)
oval = Can.create_oval(100, 100, 300, 200, fill="grey")
Can.pack()
top.mainloop()
Output:
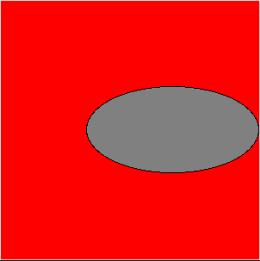
Explanation: The oval shape widget is created over the same kind of canvas. This way, one can create a widget like a rectangle, arc, line, text, etc. Here Can.pack() is can two attributes in it: fill and expand like below:
Can.pack(fill=tkinter.BOTH,expand = 1)Tkinter.BOTH refers to the flexibility given to the widget by the manager to expand horizontally and vertically if required. The “expand” can take a value of 0 or 1. If expand = 1, it tells the manager to assign extra space to the widget box to accommodate the widget in the parent window. Now let’s see how we can embed any image over the canvas.
Example #3
Code:
import tkinter
top = tkinter.Toplevel()
Can = tkinter.Canvas(top, bg="blue", height=500, width=500)
imagename = tkinter.PhotoImage(file = "C:/Users/giphy.gif")
image = Can.create_image(50, 50, image=imagename)
Can.pack()
top.mainloop()
Output:
Explanation: As one notices, we have the canvas reddy with height, width, and background color. Over which PhotoImage of the tkinter package is helping us keep our image as an item over it. The image name “giphy.gif” is saved at location “C:/Users/.” This location is referred to in the Photo image and then placed over the canvas.
Example #4 – Multiple items in Canvas
Code:
#Tkinter
import tkinter
top = tkinter.Toplevel()
Can = tkinter.Canvas(top, bg="blue", height=500, width=500)
imagename = tkinter.PhotoImage(file = "C:/Users/i505860/OneDrive - SAP SE/Documents/My Folder/Personnel/EDUCBA(Mumbai)/2020_Articles/Feb/giphy.gif")
image = Can.create_image(50, 50, image=imagename)
coord = 10, 50, 400, 200
arc = Can.create_arc(coord, start=0, extent=150, fill="red")
Can.pack(fill=tkinter.BOTH,expand = 1)
top.mainloop()
Output:
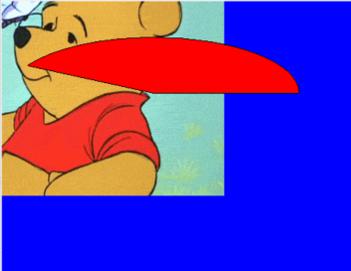
Explanation: When you place two items over the canvas. One gets over top of another item. As shown above, an arc is over the image “giphy.gif.”
Example #5 – Create Polygon
Code:
from tkinter import *
canvas_w = 200
canvas_h =200
python_green = "#476042"
master = Tk()
Can = Canvas(master,
           width=canvas_w,
           height=canvas_h)
Can.pack()
points = [0,0,100,100, 0, 100]
Can.create_polygon(points, outline=python_green,
            fill='red', width=3)
mainloop()
Output:
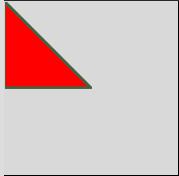
Explanation: As one can notice, the polygon is created over the canvas with the color red and created between points: (0,0),(100,100),(0,100). (0,0) always starts from the top left corner. The more points one gives to a polygon, the more customized polygon can be created. As shown below:
Example #6 – Adding Points
Code:
from tkinter import *
canvas_w = 200
canvas_h =200
python_green = “#476042”
master = Tk()
Can = Canvas(master,
           width=canvas_w,
           height=canvas_h)
Can.pack()
points = points = [0, 0, 0, 200, 100, 100, 50, 90]
Can.create_polygon(points, outline=python_green,
            fill=’green’, width=3)
mainloop()
Output:
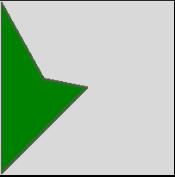
Explanation: We gave the points manually and created the polygon. However, this approach is very tedious and time-consuming.
Example #7 – Deleting the Widget
There are ways of deleting the widget from the canvas.
Code:
import tkinter
top = tkinter.Toplevel()
Can = tkinter.Canvas(top, bg="blue", height=500, width=500)
imagename = tkinter.PhotoImage(file = "C:/Users/giphy.gif")
image = Can.create_image(50, 50, image=imagename)
Can.delete(image)
Can.pack()
top.mainloop()
Output:

Explanation: If someone notices, “Can.delete(image)” helped in removing “giphy.gif” from the canvas. If there exists more than one image, one wants to remove all images over the canvas. One simple code will be:
Can.delete(ALL)Conclusion
As we saw above, Canvas is a class from package Tkinter that helps hold items over it. It provides a graphical facility to create objects over the canvas, like lines, arcs, ovals, images, and other widgets. Custom widgets can be explored once one has a good grip over basic widgets. Generalizing and presenting the model in the application form is the best one can think of. Hence, knowing Tkinter Canvas and its widget will greatly boost your Python horizon.
Recommended Articles
This is a guide to Python Tkinter Canvas. Here we discuss the basic concept, examples, and code implementation. You may also look at the following articles to learn more –
