Updated March 27, 2023
Introduction to Tkinter Grid
As today’s world is going digital, and people are looking to interact with electronic devices. To interact, the devices must be designed in proper GUI (graphical user interface), which is an interface that helps the user interact with electronic devices or computers using few graphical elements on it such as windows, icons, and buttons. Different programming languages provide a variety of grid managers in Python; also, a grid manager is a geometry manager that organizes widgets in the 2D table that is used to design GUI. Tkinter grid provides some manager classes to manage widgets such as pack(), grid() and place(). As Tkinter is a Python module for GUI, it has a grid method that needs to be imported from Tkinter.
Syntax:
widget.grid(options_of_grid)Lists of Options in Tkinter Grid
Below mentioned are the different options provided:
- column: This option is used to put the widget in a column that is leftmost column. The default column is 0.
- columnspan: This option keeps track of how many columns it will take to occupy widgets, and by default, this is 1.
- ipadx and ipady: These two options are used for how many pixels on the interface to pad the widgets in horizontal and vertical, respectively, but it will be used in padding inside the widgets border.
- padx and pady: These two options are similar to the above options, but these are used to pad outside widget borders in horizontal and vertical padding the pixels.
- row: This option is when the widget is to put in a row; by default, the first row is empty.
- rowspan: This option will be used to tell how many rowwidgets are occupied, and the default value is 1.
- sticky: This option is used when a cell cannot fit in the widget, which means when the cell is larger than the widget, then this option is used to know which sides and corners of the widgets the cell can stick to. By default, widgets are always centered in the cell. Sticky uses similar to compass directions to stick the cells to the widgets like North, south, east, west and all the combination of these four.
Examples of Tkinter Grid
In this article, we will see the Python grid() method in Tkinter. This method is usually used to design and manage the widgets in the graphical interface. This is a geometry manager to manage the widgets in a table-like structure; usually, a 2-dimensional table is used to manage these widgets in the parent widget, which is in turn split into row and column.
As we saw, that grid is one of the modules or class of geometry manager that is available in Tkinter. There are geometry managers like “pack”, which is also very good and powerful, but it’s very difficult to understand, and another geometry manager is “place”, which gives us complete control of positioning or placing each element. The grid manager is best known for its flexibility, easy to understand, easy to use, and mix features, which makes the grid manager powerful than any other geometry manager.
Now let us see a few examples to understand the grid geometry manager with the following code below:
Example #1
Code:
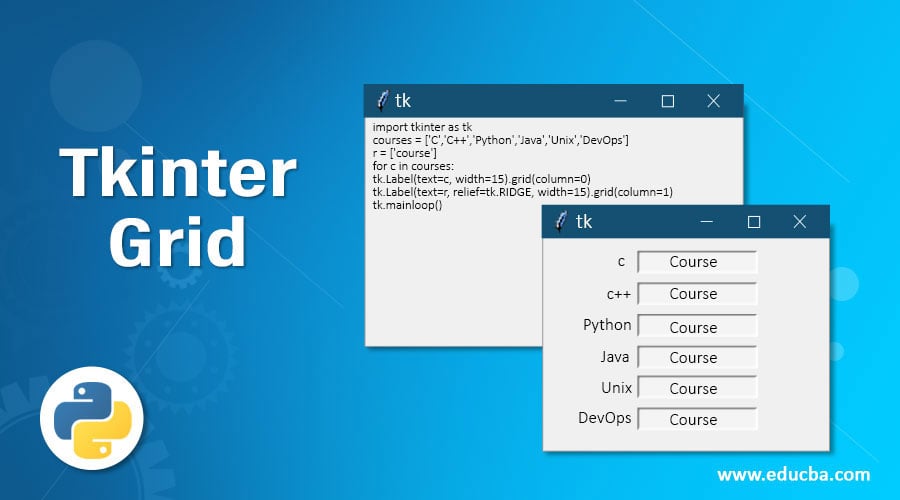
import tkinter as tk
courses = ['C','C++','Python','Java','Unix','DevOps']
r = ['course']
for c in courses:
    tk.Label(text=c, width=15).grid(column=0)
    tk.Label(text=r, relief=tk.RIDGE, width=15).grid(column=1)
tk.mainloop()
Output:
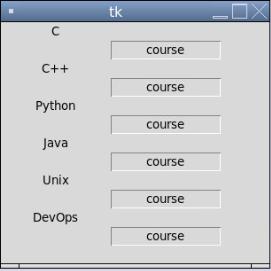
Explanation: In the above example, firstly, we need to import Tkinter and then we need to declare the parent cell as “tk”, in which we want the grid layout of the widgets in row and column-wise. So in the above code, we have taken a column as the courses and each row is kept for each course; to do this, we have taken a list of programming languages as a column, and these are labeled as courses for each language row-wise. Hence the grid manages to display it in a two-dimensional table. You can even modify the above code to look it more attractive by using ridges which means it looks like boxes are drawn for every row in relief as you can see in the output, and you can also give some background color by using “big”, and you can have the tabs in the sunken mode for relief.
Example #2
Code:
from tkinter import *
root = Tk()
btn_column = Button(root, text="This is column 2")
btn_column.grid(column=2)
btn_columnspan = Button(root, text="With columnspan of 4")
btn_columnspan.grid(columnspan=4)
btn_ipadx = Button(root, text="padding horizontally ipadx of 3")
btn_ipadx.grid(ipadx=3)
btn_ipady = Button(root, text="padding vertically ipady of 3")
btn_ipady.grid(ipady=3)
btn_padx = Button(root, text="padx 2")
btn_padx.grid(padx=4)
btn_pady = Button(root, text="pady of 2")
btn_pady.grid(pady=2)
btn_row = Button(root, text="This is row 2")
btn_row.grid(row=2)
btn_rowspan = Button(root, text="With Rowspan of 3")
btn_rowspan.grid(rowspan=3)
btn_sticky = Button(root, text="Sticking to north-east")
btn_sticky.grid(sticky=NE)
root.mainloop()
Output:
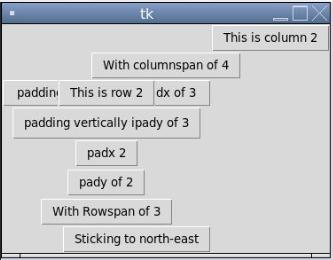
Explanation: In the above program, we have imported Tkinket, and we have imported “*”, which means all the methods or functions in the Tkinter can be imported. Then we are declaring the parent cell as “root” as this is a master widget in which other widgets are placed, and we are calling the “Tk()” method from Tkinter, which is used for creating the main window. At the end of the program, we write “root. mainloop”, where mainloop() is a method from Tkinter again which is used to run your GUI application; when it is ready, it waits for the event to occur and then processes this event until the window is closed. In the above code, we have used a button widget to demonstrate all the grid() class options. So each option is displayed using this widget with their working, or we can say how the options layout of grid works.
Conclusion
In this article, we have seen how to develop the GUI in Python using Tkinter. This Tkinter, in turn, has different geometry managers to make the GUI layout look attractive ad we can use them according to our requirements. The geometry managers are grid() which is very powerful and most widely used, pack() is also used, but as it is a little hard to understand than a grid(), place() manager is used to control the layout. The above article explains about the grid() geometry manager along with the options used in it.
Recommended Articles
This is a guide to Tkinter Grid. Here we discuss the Introduction and lists of options in Tkinter Grid along with different examples and code implementation. You may also have a look at the following articles to learn more –
