Updated March 24, 2023
Introduction to Tkinter LabelFrame
The variant of the Tkinter frame widget is the LabelFrame widget; its task is to draw a border around its child widgets along with displaying the title by default, and it is used to group together all the widgets that are related like for example, all the radio buttons can be grouped together by using LabelFrame, its features being the features of the frame, it acts as a container. Whenever a LabelFrame is created with its children added into it, the LabelFrame creates the border around them and places a text label above them.
Syntax:
w = LabelFrame(master, option,..)The master represents the parent window, and the option is the list of options that can be used for the widget, and options are the key-value pairs separated by commas.
Tkinter LabelFrame Widget
The most commonly used list of options for the widget are:
- bg: Behind the label and indicator, the normal background color is displayed.
- bd: This represents the border size around the indicator. Its default value is two pixels.
- cursor: Usually, the cursor is represented by a dot, arrow, etc. If the cursor option is set to the cursor name like dot, arrow, etc., the pattern of the cursor will be changed when it is placed over the check button.
- font: This represents the frame’s vertical direction.
- height: This represents the frame’s vertical direction.
- labelAnchor: This option specifies the place where the label can be placed.
- highlightbackground: This represents the focus highlight color when the focus is not in the frame.
- highlightcolor: This represents the focus highlight color when the focus is in the frame.
- highlightthickness: This option represents the focus highlight thickness.
- relief: This option represents the style of the border. If this option is set to its default value, FLAT or GROOVE or RAISED or SUNKEN or RIDGE, the check button is the same as the background, and it is no different from the background.
- width: This option is used to specify the width for the window that is desired.
- text: This option specifies the text that is to be displayed inside the widget.
- class: LabelFrame is the default value for the class.
- colormap: This option specifies the colormap that is used for the widget. Two hundred and fifty-six colors are used to form graphics, and this what we mean when we say colormap. By using this option colormap, the colormap can be reused on another window in this widget.
- container: This option is used to make the LabelFrame a container widget. The LabelFrame becomes a container widget only if this option is set to true. False is the default value for this container option.
- fg: The foreground color of the widget is represented using this option.
- labelwidget: This option represents the widget that is to be used for the label. If there is no value specified, the text is used for the label by the frame.
- padx: This option represents the padding of the widget that is horizontal.
- pady: This option represents the padding of the widget that is vertical.
- visual: This option represents the visual of the screen. There is no default value for this option.
Methods of Tkinter LabelFrame
Some of the methods that can be implemented on LabelFrame objects are:
- cget(“option”): The option value represents the configuration value, and the current value of the configuration value is returned. The option can be of any value.
- configure(): If there is no option value specified as an argument, a list is returned, describing all the available options.
- configure(“option”): If there is an “option” value specified as an argument, a list is returned which describes the given option.
- configure(**option): If there is a “**option” value specified as an argument, the widget option(s) is modified by the command to hold the given values.
Examples
Below are the examples of Tkinter LabelFrame:
Example #1
Python program using Tkinter LabelFrame to demonstrate how Tkinter LabelFrame works.
Code:
#Import tkinter package
from tkinter import *
#Define a window name
root1 = Tk()
#Define the labelframe and assign the text to be displayed by the frame
label_frame = LabelFrame(root1, text="Welcome to python programming")
label_frame.pack(fill="both", expand="yes")
#Define the child frame and assign the text to be displayed in the child frame
left1 = Label(label_frame, text="Python is an easy language")
#To show the content in the window
left1.pack()
root1.mainloop()
Output:
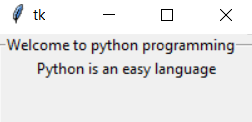
In the above code, the Tkinter package is imported as the first step in the program. A window name is defined using which LabelFrame is defined, and the text to be displayed by the LabelFrame is also defined. Then the child frame is defined with the text that is to be displayed in the child frame, and finally, the content of the window consisting of both LabelFrame and child frame is displayed.
Example #2
Python program using Tkinter LabelFrame to demonstrate how Tkinter LabelFrame works along with buttons and check buttons.
Code:
#Import tkinter package
from tkinter import Tk, mainloop, LEFT, TOP
from tkinter.ttk import *
# tkinter window is created by defining the geometry
root1 = Tk()
root1.geometry('250x150')
# LabelFrame is created
labelframe = LabelFrame(root1, text = 'Welcome to Programming')
labelframe.pack(expand = 'yes', fill = 'both')
# Buttons are defined and created
button = Button(labelframe, text = 'option 1')
button.place(x = 30, y = 10)
button1 = Button(labelframe, text = 'option 2')
button1.place(x = 130, y = 10)
# Checkbuttons are defined and created
checkbutton1 = Checkbutton(labelframe, text = 'Checkbox 1')
checkbutton1.place(x = 30, y = 50)
checkbutton2 = Checkbutton(labelframe, text = 'Checkbox 2')
checkbutton2.place(x = 30, y = 80)
# An infinite loop is created and it
# waits for interrupt (like keyboard or
# mouse) for termination
mainloop()
Output:
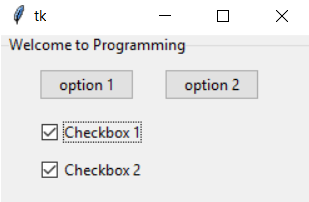
In the above code, the Tkinter package is imported as the first step in the program. A window name is defined using which LabelFrame is defined, and the text to be displayed by the LabelFrame is also defined. Then the buttons are defined and created with their names that are to be displayed on the button and then the check buttons are defined and created along with the text to be displayed on the check button and then finally the content of the window consisting of LabelFrame, buttons and check buttons are displayed.
Recommended Articles
This is a guide to Tkinter LabelFrame. Here we discuss a brief overview on Tkinter LabelFrame Widget, attributes, and examples to demonstrate the working of Tkinter LabelFrame. You can also go through our other suggested articles to learn more –
