Updated June 30, 2023

Introduction to Docker Privileged
The Docker privileged option is a feature available in the docker run command. It enables Docker containers to access all devices located under the /dev directory on the host machine. By default, Docker containers are restricted from accessing host devices for security reasons.A container gains all capabilities and can access all host’s devices, for example, CD-ROM, flash drives, hard drives attached to the host, and even access to webcams while running in privileged mode; however, we can limit the access using other different options available in the ‘docker run’ command. This feature is added in Docker 0.6
Syntax:
docker run --privileged [OPTIONS] <docker_image>
[OPTIONS]
–cap-add: We can add additional capabilities to the container using this option
–cap-drop: We can limit additional capabilities to the container
Note: We have other OPTIONS available in the ‘docker run’ command, but we can use these options in addition to the ‘–privileged’ option.
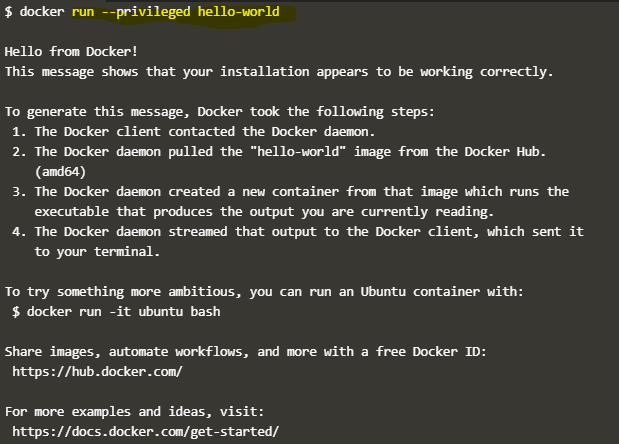
In the above snapshot, we are just checking whether the privileged option is working fine or now; this is not a real scenario where we need to run the container in privileged mode.
How Privileged Function Works in Docker?
As we know, the privileged mode allows access to all devices connected to the host, similar to the host using those devices or resources. It allows access to all connected devices and makes some configuration changes in AppArmor or SELinux that allow the container to have almost the same access to the host as a process running outside containers on the host.
Examples
Let’s understand the working process of the privileged mode with the below examples:
Scenario 1:
Let’s run a non-privileged container and a privileged container and try to mount a disk inside the container to store the data. So, let’s assume we have two disks attached to our host, and we want to mount the second disk to the container to store the data produced by the application running inside a container.
1. Non-Privileged Container
Step 1 – Run a container without the privileged option using the command shown below: –
docker run -it --rm <Docker_Image> sh

docker run -it --rm ubuntu sh
In the above snapshot, we can see that a container has been started using the ‘ubuntu’ Docker image and connected to the container. We have also used the ‘–rm’ option to remove the container once we exit. Good for testing purposes.
![]()
Step 2 – Now, try to list the available disks using the ‘fdisk’ utility as shown below: –
fdisk -l

In the above snapshot, we can see that it is not showing any disks because the container is not running in the privileged mode, so it is not displaying the attached disk. Let’s run a new container in privileged mode.
2. Privileged Container
Step 1 – Run the below command to start a container in privileged mode; you just have to use one extra flag, which is the ‘–privilege’ option, as shown below: –
docker run -it --rm --privileged <Docker_Image> sh

docker run -it --rm --privileged ubuntu sh
![]()
Step2 – Let’s run the ‘fdisk’ command to list available disks as shown below: –
fdisk –l
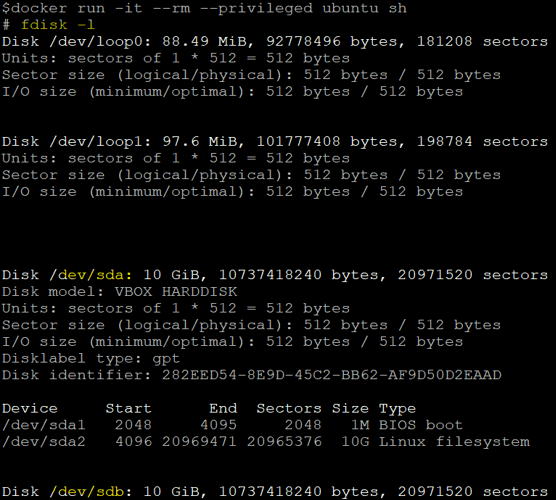

In the above snapshot, we can see that it has listed all available disk information now and its partitions. Here, we are going to concentrate on ‘/dev/sdb’; the partition has been already for this disk, and the partition name is ‘/dev/sdb1’. This operation can be performed inside the container while it is running in privileged mode.
Step 3: Now, create a folder to mount this partition over there:
mkdir /mnt/my-data
![]()
Step 4: Let’s go ahead and mount this partition to the container and write some data into it as shown below: –
mount /dev/sdb1 /mnt/my-data
![]()
Step 5: Change the directory to ‘/mnt/my-data’ and create a test file named ‘test.txt’ and also populate some data into it as shown below: –
cd /mnt/my-data

cat >> test.txt
It is a test file.
^Z(press ctrl + Z)

cat test.txt
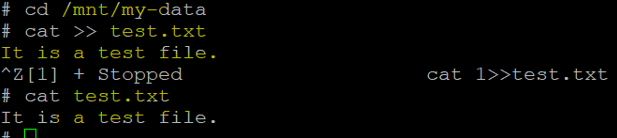
In the above snapshot, we have created a test file and added some text to it; now, we are going to exit from this container and mount the same disk partition to the host and try to access that file.
Step 6: Exit from the container and run the below command to mount the disk partition ‘/dev/sdb1’ to the host:
sudo mount /dev/sdb1 /mnt/disk2

cd /mnt/disk2

ls

cat test.txt
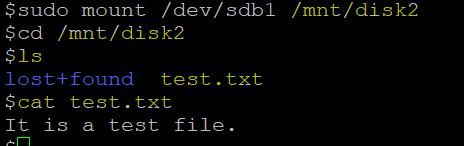
In the above snapshot, we have mounted the disk partition to an existing folder that is ‘/mnt/disk2’; you can mount it at any folder location you want, and sure enough, we are able to access the file created inside the container.
Scenario 2:
Use the ‘–cap-add’ and ‘–cap-drop’ options to add and limit the capabilities of the container, respectively.
Step 1: To provide all capabilities to a Docker container, including the default list of capabilities, and then drop a specific capability, you can use the –cap-add and –cap-drop options in combination.
docker run -it --rm --privileged --cap-add=ALL --cap-drop=MKNOD ubuntu sh

In the above snapshot, we have added all capabilities except the ‘MKNOD,’ which will prevent creating special files using mknode. We have run the ‘fdisk –l’ command to check that the container is running under privilege mode.
Notes:
- Any command that requires a privilege flag to be successful can be used to test the privilege mode inside the container.
- We can inspect the container to know if that container is running in privileged mode or not using the below command:
docker inspect --format='{{.HostConfig.Privileged}}' <container id>

Advantages
- It provides similar access to the host to the container running in privileged mode.
- It also allows you to run Docker in Docker with this mode.
- We can provide Docker-as-a-Service if someone wants their own private Docker instance.
Conclusion
Docker-privileged mode is great in a few scenarios. However, we should be aware of its risks as we can do anything from inside the container, even if it can destroy the partition on which the host machine is running. It is recommended to limit access using other available flags.
Recommended Articles
This is a guide to Docker Privileged. Here we discuss the introduction, advantages, examples, and How Privileged Function Work in Docker. You may also have a look at the following articles to learn more –

