Updated June 16, 2023
Introduction to Docker run Command
The ‘docker run’ command is used to run or start a command in a new container, creating a writeable layer on top of the mentioned image in the command. That’s why we call a container a writeable image. This is the first command that we run when we start learning Docker. There are a lot of options available with this command to configure the container as per our requirements, like running a container in detached mode or interactive mode, specifying a name to the container, attaching network, volume, etc., exposing the port to access the containers’ application externally, and many more things.
Syntax
docker run [OPTIONS] IMAGE [COMMAND] [ARG...]Options:
- d, –detach: It is used to run the container in the background and print the container ID.
- e, –env: It sets environment variables in the container.
- h, –hostname: It is used to change the hostname of the container.
- i, –interactive: It is used to interact with the container.
- isolation: It is used to specify container isolation technology.
- l, –lable: It adds metadata to the container.
- link: It adds a link to another container.
- log-driver: It is used to specify the logging driver for the container; it overrides the default log-driver.
- log-opts: It is used to specify options to log-driver.
- m, –memory: It sets memory limit in bytes.
- mount: It is used to mount filesystem to the container.
- name: It is used to specify the container’s name.
- network: It is used to connect the container to a different network than the default.
- p, –publish: It is used to publish the container’s ports to the host.
- restart: It allows us to specify the restart policy for the container.
- rm: It removes the container as soon as the container exit or stop running.
- t, –tty: It allocates terminal and is mostly used with the ‘-i’ option.
- v, –volume: It is used to bind volume to the container for persistent storage.
- w, –workdir: It allows setting the working directory of the container.
The above options are the most common ones we frequently use while working with the ‘docker run’ command.
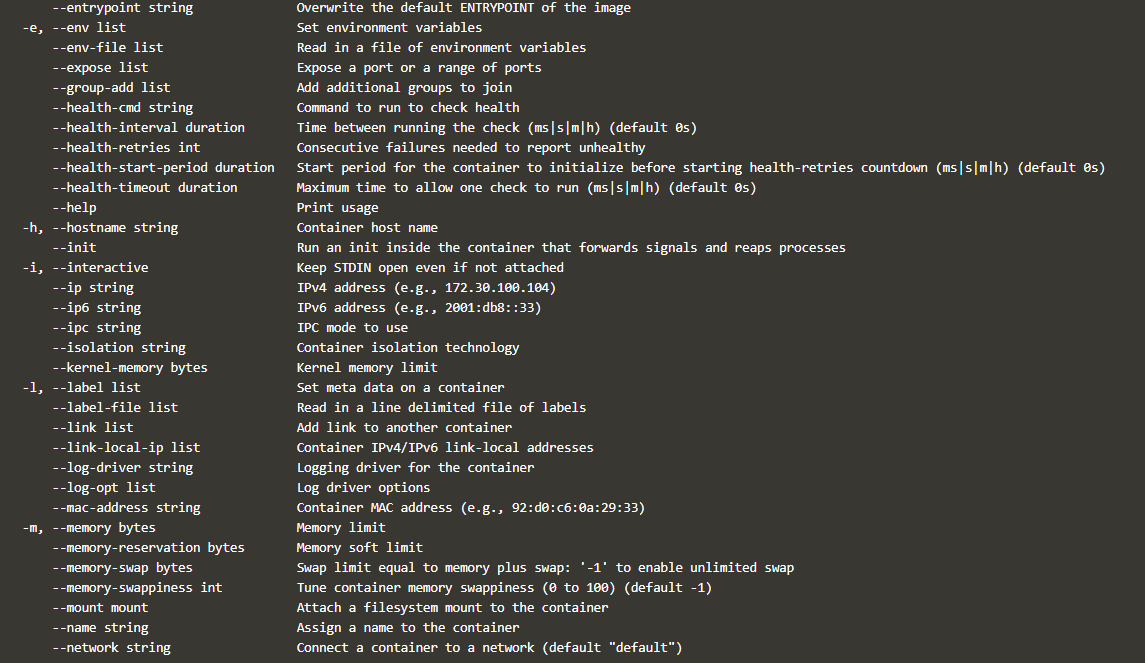
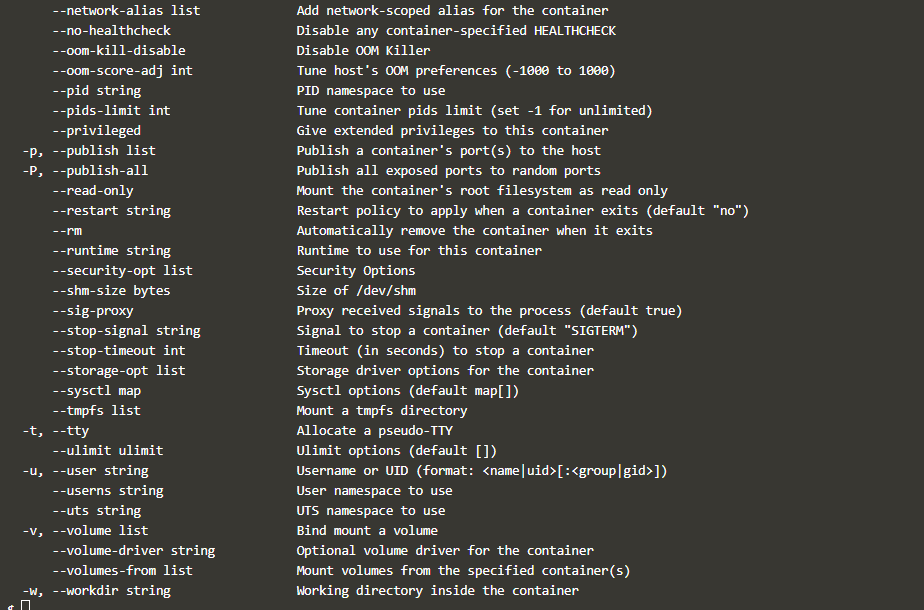
We can use the ‘–help’ option to list all available options of this command as below:
docker run --help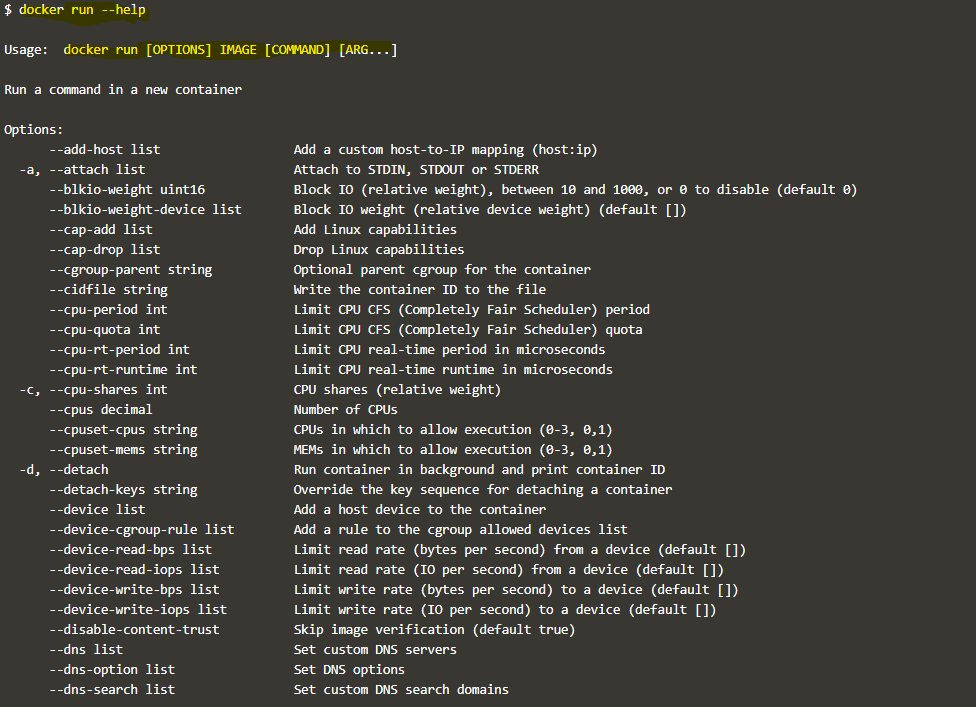
How run Command Works in Docker?
When we run the ‘docker run’ command on the terminal, Docker daemon searches for the mentioned Docker image locally, and if it finds the image locally, then it creates a writeable layer over the specified Docker image and starts the container using the specified command. If it does not find the image locally, it firsts pull that image from the registry, and by default, it goes to ‘hub.docker.com’ if there is no local registry mentioned in the daemon.json file.
Examples of Docker run Command
Given below are the examples mentioned:
Example #1
Let’s run our first container ‘hello world, without specifying any options as shown below:
docker run hello-world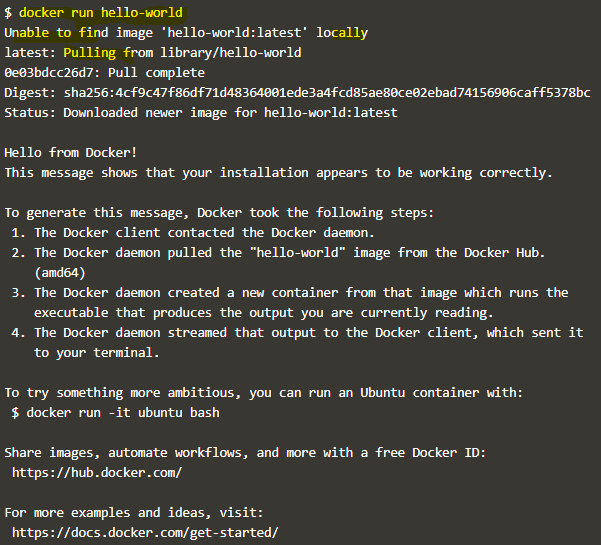
Explanation:
- In the above snapshot, we can see that the ‘hello-world’ image was unavailable locally, so daemon first pulled that image locally and ran the container, and the ‘hello-world’ container showed some data on STDOUT and exited.
Example #2
Let’s give a name to the container using the ‘–name’ option as below:
docker run –name nginx-con nginx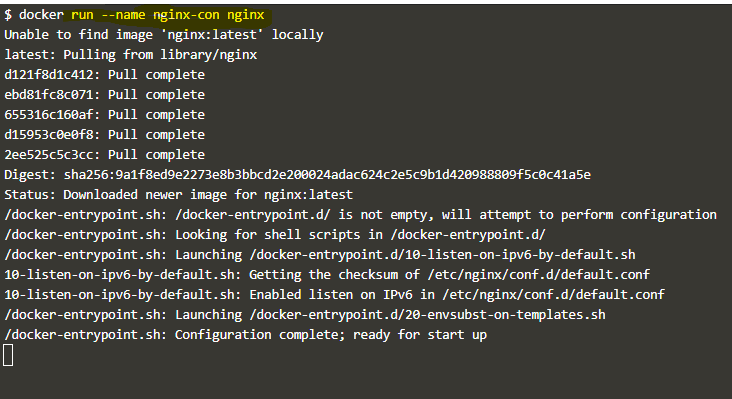
Explanation:
- In the above example, created an nginx container named ‘nginx-con’. If we don’t use the ‘–name’ option, the daemon randomly picks any name and assigns it to the container. We use ‘ctrl+c’ to exit the container; however, it stops the container as well.
Example #3
Let’s run the container in detached mode to overcome the above issue using the ‘-d’ option as shown below:
docker run -d --name nginx-con2 nginx
Explanation:
- In the above example, we only got the container ID because the container is now running in the background. Also, this time daemon did not pull the image because nginx image is already available locally.
Example #4
Now, set environment variables using the ‘-e’ option as below:
docker run -d -e "USER=test1" --name nginx-con nginx![]()
Explanation:
- In the above example, we have used the ‘-e’ option to set an environment variable USER to test1. In that case, we can connect to the container using the ‘exec’ command with ‘-i’ and ‘-t’ options together, as shown below:
docker exec -it nginx-con sh
#echo $USER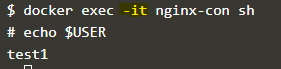
Explanation:
- In the above snapshot, we have connected to the container with its name; however, we can use container ID as well, and the container must be in a running state to connect to it.
Example #5
We can also use the above options with the ‘docker run’ command, as shown below:
docker run -it -e "USER=test1" --name nginx-con nginx sh

Explanation:
- In the above example, we can see that we have not used the ‘-d’ option; otherwise, it will run the container in the background and will not be able to connect to the container, which means we cannot use the ‘-d’ and ‘-it’ options together.
Example #6
Let’s assume we have to create an nginx container named ‘my-nginx’ with the below configuration:
- Attach a volume named my-vol.
- Attach a network named my-net.
- Restrict memory utilization to 256 MB.
- Open port 80 to access nginx externally.
- Set restart policy to unless stopped.
- Set the hostname of the container to ‘my-nginx’.
Here is the ‘docker run’ command to achieve the above objective:
$ docker run -it -v my-vol:/root --network=my-net -m 256m -p 80:80 --restart=unless-stopped -h my-nginx --name my-nginx nginx sh
Explanation:
- In the above example, we have used the ‘-it’ option to connect to the container directly to verify the hostname; otherwise, we can use the ‘-d’ option. Note: – Network must exist before creating the container.
- We can create a simple network using the below command:
docker network create my-netExample #7
Sometimes we create a container for testing purposes, and the container is no longer required after testing, so we can use the ‘–rm’ option to delete the container once it is stopped.
docker run --it --rm ubuntu sh
Explanation:
- We can use it for testing the connection between two containers using the ping command directly in the command line.
Advantages
- The ‘docker run’ is a short command to run a container as compared to the ‘docker container run’ command.
- It has a lot of options to configure the containers as per our requirements.
Rules and Regulations for Using a run Command
- Docker network must exist before attaching to containers using the ‘docker run’ command.
- There is pointless to use the ‘-d’ and ‘-it’ options together.
- We can use the same port for the different containers. Still, not at the host level, for example, we can create multiple nginx containers and open port 80 on each container. However, we can not expose these containers externally on the same port; we need to expose each container on a different port to access it externally.
Conclusion
The ‘docker run’ command has a lot of options, but not all the options are used frequently, so we have only discussed the most frequently used options. You can read official documentation to know all the options or use the ‘–help’ option to get all available options.
Recommended Articles
This is a guide to Docker run Command. Here we discuss the introduction to Docker run Command, working, examples and advantages. You may also have a look at the following articles to learn more –

