Updated June 21, 2023

Introduction to Docker Import
Docker import is a Docker command to create a Docker image by importing the content from an archive or tarball, which is created by exporting a container. We can specify a URL or ‘-‘ to import data or content from the archive. The URL can point to a location where the archive file is present, and ‘-‘ (dash) is used to import data directly from the STDIN i.e. standard input. We can apply Dockerfile instructions while creating the image using Docker import, however, there are limited Dockerfile instructions that are supported here.
Syntax:
docker import [options] file|URL|- [REPOSITORY[:TAG]]
Options:
- -c, –change: It provides Dockerfile instructions if needed while creating the Docker image. It takes input as a list.
- -m, –message: It adds a message to the Docker image while importing from an archive file. It is a string.
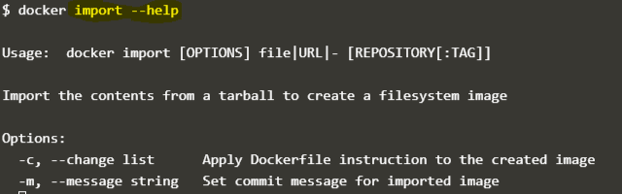
Here is the snapshot of the ‘docker import –help’ output that tells what we discussed above.
How to Import Docker Image?
To import a Docker image, first, we must have an exported archive file of a container. So when we export any container, it actually exports containers as a regular Linux file system in an archive file. Importing the archive file as a Docker image allows us to preserve the functionality of the old container when running a new container using the imported image. This approach saves time by eliminating the need to rebuild the Docker image from scratch in case any changes are required. Docker import only supports these Dockerfile instructions: CMD, ENTRYPOINT, ENV, EXPOSE, ONBUILD, USER, VOLUME, WORKDIR.
Examples
Let’s understand the process using an example:
Example #1 – Exporting a Container
1. First, create a Docker image using the below Dockerfile:

docker build -t my-image:v2 .
2. Run this image as a container using the below command: –
docker run my-image:v2

docker ps –a
3. Export the container in a tar file named helloworld.tar using the below command: –
Syntax:
docker export <container_ID> > <file_name>

docker export <container_name> > <file_name>
Example:
docker export 3673f8996e1a > helloworld.tar
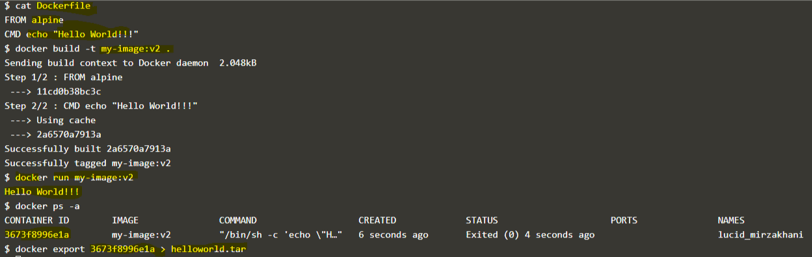
Explanation: In the above snapshot, we have created a Docker image named ‘my-image:v2’ and started a container using it, and the container just displayed the output “Hello World!!!” that is mentioned in the Docker image, and it gets stopped. Then, we exported this container as a tar file named “helloworld.tar.”
Example #2 – Investigating the Exported Archive File
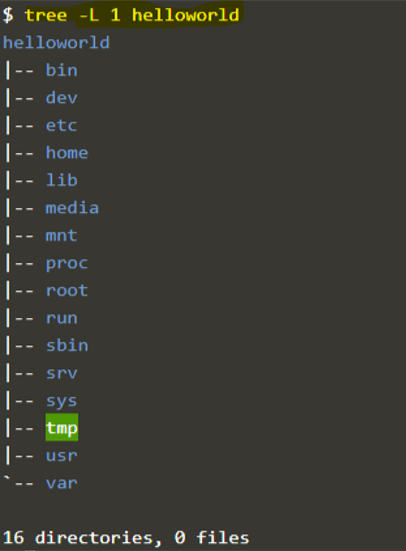
4. Now create a folder ‘helloworld’ and extract the content of the tar file to this folder as below: –
mkdir helloworld

tar -xf helloworld.tar -C helloworld

5. If we check the folder structure of helloworld, it looks like a regular Linux filesystem.
tree –L 1 helloworld
Example #3 – Different Ways to Import the Docker Image
6.Let’s import this tar file as a Docker image using the below command: –
Syntax:
docker import <archive_name> <Image_name>

cat <archive_name> | docker import - <image_name>
Example:
docker import helloworld.tar my-imported-img:v1

cat helloworld.tar | docker import – my-imported-img:v2


docker import history my-imported-img:v1

Explanation: In the above snapshot, we can see there is no difference in the images, so we can use any of the above commands to import the Docker image from an archive.
7. We can also pass comments while importing the Docker image using the ‘-m’ option as below: –
Syntax:
cat <archive_name> | docker import -m <comment or message> - <image_name>
Example:
cat helloworld.tar | docker import -m “New Image imported” – my-imported-image:v3

Example #4 – Verify the Imported Image
8. Run a container using this new Docker image to verify if it is working as the earlier container:
docker run --it my-imported-img:v1 sh

Explanation: – In the above example, we can see that we need to specify the command while running a container using the imported Docker image as there is no command to run, so we get an error if we run the command
docker run my-imported-img:v1
Example #5 – Adding Dockerfile instruction while importing the Image
9. We can apply Dockerfile instruction while importing the Docker image using the ‘-c’ option as below: –
Syntax:
docker -c <Dockerfile Instruction> <archive_file> <image_name>
Example:
docker -c ‘CMD echo “HelloWOrld!!!”’ helloworld.tar my-imported-img:v4

10. let’s say we have to add a file to the previous image. We can do this in two ways; the first is to edit the Dockerfile and rebuild the image or run a container using this image, create the file, export the container, and then import it as a new Docker image. The easy way is to run a container, make the required changes, export it, and import it as a Docker image.
docker run -it my-image:v1 sh
Explanation: In the above example, created a new container using the ‘my-image:v1’ and connected to it; created a testfile.txt and populated some data in it. Exported that container and imported it as a Docker image named ‘my-imported-img:v5’ and ran a new container using this newly imported image, and when we can see that the ‘testfile.txt’ also exists in this container.
Advantages
- It is very useful if we have to make minor changes to the existing image but do not want to rebuild the Docker image as it takes much time to rebuild from scratch again. It saves our time by avoiding the rebuilding process of the image as well.
- We can share the Docker images with others without using the Docker registry as we can export it as a tar file and share the tar as we share regular files, and one can import it using Docker import.
- It is also useful to create a single-layer Docker image file that is sometimes required to improve the performance, etc.; however, it is not recommended by Docker.
docker image history my-image:v1

docker image history my-imported-img:v5

Explanation: In the above snapshot, we can see that the ‘my-image:v1’ image has 3 layers; however, the imported image ‘my-imported-img:v5’ has only one layer.
Conclusion
Docker Import is a great tool that helps us to save time by avoiding the re-build process of Docker images for minor changes and also to share the Docker image with others without a Docker registry. However, we have ‘load’ and ‘save’ commands to back up or share the Docker image. It only works with the container. We mostly use this to improve the performance of the container as it creates a single-layer Docker image.
Recommended Articles
This is a guide to Docker Import. Here we discuss the Introduction, How to Import Docker Image, with examples? respectively. You may also have a look at the following articles to learn more –

