Updated August 23, 2023
Customize Ribbon in Excel – Introduction
The Ribbon in Excel can help users complete various tasks with the same tools. However, not every user requires all default Ribbon commands and may wish to have commands arranged differently. To do this, you can customize ribbon in Excel to fit your specific purposes.
For example, if you frequently use the same commands, you can create your own tab on the Ribbon with these commands. On the other hand, you can hide some tabs that you rarely use.
Table of Contents
- Customizing Excel Ribbon – Introduction
- How to Access the Customize Ribbon Options?
- How to Customize Ribbon in Excel?
How to Access the Customize Ribbon Option?
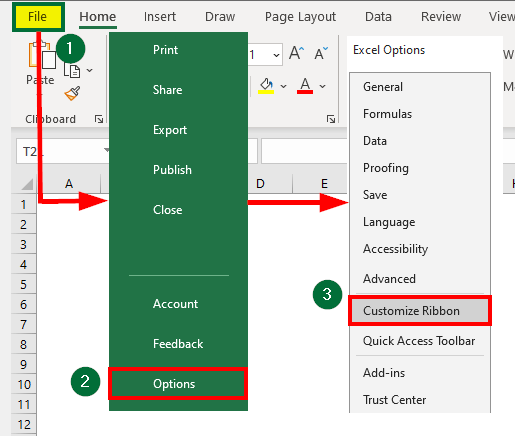
You can easily access the customize ribbon option using the following steps:
- Go to “File,” select “Options,” and then click on “Customize Ribbon.”
Or
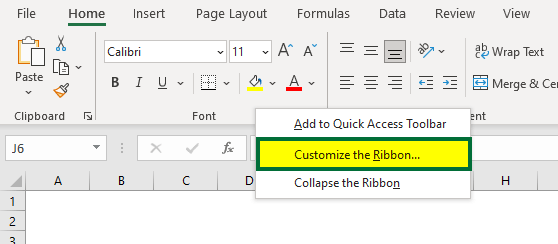
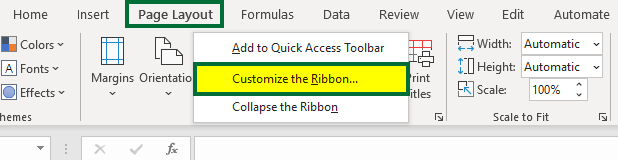
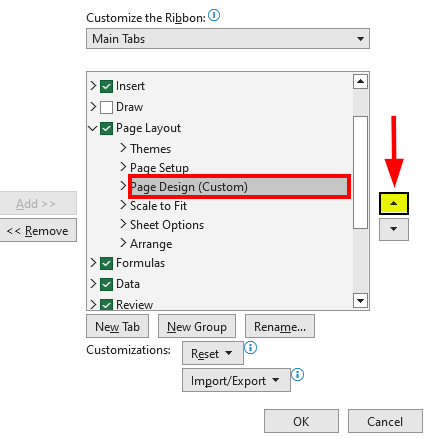
- Right-click anywhere on the ribbon and click the “Customize the Ribbon” option, as shown below.
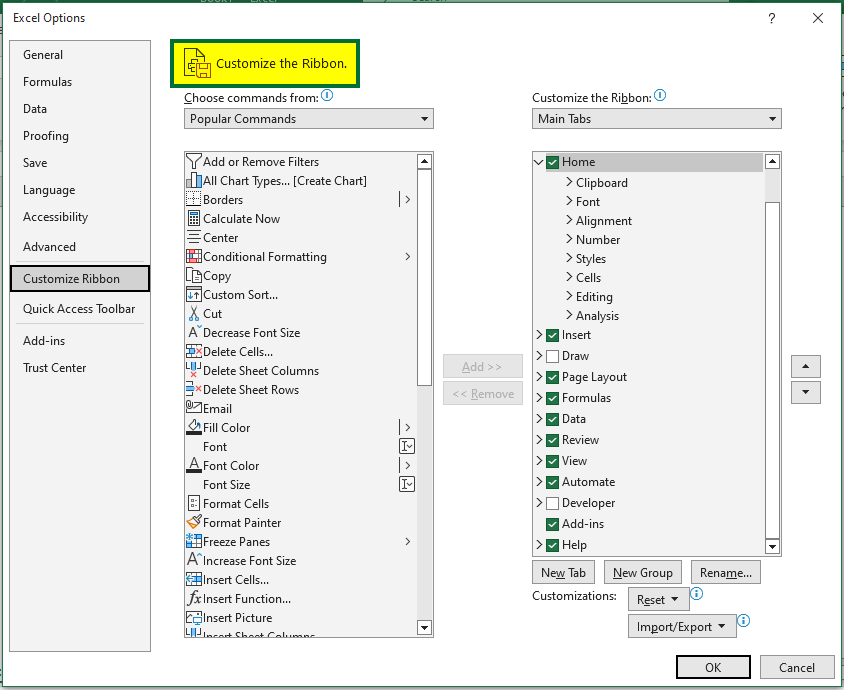
A dialogue box of “Excel Options” will appear. The “Customize the Ribbon” window allows users to add new tabs, groups, and commands and customize the existing tab in the ribbon.
How to Customize Ribbon in Excel?
1. How to Add a New Tab?
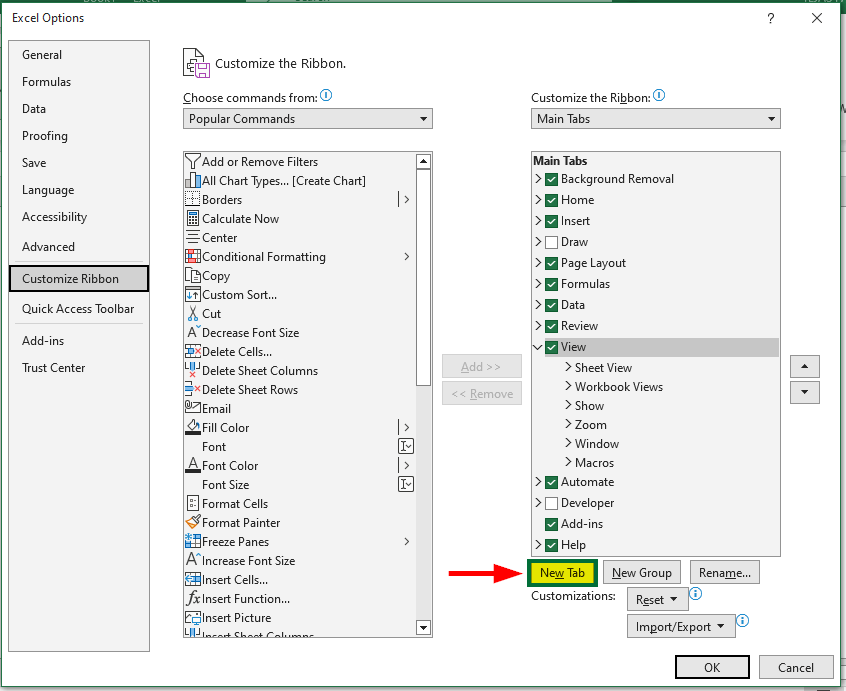
Follow the steps below to add a new tab after the “View” tab.
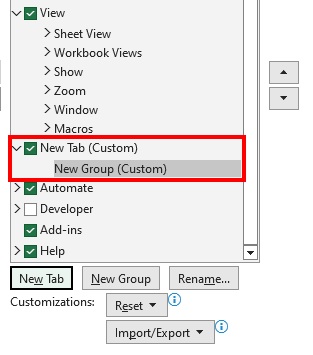
Step 1: In the “Customize the Ribbon” window, click “New Tab” under the right pane, as shown below.
A “New Tab (Custom)” and “New Group (Custom)” appear.
Note: Excel automatically created a “New Group” in the new tab because all tabs must have at least one group.
2. How to Add Commands?
Let’s say you want to add “Edit Cell Styles” commands in the new group of the new tab.
Solution:
Step 1: Click ”New Group” under the “New Tab.”
Step 2: Select “Commands Not in the Ribbon” in the “Choose commands from” drop-down list.
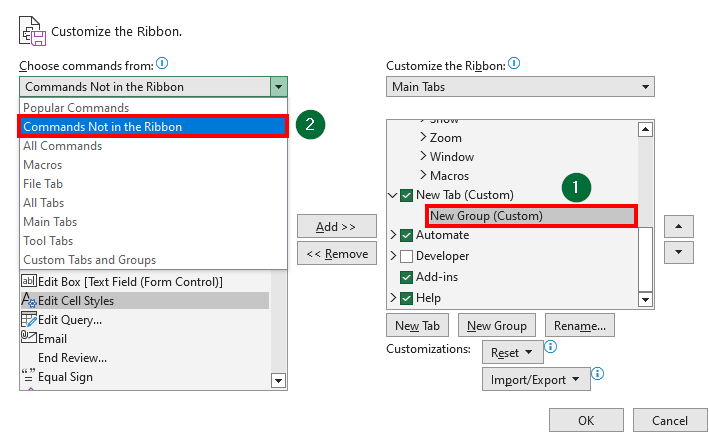
Step 3: Select “Edit Cell Styles” from the left pane of the window and click on “Add>>,” as shown below.
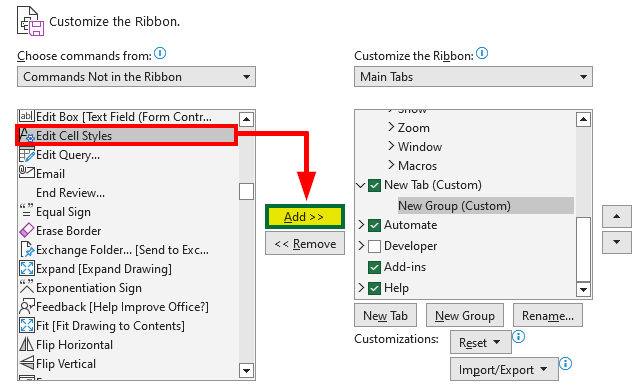
In the below image, you can see the “Edit Cell Styles” in the window’s right pane under the “New Group.”
3. How to Add Groups to the Existing Ribbon?
Suppose you want to add a new group to the ribbon’s default “Page Layout” tab.
Solution:
Step 1: Right-click on the “Page Layout” tab and select “Customize the Ribbon.”
Step 2: An “Excel Options” dialog box will open. From that, select the “Arrange” group and Click “New Group.”
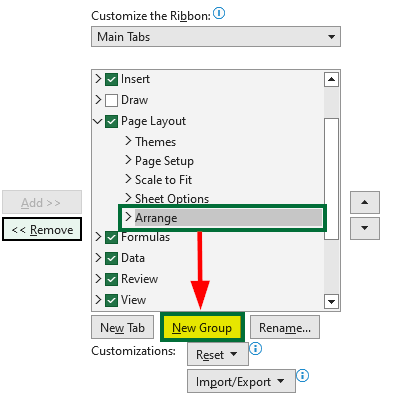
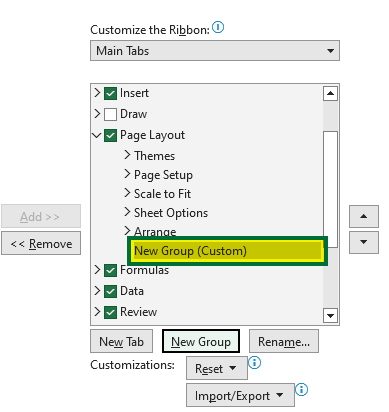
As shown below, a “New Group (Custom)” will appear.
Step 3: Select “Draw border” from the “Commands Not in the Ribbon” option and click “Add>>.”
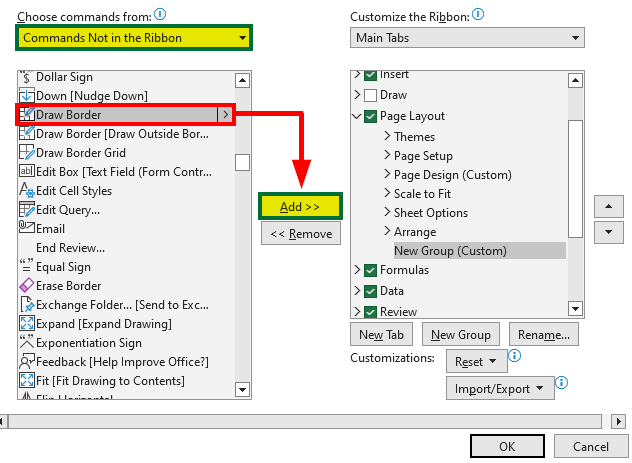
Step 4: Click “OK after the “Draw Border” commands appear under the “New Group.”
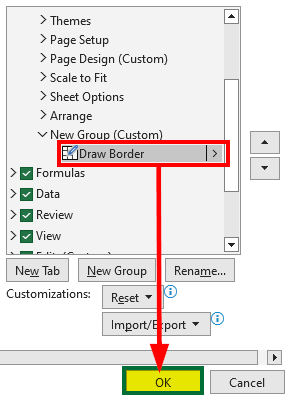
The new group successfully appears in the “Page Layout” tab.

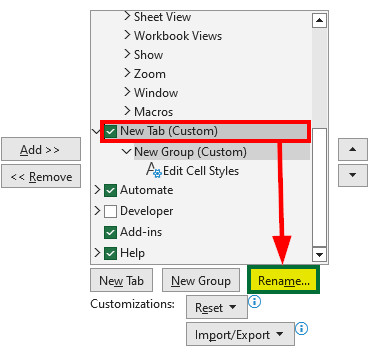
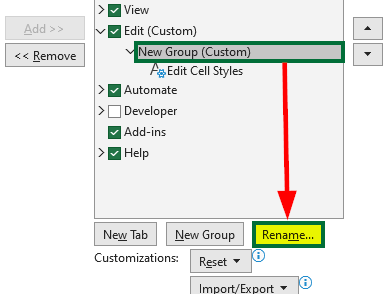
4. How to Rename Tab and Group?
Consider the new customized tab. Let’s learn how to rename tabs and groups with the following steps.
Step 1: Select “New Tab (Custom)” and click “Rename,” as shown below.
Step 2: Enter “Edit” (or any name you prefer) in the “Rename” dialog box and click “OK.”
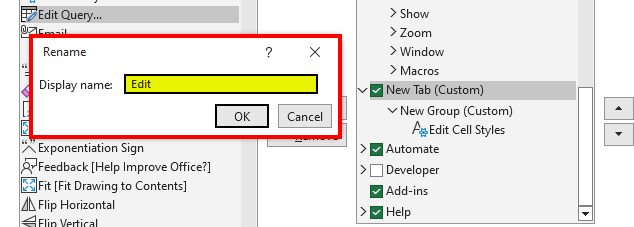
After clicking on “OK,” the “New Tab” changes to “Edit.”
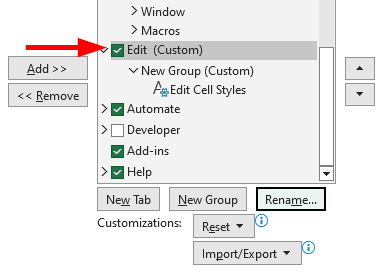
To rename Group:
Step 3: Select “New Group (Custom)” and click on “Rename.”
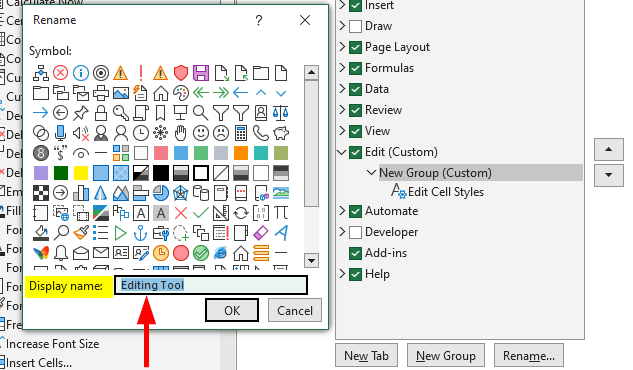
Step 4: A Rename dialog box will appear. Enter “Editing tool” in the “Display Name” and click on “OK.”
The “New Group” changes to the “Editing Tool,” as shown below.
Step 5: Click on “OK.”
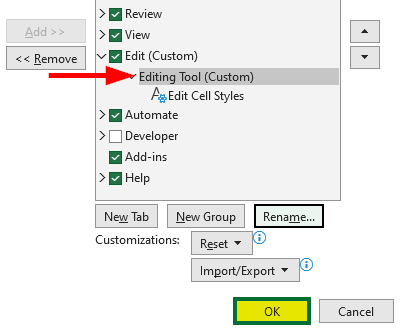
In the Ribbon, the “Edit Cell Styles” commands appear in the “Editing tool” group of the “Edit” tab.

5. How to Move or Reorder Tab, Group, and Command?
Imagine you want to move the “Page Design” group after the “Page Setup” group in the “Page Layout” tab.
Solution:
Step 1: In the “Customize the Ribbon” window, select “Page Design” under the “Page Layout” tab.
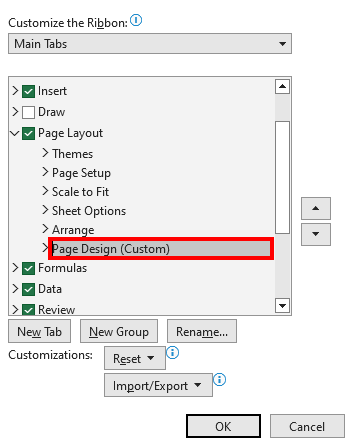
Step 2: Click on the “Move up” button till the “Page Design” group appears after the “Page Setup” group. See the below image for reference.
Step 3: Click “OK.”
The “Page Design” group appears after the “Page Setup” group.

Similarly, you can use the up and down arrow to move tabs and commands to the left or right of the selected item.
6. How to Remove Tab, Group, and Command?
You can remove any tab, group, or command using the “< < Remove” option in the “Customize Ribbon” dialog box. However, you can only remove custom tabs.
Now, let’s say you want to remove the “Edit” tab from the ribbon.
Solution:
Step 1: Select the “Edit” tab in the right pane and click on “Remove.”
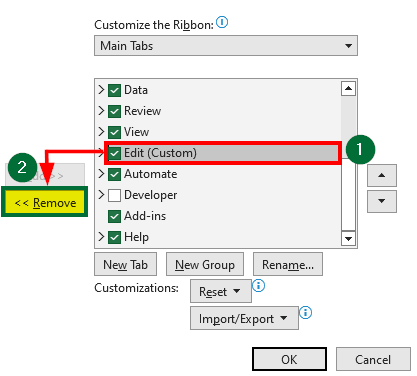
Step 2: Click “OK.”
Excel deletes the “Edit” tab from the ribbon. See the below image.
7. How to Hide and Show Tabs?
Excel displays the main tab in the Ribbon. However, you can hide unwanted custom and default tabs except for the file tab. You can also show the default hidden tabs in the Ribbon, such as the “Data” and “Developer” tab.
A) Show Hidden Tab
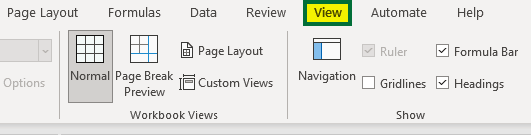
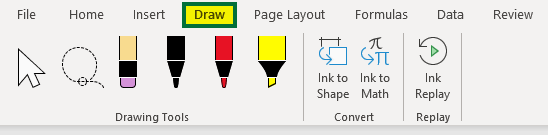
Let’s say you want to show the hidden “Draw” tab in the ribbon.
Solution:
Step 1: Go to “File,” select “Options,” and click on “Customize Ribbon.”
Step 2: On the left side of the window, select the “Draw” tab and click “OK.”
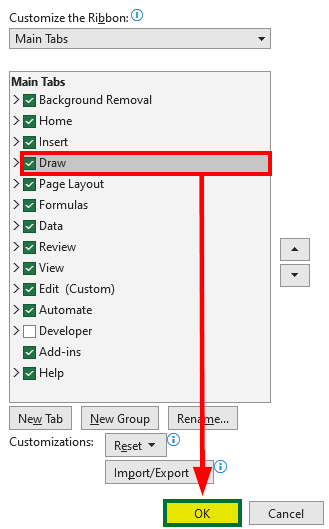
The “Draw” tab appears in the ribbon, as shown below.
B) Hide tab
Suppose you want to hide the “Formulas” tab because you don’t use it much.
Solution:
Step 1: In the right pane of the “Customize the Ribbon” window, uncheck the“Formulas” tab and click “OK.”
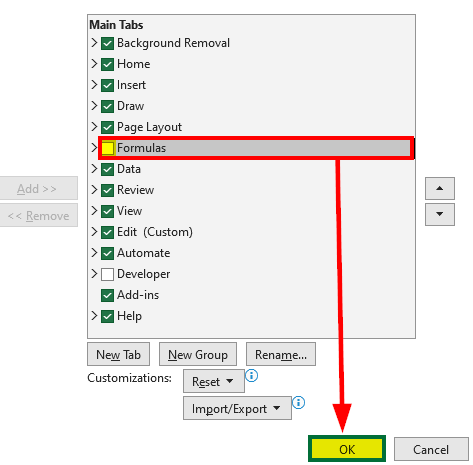
The Formulas tab is now hidden and does not appear on the ribbon.

Now, if you want to show it again, then tick on the tab in the Customize Ribbon window.
8. Hide Command Label and Only Show Icon
Excel allows you to remove text labels and only show icons from the custom commands. For instance, suppose you want only to display the Icon of the “Edit Cell Styles” Command in the newly created “Edit” tab.
Solution:
Step 1: Right-click on the “Editing tool” of the “Edit” tab in the “Customize the Ribbon” window.
Step 2: Select “Hide Command Labels” and click “OK,” as shown below.
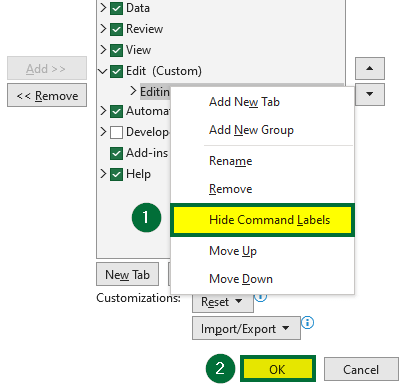
The text label is not visible; only the icon is visible, as shown in the image below.

Note:
- You cannot hide labels from in-built commands.
- If there are many custom commands in the group, the “Hide Command Labels” option will hide all command labels. You cannot hide any specific command.
9. Reset Ribbon to Default Setting
You can also easily reset the entire ribbon or specific tabs to the default setting. Follow the below steps to reset the customized ribbon.
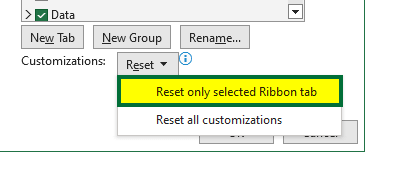
To Reset Specific Ribbon:
- Select all the tabs you want to reset in the “Main Tabs” option and click “Reset.”
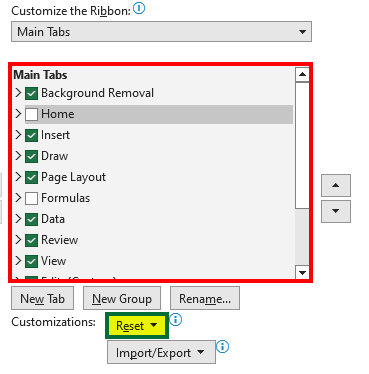
- Now, select “Reset only selected Ribbon tab.”
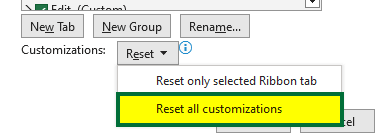
To Reset Entire Ribbon:
If you want to remove all customs tabs, groups, and commands and want to reset the entire ribbon to the default setting,
- Click “Reset” and select “Reset all customizations.”
10. Import and Export Customize Ribbon
If you work on Excel files using multiple computers, you can transfer all your customizations from one computer to another. Additionally, you can share these customizations with your team members. Follow the below steps to export and import the customized ribbon.
Export Customized Ribbon:
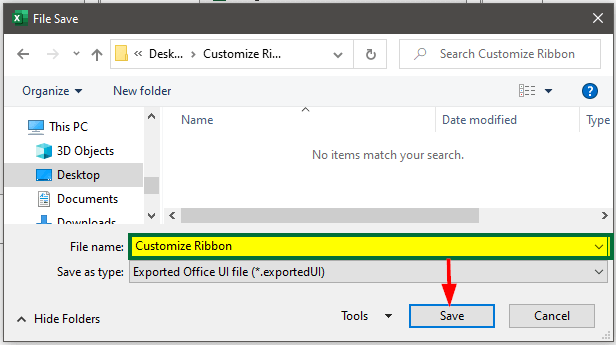
Before exporting, create all the custom tabs, groups, and commands on the ribbon.
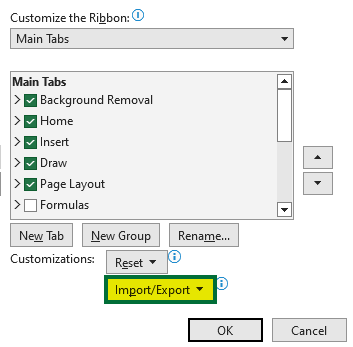
- Open the “Customize the Ribbon” window and click the “Import/Export” option.
- Select the “Export all customizations” option.
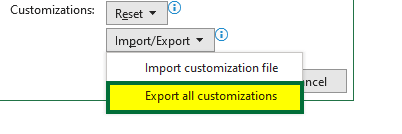
- Now, select the location where you want to save the Excel file in the “File Save” dialog box.
Import Customized Ribbon:
Now, choose the PC where you want to import this file and follow the below steps.
- Open the “Customize the Ribbon” window.
- Click “Import/Export” and select “Import customization file.”See the below image.
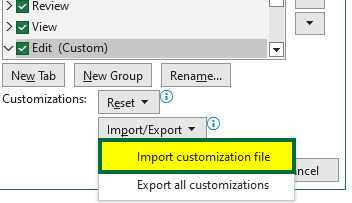
- Now, select the file with the customized ribbon.
Frequently Asked Questions (FAQs)
Q1. What can and cannot be customized in a ribbon?
Answer: While customizing the ribbon, you can reorder the tabs, groups, and custom commands, create as well as remove new tabs and groups. Moreover, you can also hide and unhide tabs and export or import the personalized ribbon. However, you cannot remove or change the icons of in-built commands, reduce the size of the ribbon, or change the color and size of the text on the ribbon.
Q2. What are tips for effective ribbon customization?
Answer: You can follow the below tips to customize ribbon effectively.
- Keep related commands in one group for quick access.
- Hide unwanted tabs to avoid overloading the ribbon.
- Use descriptive and clear labels for customized commands.
- Choose icons or symbols that relate to the function of the command.
- Keep a backup of the customized ribbon to restore it later if lost.
- Stay updated with new features in Excel.
Q3. What are the benefits of customizing the ribbon?
Answer: Customizing the ribbon in Excel has several benefits. You can easily access the most frequently used commands in one tab or group. You can also share the customized ribbon with other team members to achieve consistency and complete the task on time.
Recommended Articles
This article on Customize Ribbon in Excel provides a comprehensive, step-by-step guide on how to customize your Excel ribbon. With easy-to-follow screenshots, we hope this article was helpful. For more Excel-related information, you can click on the links below.
