Updated July 3, 2023
What is Solver in Excel?
Solver in Excel is a handy tool that helps you find the most suitable answer to a problem by letting you enter particular values and constraints it must fulfill to obtain the desired result. It’s like a “Puzzle Solver” that puts the pieces in the right place to solve the puzzle for you.
Solver uses advanced mathematical algorithms to test different scenarios and find the best solution. It can handle many variables and constraints, ensuring you get the best possible answer.
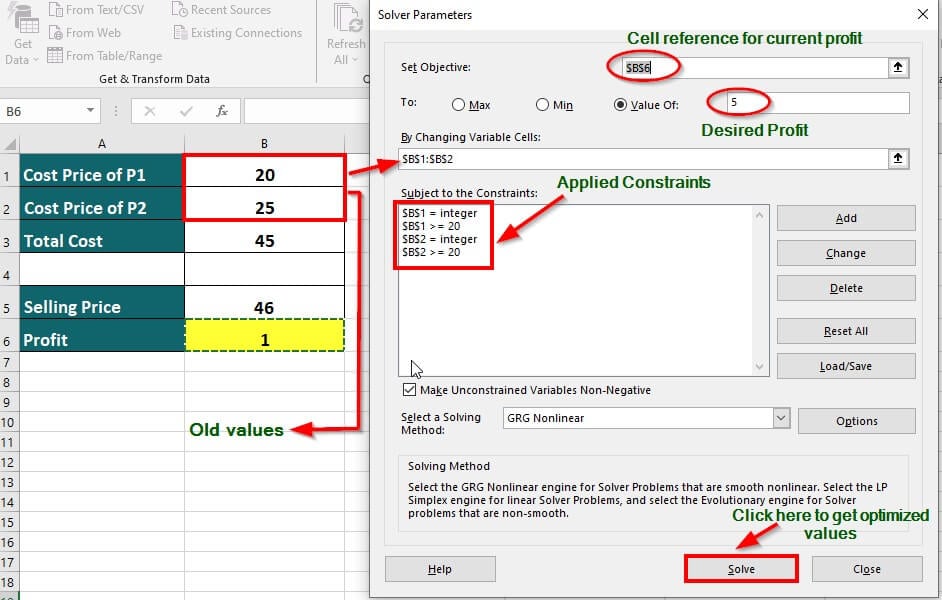
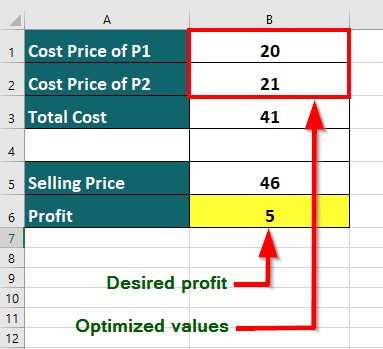
For example, assume that you run a small business that sells two different products, let’s call them P1 and P2. The cost price of P1 is $20, and P2 is $25, so the total manufacturing cost is $45. You sell both products for $46, making a profit of $1. Now, you aim to increase your profit and want to explore how you can optimize your prices to make a profit of $5. It is where Solver comes in. The Solver tool provides the optimized values illustrated in the image below.
How to Add Solver in Excel?
To add Solver in Excel, follow these steps:
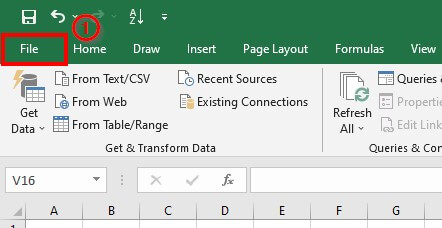
Step 1: Open an Excel workbook and go to File in the Excel Ribbon
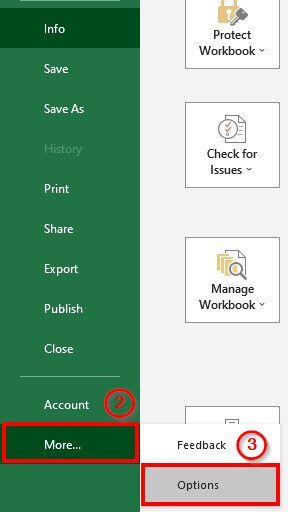
Step 2: Click More and go to Options
An Excel Options dialog box will appear.
Step 3: Click Add-Ins, select Excel Add-ins from the Manage section’s drop-down list, and click Go.
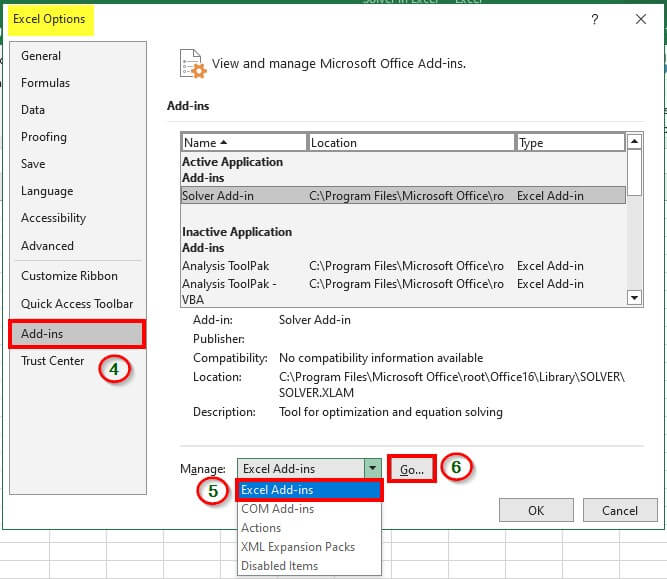
An Add-Ins window will appear.
Step 4: Select the Solver Add-in checkbox and click OK.
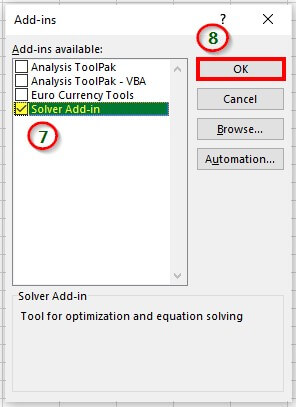
Excel places the Solver tool in the Analysis group of the ribbon.

How to Use Solver in Excel?
To use Solver in Excel, follow these steps:
Step 1: Go to Data in the Excel ribbon and click Solver in the Analyze group
It opens a Solver Parameters window.
Step 2: Enter the values for the below parameters in the Solver window:
- Set Objective: Give the cell reference for the current value.
- Value Of: Provide the desired value (outcome)
- By Changing Variable Cells: Provide cell reference of values that you want Solver to adjust/change to get the desired outcome.
- Subject to the constraints: To obtain the desired outcome, define the conditions or limits under which Solver will operate.
Step 3: Click Solve
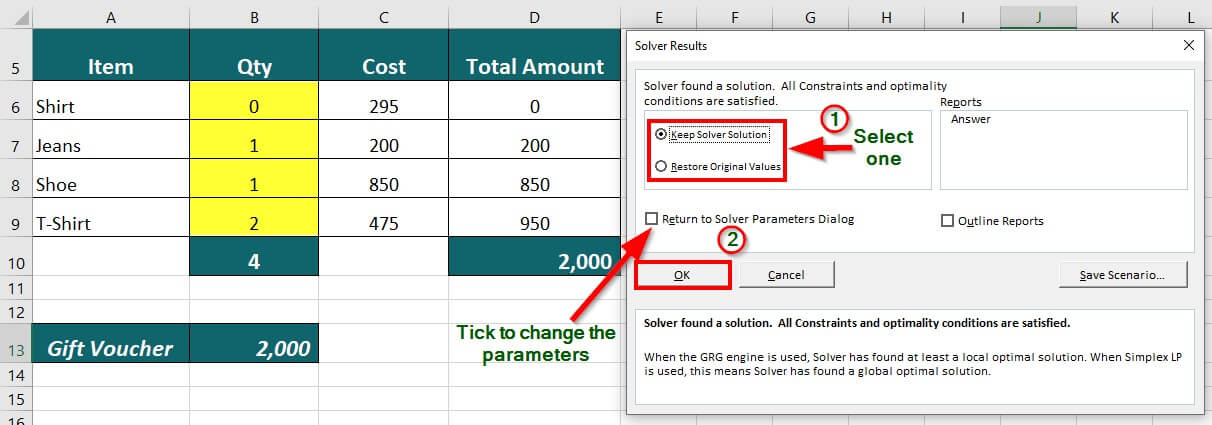
A Solver Results window pop-up with two options:
- Keep Solver Solution
- Restore Original Values
Step 4: Click Keep Solver Solution if you are satisfied with the optimized values that Solver produces, and to load the values in Excel,
OR Click Restore Original Values if you are unsatisfied with the new values.
Step 5: Click OK
Let us understand using Solver with the help of some examples:
Example #1
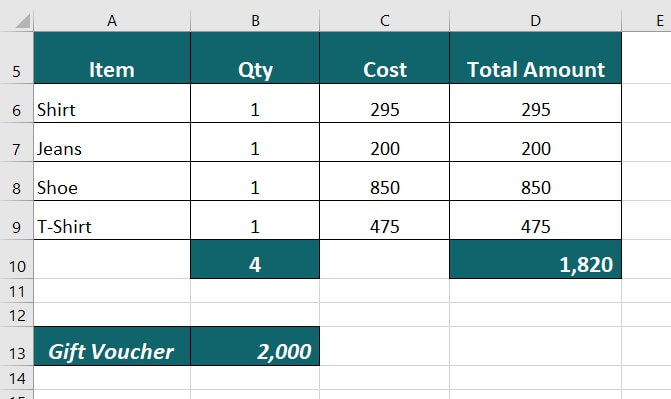
Imagine you receive a Gift Voucher worth $2,000 at a shopping mall. The list of items you can purchase using the voucher is given below, with their prices. If you buy one of each item, it costs $1,820. We want to determine how many items you need to purchase to spend the entire voucher amount of $2,000. Let’s see how we can use Solver in Excel to achieve this.
Given:
Solution:
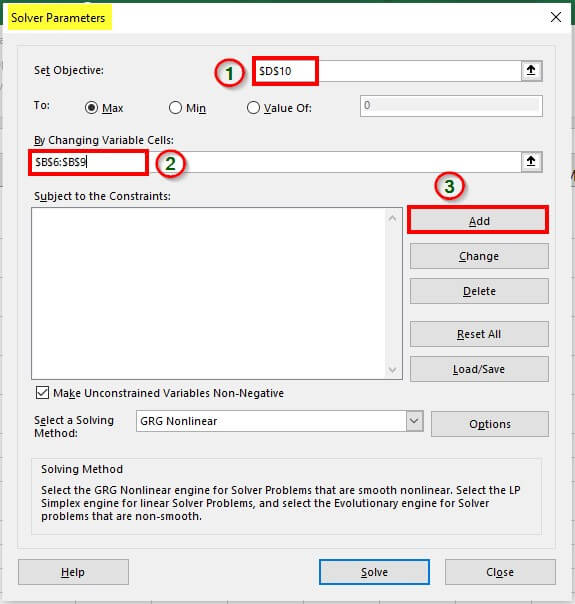
Step 1: In the Excel ribbon, go to the Data tab and click Solver in the Analyze group
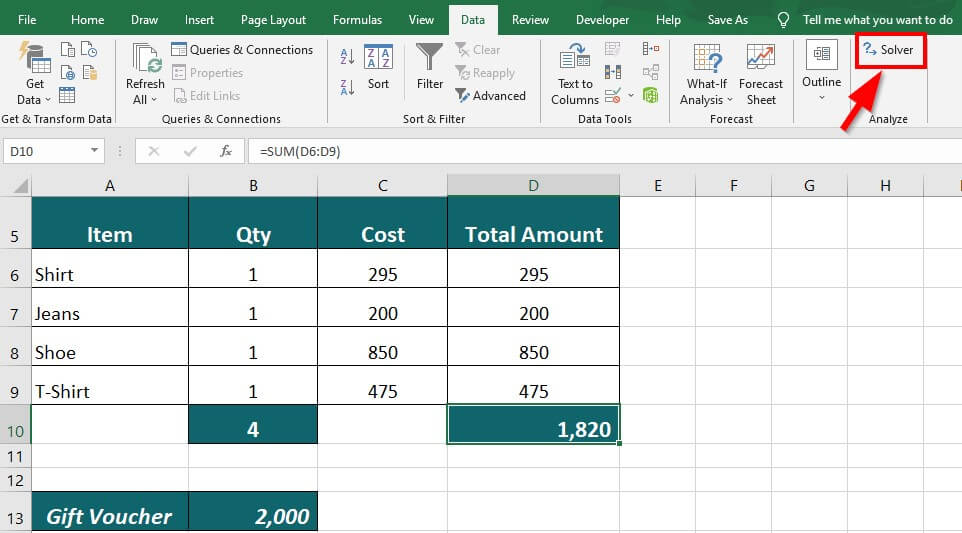
It will open the Solver Parameters window.
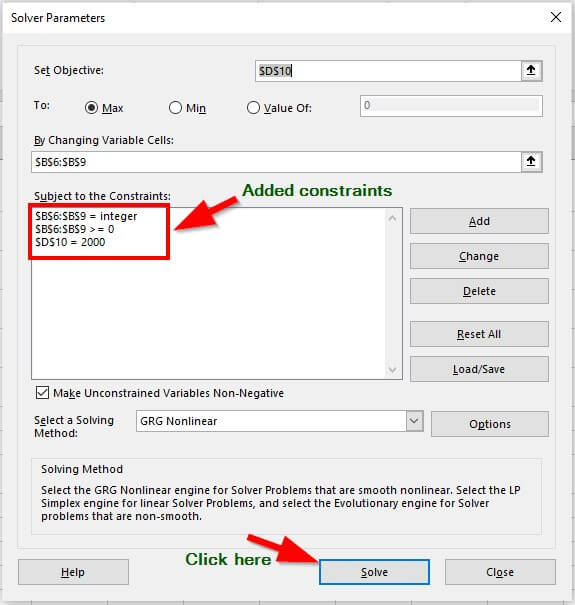
Step 2: Select the cell reference (D10) with the current total as the “Set Objective” and cell range with the cost of items (B6:B9) as “By Changing Variable Cells”.
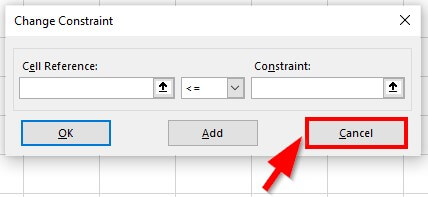
Step 3: Click Add to input the constraints or conditions.
An Add constraint window appears where we must provide conditions to the Solver.
1st Condition: We want the sum of the total amount to be $2,000.
Step 4: Select cell reference as cell D10, click the “Equal to” sign (=), and type 2000.
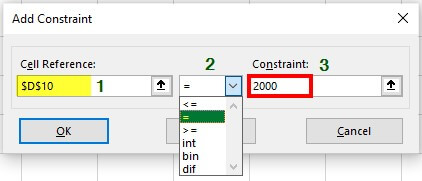
Explanation: We want the total amount (maximum limit) to be $2,000. Therefore, we enter the Cell Reference of the Total current amount, select the equal-to operator (=) from the drop-down, and enter the voucher amount as the constraint value.
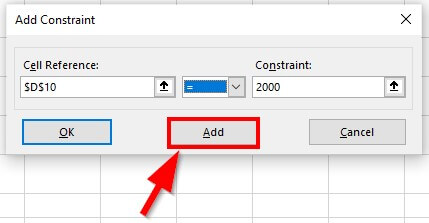
Step 5: Click Add
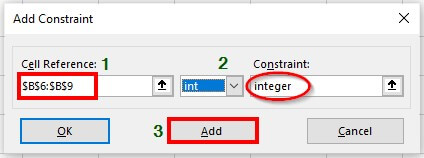
2nd Condition: We want the new cost value to be an integer.
Step 6: Select the cell cost range (B6:B9) and provide the Cell Reference.
Step 7: Select int (integer) from the drop-down.
The value integer automatically reflects as the constraint.
Step 8: Click Add.
3rd Condition: We want the new sum values to be non-negative.
Step 9: Select the cell cost range (B6:B9) to provide the Cell Reference.
Step 10: Proceed to the next drop-down menu. Select greater than or equal to (>=) therein.
Step 11: Then, give 0 as the constraint value.
Step 12: Click Add. The values are added successfully.

Step 13: Click Cancel to go to the Solver Parameters window
The Solver Parameters window shows all the added constraints.
Step 14: Click Solve.
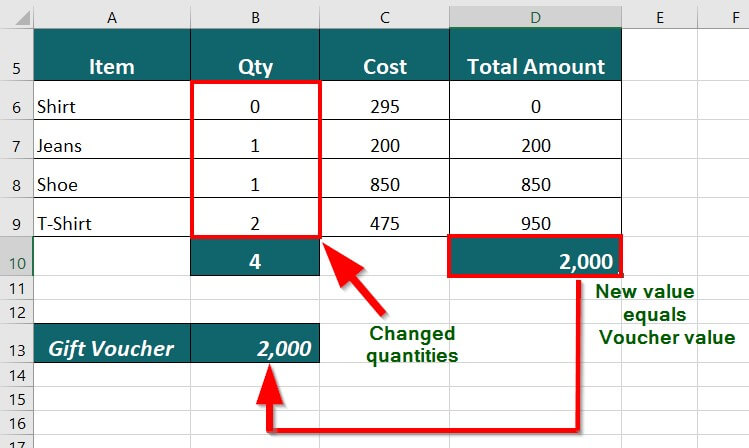
The Solver tool evaluates the values and constraints and gives the optimized output, shown in the image below.
Example #2
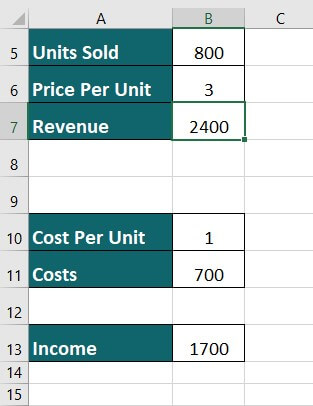
Let’s say you sold 800 units of a product at $3 each, earning a revenue of $2400. Now, you want to make $3000 next month. To reach this goal, let’s see how we can use Excel’s Solver feature to find the best price per unit and the number of units sold.
Given:
Solution:
Step 1: Click Solver in the Data tab of the Analyze group.
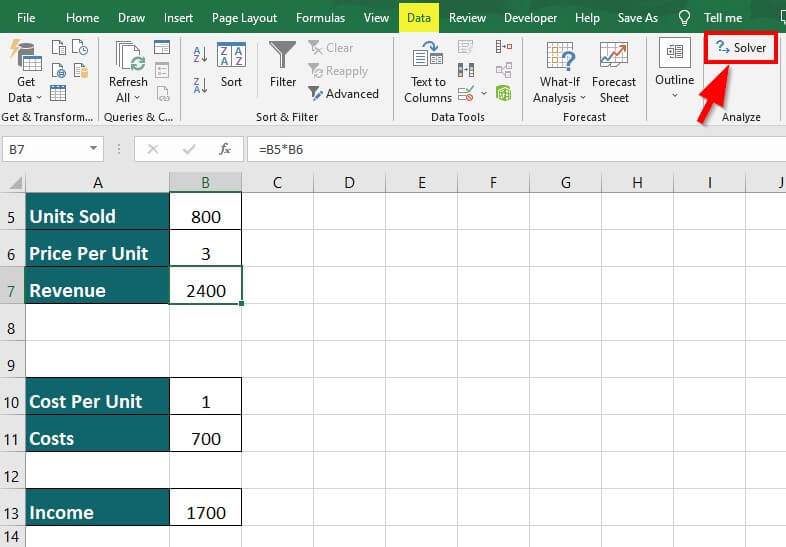
A Solver Parameters window appears on the screen.
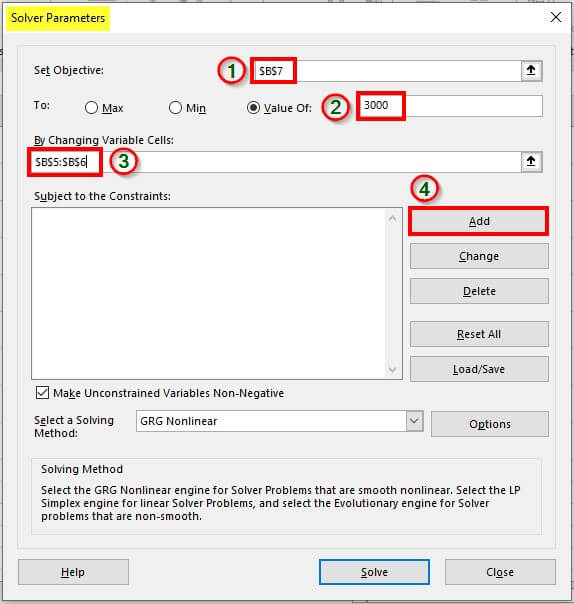
Step 2: In the window, specify the below parameters:
- Set Objective: Select the cell where you want to display the new value (cell B7)
- Value Of: Provide the desired value (desired revenue- 3000)
- By Changing Variable Cells: Choose the cells whose values you want to optimize for getting the desired result. Here, we want to modify the values of Units Sold and Price Per Unit; therefore, we select cells $B$5:$B$6.
The next step is to provide Solver with the constraints to optimize the specified components.
Step 3: Click Add
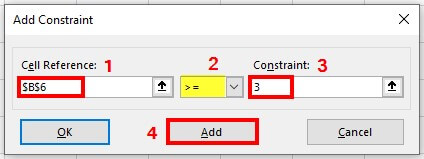
Step 4: We need to tell Solver that the value in cell $B$6 should be greater than or equal to 3.
To do this, enter the cell reference as $B$6, select >= sign from the drop-down, enter the constraint as 3, and click “Add“.
It will ensure that the number of units sold is at least 3 while Solver optimizes the price per unit to reach the desired revenue goal.
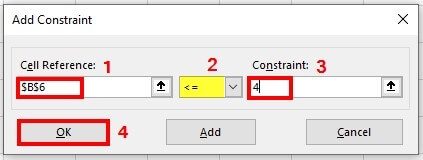
Step 5: Next, we need to add a constraint to tell Solver that the value in cell $B$6 should not exceed 4.
To do this, enter the cell reference as $B$6, select <= sign from the drop-down, enter the constraint as 4, and click “OK“.
It will ensure that the number of units sold is, at most, the maximum limit of 4 while optimizing the price per unit to reach the desired revenue goal.
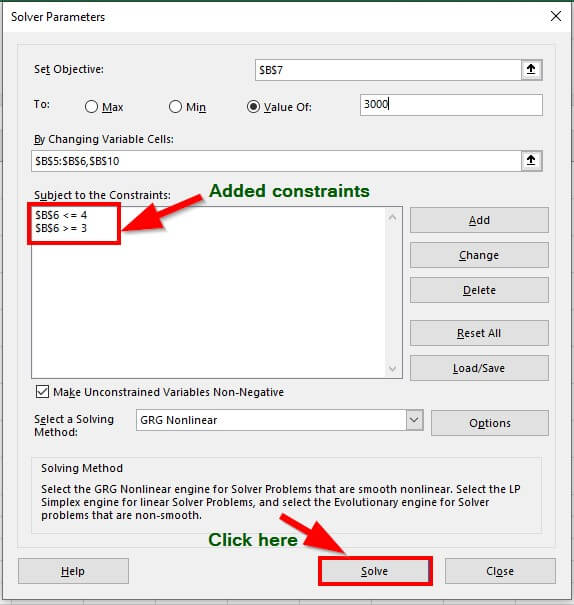
As you can see below, Excel adds the constraints to the Solver. Click Solve to tell Solver to perform its optimization operation.
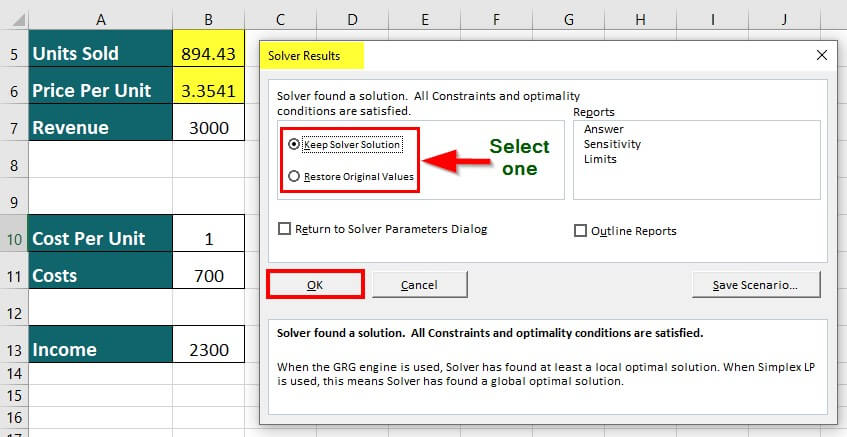
A Solver Results window asks you to Keep Solver Solution or Restore Original Values if you are unsatisfied with the new values.
Step 6: We will click “Keep Solver Solution” and then “OK” to update the values and close the Solver Results dialog box.
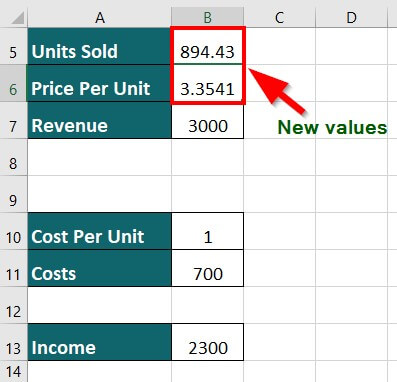
Step 7: Solver will display the result. To reach the revenue goal of $3000, we must sell the item for $3.3541 per unit, with a total of 894.43 units sold.
Example #3
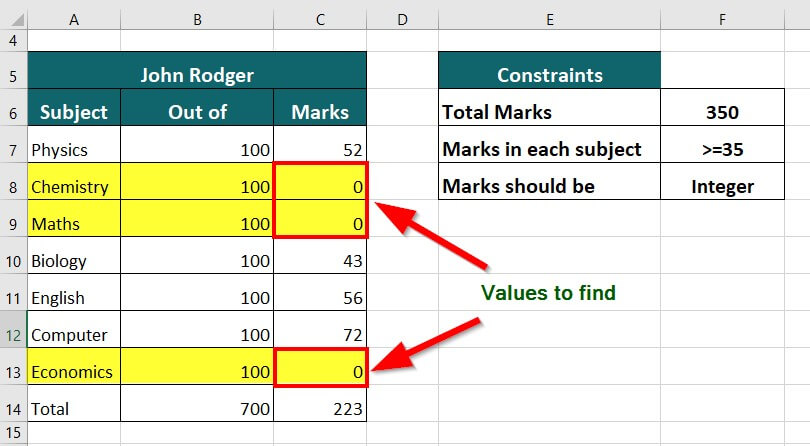
John got 223 marks in Physics, Biology, English, and Computer exams but missed the Chemistry, Maths, and Economics tests. He is exempted from retaking the missed exams but needs to score 350 marks overall. Let’s understand how he can use the Solver tool to determine the marks required in each of the three subjects.
Given:

The table below shows the criteria/constraints he must provide for the Solver tool.
Solution:
Step 1: Select Solver in the Data tab of the Analyze group.
A Solver Parameters window pops up on the screen.
Step 2: In the window, provide value for the below parameters:
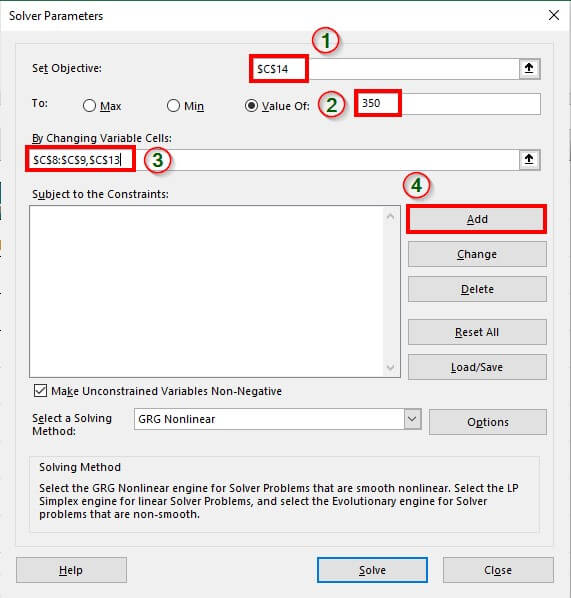
- Set Objective: Select the cell where you want to display the new value (here, Total marks – Cell C14)
- Value Of: Provide the desired value (here, total marks- 350)
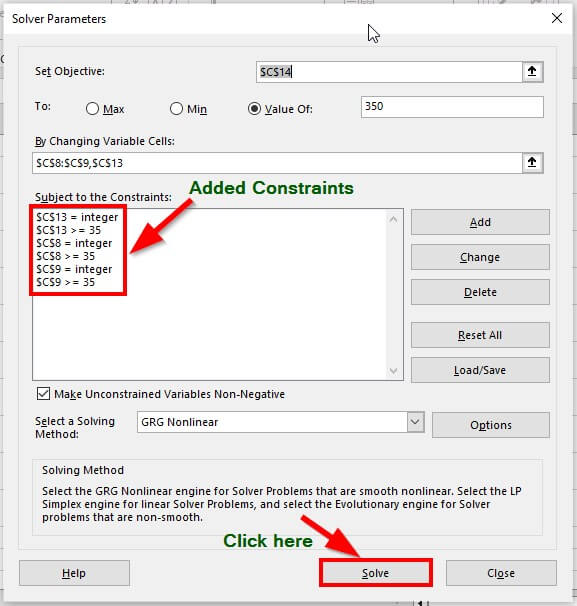
- By Changing Variable Cells: Select the cells whose values you want to optimize for the desired result. Here, we want to change the values of Chemistry, Maths, and Economics; therefore, we select the cells $C$8:$C$9 and $C$13.
The next step is to provide Solver with the constraints, i.e., conditions to optimize the specified components.
Step 3: Click Add
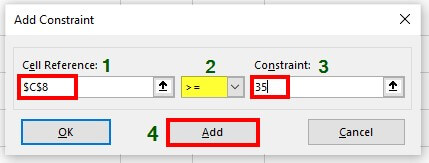
Step 4: Here, we need to add a constraint to tell Solver that the value in cell $C$8 should not be less than 35.
To do this, enter the cell reference as $C$8, select >= to sign from the drop-down, enter the constraint as 35, and click “Add”.
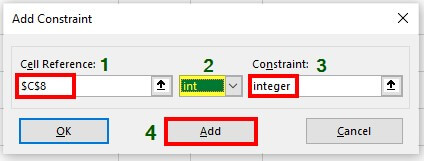
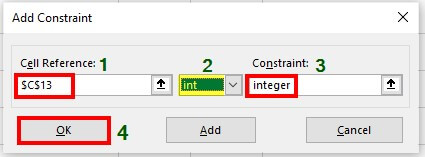
Step 5: We want to provide the following condition: the value in cell $C$8 should be an integer.
To do this, enter the cell reference as $C$8, select “int” from the drop-down, enter the constraint as an integer, and click “Add”.
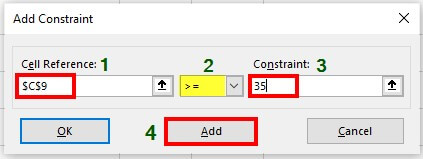
Step 6: Next, we want to suggest that the value in cell $C$9 should not be less than 35.
To do this, enter the cell reference as $C$9, select >= sign from the drop-down, enter the constraint as 35, and click “Add”.
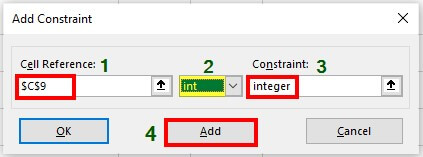
Step 7: We want to provide the next condition that the value in cell $C$9 should be a non-negative number.
To do this, enter the cell reference as $C$9, select “int” from the drop-down, enter the constraint as an integer, and click “Add”.
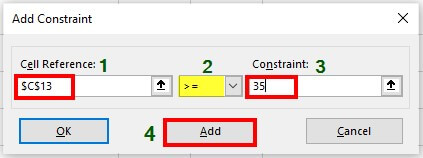
Step 8: Next, we want to give the constraint that the value in cell $C$13 should not be less than 35.
To do this, enter the cell reference as $C$13, select >= sign from the drop-down, enter the constraint as 35, and click “Add”.
Step 9: We want to provide the next condition that the value in cell $C$13 should be an integer.
To do this, enter the cell reference as $C$13, select “int” from the drop-down, enter the constraint as an integer, and click “Add”.
The image below shows all the constraints we provide to the Solver tool.
Step 10: Click Solve
The Solver tool performs the optimization operation and gives the evaluated output (highlighted in yellow in the data table).
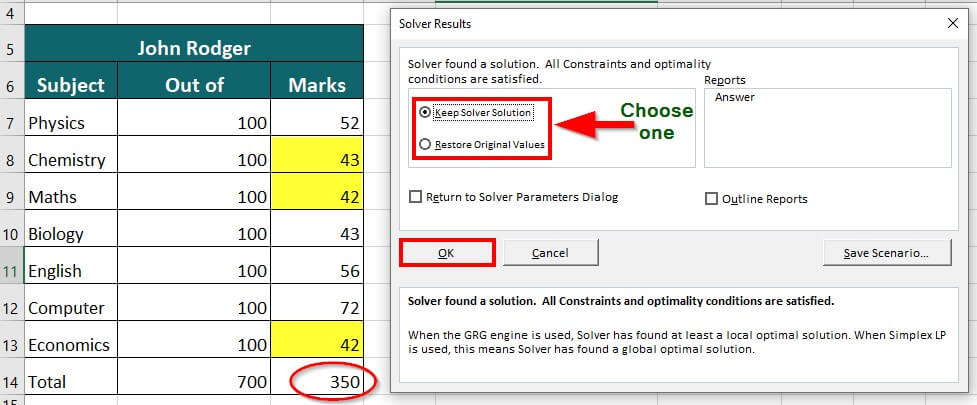
As we can see, the values satisfy the given criteria, and the total mark is the desired value(350). Therefore, we will keep the solution.
Step 11: Choose “Keep Solver Solution” to keep the values in the data table and click OK.
Therefore, to reach 350 marks and meet the condition, John needs to get 43 marks in Chemistry, 42 in Maths, and 42 in Economics.

Things To Remember
- Solver is not an in-built Excel function; therefore, we must activate it by loading the Solver add-in into Excel.
- We can use Solver to solve problems with up to 200 decision variables.
- In the 2007 and earlier versions of Solver, Excel refers to the objective cell as the Target cell, and By changing variable cells as changing cells or adjustable cells.
- Solver allows six criteria: >=, <=, =, (int) integer, (bin) binary, and (dif) difference, but we can use only int, bin, and dif for constraints on variable cells.
- By default, Excel saves the specified parameters in the Solver Parameters dialog box within a worksheet.
Frequently Asked Questions (FAQs)
Q1. What is the difference between goal seek and Solver?
Answer: Solver and Goal Seek are handy tools for performing financial modeling and analysis in Microsoft Excel spreadsheets. The fundamental distinction between the two is as follows:
|
Tool |
Allows changing multiple variables? |
Allows finding an optimized solution? |
| Solver |
Yes Allows changing multiple variables. |
Yes Allows finding an optimized solution (Max or Min). |
| Goal Seek |
No Allows changing only one variable. |
No Allows finding a specific outcome but not necessarily the optimal solution. |
Q2. What is the importance of Solver as an optimization tool?
Answer: Excel Solver is a tool that helps you to solve problems and make decisions by arriving at optimal solutions. The Solver tool lets you test multiple scenarios and determine how they affect the outcome in the spreadsheet.
Q3. How do I make Excel Solver more accurate?
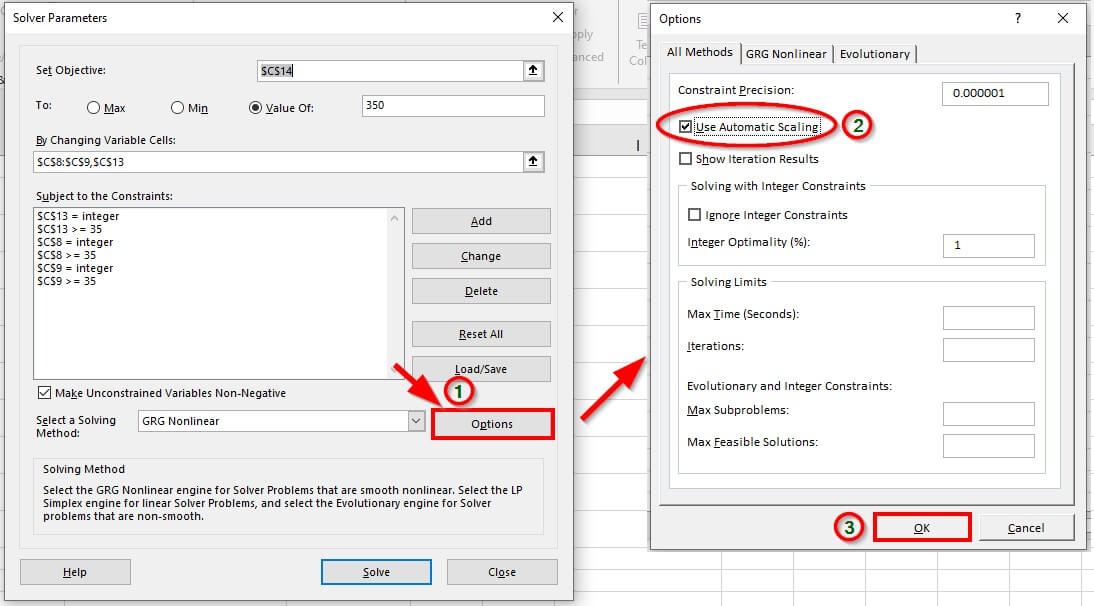
Answer: To improve the accuracy of the Excel Solver, you can check the “Use Automatic Scaling” box. It will allow Solver to adjust the values of constraints, variables, and the objective to similar values. It helps to reduce the impact of extremely small or large values on the accuracy of the solution.
To locate and check the Use Automatic Scaling option, follow these steps,
Step 1: Go to Solver in the Analyze group of Data tab. It opens up the Solver Parameters window.
Step 2: Here, click “Options”. The Options window pops-up
Step 3: Select “Use Automatic Scaling” and click OK.
Recommended Articles
The above article provides a comprehensive guide on using Solver in Excel, with illustrative examples. For additional resources on practical techniques in Microsoft Excel, EDUCBA suggests referring to the following articles.
