What is AutoCAD Architecture?
AutoCAD architecture is an advanced form of AutoCAD. Some special features are added related to architecture to make it more creative and user-friendly for civil engineers and interior designers. AutoCAD architecture is also known as a super time-saving tool. We can design and modify every single content of 3D walls, floors, and buildings instead of the usual lines, curves, and circles. With these intelligent features of AutoCAD, people can feel a mimic real-world image in front of them, giving life to their imagination.
Architecture of AutoCAD
Here are some special features added which are related to architecture as stated below:
1. Organizing Your Workspace
- According to your visuality, you can choose a white or black background.
- Click on customize icon near to command line.
- Select options, then move to the display tab.
- Click on the drawing windows color panel.
- Keep the context active in the first tab, and change the interface element in the second tab.
- Choose a uniform background color.
- Then apply and close.
The most used icons in drawing space:
![]()
View Cube: It is used to switch from standard to isometric view. It is draggable or clickable on the interface.
2. Floor Plans
- Start a drawing using QNEW or choose the + tab.
- In-home Ribbon menu, launch the content browser.
- Select-create a cataloging tool, then browse it and choose the design.
- Then open it and click OK.
- Now the catalog is listed in a content browser.
- To add tools from the content palette.
- Launch the content browser, and choose the design tool palette.
- In that, click on a new palette and rename it as walls.
- Now left-click the Design tool catalog– Imperial on a content browser to open.
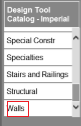
- In those categories, select walls.
- Then search for stud-4 and click on Go.
- Now select common wall type Stud-4 Rigid-1.5 Air-1 Brick-4. Then click on the left mouse button and adjust it to fit the screen.
- Now the designed wall is added to the wall tool palette.
- To have three wall style search CMU-8.
- Then locate CMU-8 Stud-4 Rigid-1.5 Air-1 Brick-4.
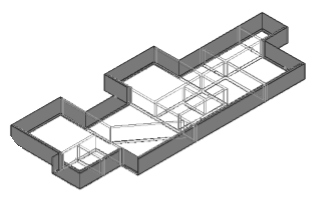
- The floor, which is the main part of the architecture, is ready. Because with the help of floor measurements, only it can depict the room size, furniture, wiring system, etc.
3. To Convert 2D to the 3D Floor Plan
- Tap on QNEW or + Menu.
- Type UNITS, then select Inches.
- Set the type to Architectural.
- Approximately set to ¼’’ precision.
- Click OK.
- In the INSERT option, select Attach.
- Locate the autocad_file_drawing file in the exercise. Save the file type as .dwg
- Then click on OK.
- Use the view cube button to switch to the 3D view.
- Activate the 2D wall from the previous exercise by clicking on the Design tool option from the Home ribbon.
- Right-click and select the Import option on Stud-4 Rigid-1.5 Air-1 Brick-4.
- To load the wall style into the file, right-click and import the wall style.
- Activate the component tab and add component tools required from construction.
- Make sure the floor and wall plan is aligned properly. To join the walls, use the fillet option.
Hence according to your measurements, the wall and floor are designed and use TRIM, FILLET, and EXTEND options to make suitable changes.
4. To Add Doors
- Right-click on the command prompt and select options, then activate the Profile tab.
- Then choose the door location.
- Open the design tool palette, select Bi-Fold double door, and right-click on properties. Set the opening percentage as 50.
- For the entry door, repeat the previous step and choose Hinged – Single – Exterior door on the Doors tab of the Design Tools palette. Set the swing angle as 30 – degrees.
An arrow will appear to standard-size fields by clicking on the left options. For example, if it is 25% opening, it will show 45 degrees angle; if it is 50%, it is 90 degrees angle. The value of the opening percentage is decided upon the arc swing.
5. To Add an Arched Opening
- The opening can be in any size and elevation.
- Locate the Cased opening tool in the door palate.
- Right-click and copy-paste it on the Doors tab.
- Right-click and highlight the copied tool and select properties.
- Change the name and description to the Arched opening door.
- Select the Arched opening door and set properties as Offset or center to 6.”
- Now use the view tool for 3D orbit.
- In the View ribbon, click on shades of grey, types of material and texture, and shadows.
- Now select the Opening and press Enter.
- Tap the work tab to view the model.
6. To Add a Window
- Set the view style as a 2D wireframe and switch to the top view.
- Select the window tab on the tool palate, then choose the Picture window.
- Select the location Position to Offset/Centre. Set the Automatic Offset to 6″
7. To Add the Roof
- Draw a closed 2D polyline in the shape of the roof and place it in the location.
- Open the tool palette and choose the roof option.
- Right-click on the roof tool and select Apply Tool Properties to linework and walls.
- Set the parameter of the roof on the properties palette.
8. To Add a Staircase
- Select the top to set the plan view on the view control option.
- In the Home tab, select the build panel and click on the stair tool.
- In the properties palette, browse and select the type as required.
- Mention the flight start point and endpoint.
- Select the isometric view to view in 3D.
Conclusion
To draw a wall, and the materials required for composing the wall are on the wrong side, reverse the direction of the wall. Select the wall, right-click on it, and select the Reverse menu. To move a door along a wall, use Door to Reposition to Along Wall. Use the OSNAP. Apart from these basic drawings, AutoCAD helps design all single entities like a building of chimneys or design of a storeyed building, creating space for entry-level and exit levels, creating multiple sections and elevations, and building garages. AutoCAD is a time- and budget-saving tool to create a miniature model before a huge investment.
Recommended Articles
We hope that this EDUCBA information on “AutoCAD Architecture” was beneficial to you. You can view EDUCBA’s recommended articles for more information.
