Updated June 9, 2023
Why Is It Important To Upgrade Your Device to iOS 8?
Upgrade your device to iOS 8 – Apple announced iOS 8 at the company’s Worldwide Developers Conference (WWDC) 2014 on June 2, 2014. This is the eighth major release of the iOS mobile operating system, designed by Apple Inc. iOS 8 was officially released on September 17, 2014. According to reports, iOS 8 has been installed on 85% of compatible Apple devices.
iOS 8 has been the “Biggest change to iOS since introduction of App-Store”. There have been several versions of iOS 8, with each version fixing ios 8 bugs. There has been a WiFi issue in the initial launch of the iOS 8 version. This resulted in a sudden drop in WiFi connectivity, leaving users in the lurch. Apple launched a subsequent version in a short span to fix the issue. Let’s check with version history of iOS 8. This article will see why it is important To upgrade your device to iOS 8.
iOS 8 version history
1. iOS 8.0 beta one was launched on June 2, 2014, at Worldwide Developers Conference at the company’s location in California. It was for developers. The terminology beta refers to the software containing bugs and needs a future version with bug fixes. There were several beta versions of iOS 8 for developers. These beta versions had bug fixes and enhancements. The last beta version for iOS 8.0 was beta 5, released on August 19, 2014.
2. iOS 8.1 beta one was released on September 29, 2014. This release includes features such as Apple Pay support for iPhone 6 and iPhone 6 Plus, resolves issues with WiFi performance, and fixes issues with Safari. It was followed by iOS 8.1 beta two release. This release has been subverted, with each version fixing issues. iOS 8.1.3 was the final release on January 27, 2015.
3. iOS 8.2 introduces support for the Apple Watch and improvements to ioS 8 Health apps. It also increased stability and bug fixes. This was on March 9, 2015.
4. Apple released iOS 8.3 on April 8, 2015. This release includes improved performance, bug fixes, and redesigned ioS 8 Emoji keyboard. Changes included in this release are as below :
a. Improved performance for messages, app launch, control center, 3rd-party keyboards
b. WiFi and Bluetooth fixes
c. Orientation and rotation fixes
5. iOS 8.4 was released on June 30, 2015. This update introduces Apple Music, a revolutionary music service, 24 / 7 global radio. This feature was highlighted in Worldwide Developers Conference (WWDC) 2015 keynote. It also includes improvements for iBooks and bug fixes.
iOS 8 compatible device
If you fall under the 25% category of iOS users (iOS 7 and below), surely upgrade to iOS 8. And to your surprise, it is free!! Before upgrading to iOS 8, make sure your device is compatible.
Below is a list of the compatible device for iOS 8 :
1. iPhone :
– iPhone 4s and iPhone 5
– iPhone 5c, iPhone 5s, iPhone 6 and iPhone 6 plus
2. iPad :
– iPad 2, iPad (3rd generation), iPad (4th generation), iPad Mini (1st generation)
– iPad Air, iPad Air 2, iPad Mini 2, and iPad Mini 3
3. iPod Touch :
– iPod Touch (5th generation)
You can install iOS 8 on all the compatible devices listed above. However, iPhone 4s, iPhone 5, iPad 2, iPad (3rd generation), iPad (4th generation), and iPad Mini (1st generation) are 32-bit devices and will soon become obsolete. Apple has recently forced developers to publish apps on App Store built on 64-bit rather than 32-bit. This is because devices after iPhone 5 are 64-bit devices.
Backup device before upgrade
Always back up your device to iCloud or iTunes before you update your iPhone, iPad, or iPod to iOS 8. Before beginning with backup, decide on options for backup, i.e., iCloud or iTunes.
You can make a better decision based on the features each of them offers. Below are the features for iCloud and iTunes backup.
1. iTunes
- It allows you to store backups on your Mac machine or Personal Computer.
- The storage size completely depends on the space available on your Mac machine or Personal Computer.
- It offers ioS 8 encryption for backups, so you can store it securely. By default, it is Off. You need to enable it to encrypt backups.
2. iCloud
- It allows you to store backups in the cloud i.e., at some secure remote location.
- The storage size available is up to 1 TB of storage. Note that the first 5 GB is free for all Apple users. However, if you are in need of an additional store, then you need to purchase it.
- The backups on iCloud are always encrypted and secure.
How to back up your device using iCloud or iTunes?
Let’s check how to back up your device using iCloud or iTunes.
A. Perform backup using iTunes
1. Open iTunes by clicking the iTunes icon or search for iTunes in the spotlight/search menu.
2. Now connect your device (iPhone, iPad, or iPod touch) to your computer using the data cable provided with the device. Screenshot 1 shows a typical iTunes screen that appears when you connect your device to the system.
3. You can save content downloaded from iTunes or the App Store. Click on File – > Devices -> Transfer Purchases from “[device-connected]” (shown in screenshot 2). If you are working on a Windows system, the File menu might not be visible. Press the Alt key to make the File menu visible.
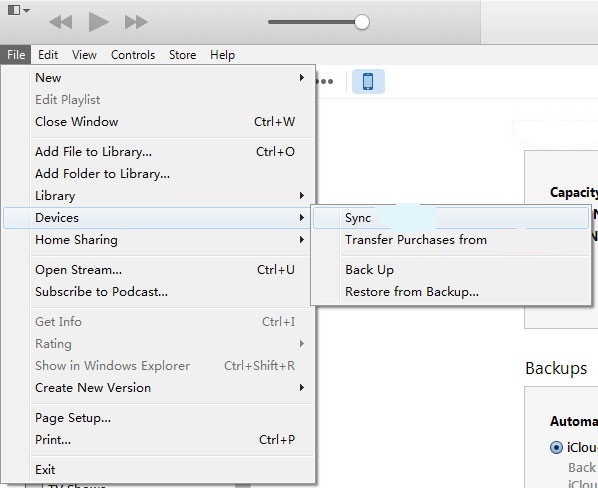
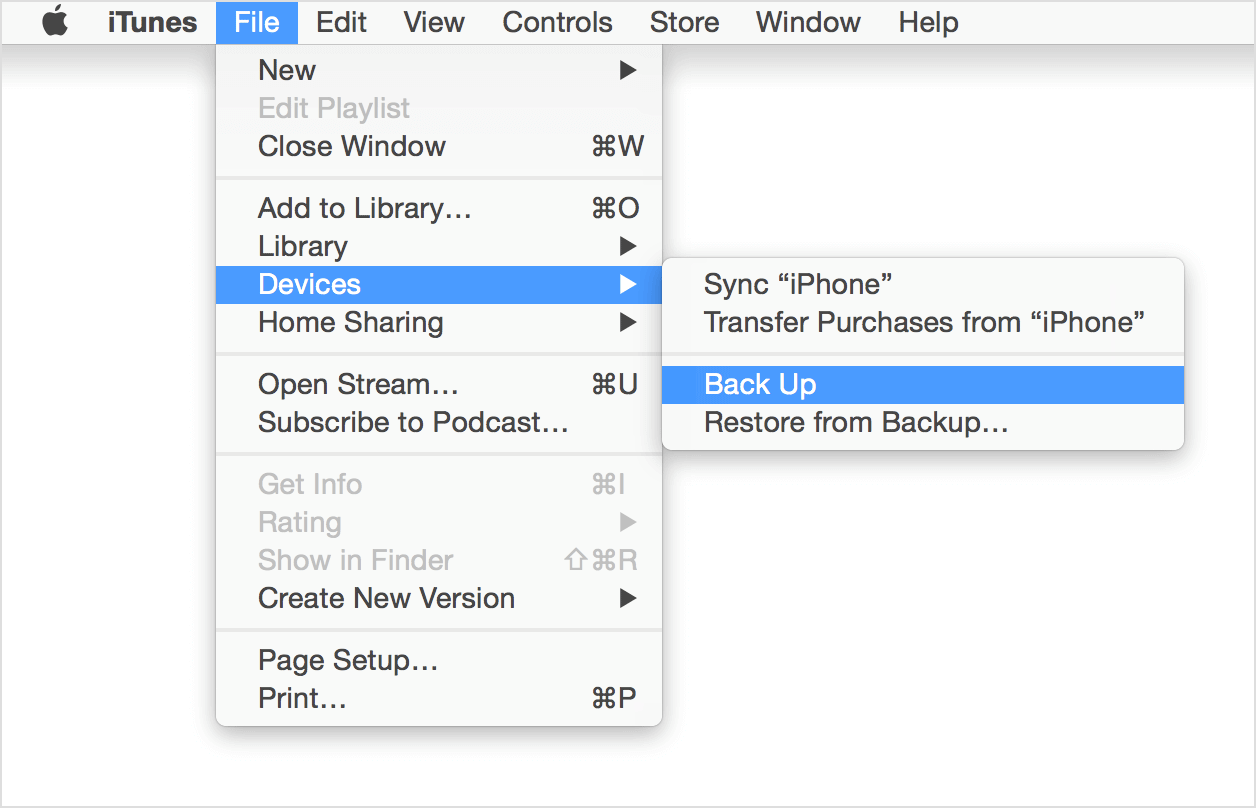
4. Once you are done with step 3, click on File -> Devices -> Back up (shown in screenshot 3). Note that if you use a Windows system, the File menu might not be visible. Press the Alt key to make the File menu visible.
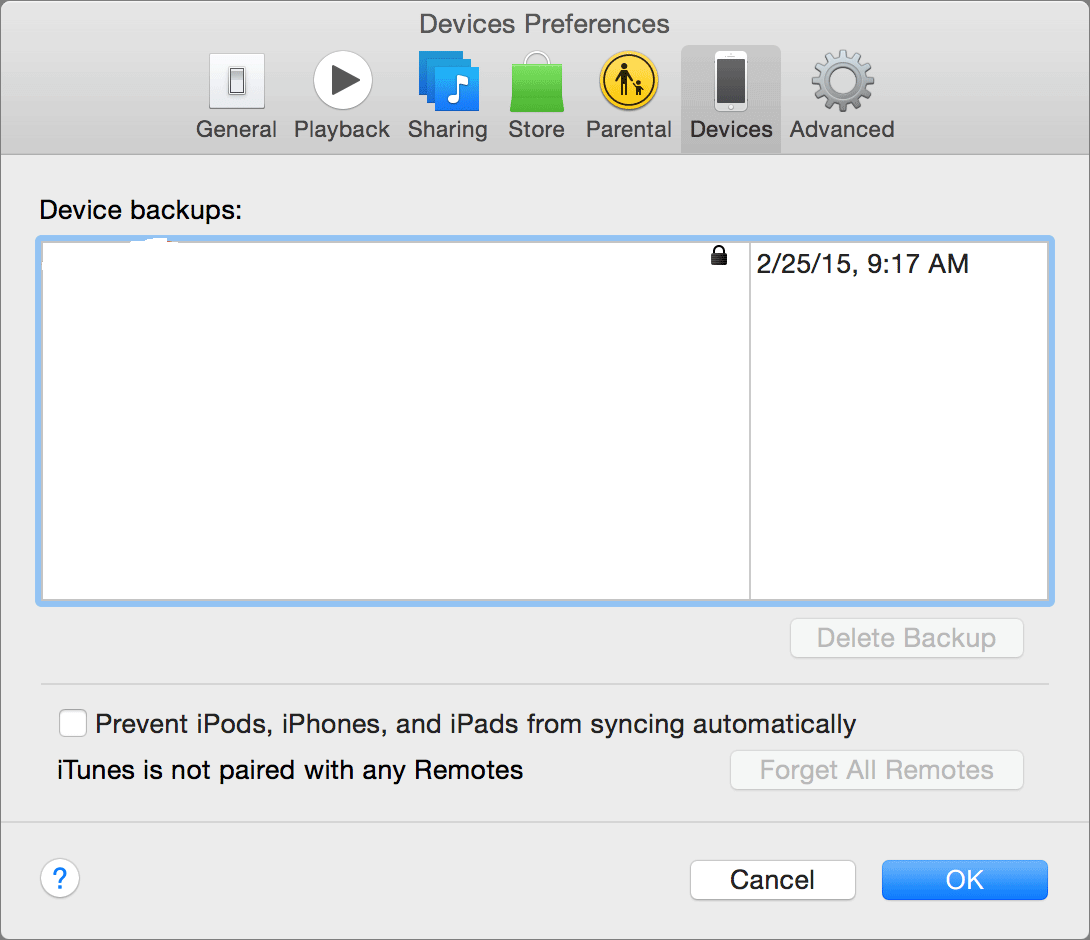
5. If step 4 is a success, you can see your device’s backup by clicking iTunes Preferences -> Device (shown in screenshot 4). The backup should display your device name along with the date and time of the backup.
B. Perform backup using iCloud
You can perform a backup of your device using iCloud. Below are steps for the same:
1. Connect your device to a WiFi network. While doing this, ensure the network signal is good enough to transfer data faster.
2. Click on Settings -> iCloud -> Storage & Backups
3. Turn on iCloud backup if it is off (shown in screenshot 5).

4. Click on Back Up Now. Ensure the connection to a WiFi network until the backup process finishes.
5. Once step 4 is completed successfully, you can check the backup by clicking Settings ->iCloud -> Storage -> Manage Storage and then selecting your device. The backup you have taken should appear in the details with the time and size of the backup.
Once you’ve turned on the iCloud backup indicated in step 3 above, iCloud can automatically back up your device daily. This daily automatic backup is possible if the below conditions are successful where the device is:
- Connected to a WiFi network
- Locked, i.e., no activity is performed.
- Connected to a power source
Restrictions of data transfer from another kind of device
There may be a situation in which you have taken a backup of your iPhone device and are trying to restore the backup on an iPad device. In such cases, there are restrictions on data from the backup device.
Below is a list of data that won’t be transferred:
- Messages and attachments in messages
- Photos
- Voice memos
- Incompatible apps (For, e.g. iPhone based apps won’t transfer to your iPad)
You can update the device to iOS 8 wirelessly or using iTunes.
1. Update your device wirelessly
You can update the device to iOS 8 using a much simple approach wirelessly. This is also referred to as updating “over the air”. Below are steps to achieve this:
i. Connect your device to a power source. This is an optional method but recommended one since your device may run out of battery while updating, thus landing you in great trouble.
ii. Select Settings -> General -> Software Update (shown in screenshot 6). If you want to know more about features available in iOS 8, then click Learn more. This will push a new view containing a detailed description of iOS 8 features (shown in screenshot 7).


iii. Click on Download and Install. Updates for iOS 8 will be downloaded automatically while your device is connected to WiFi and a power source.
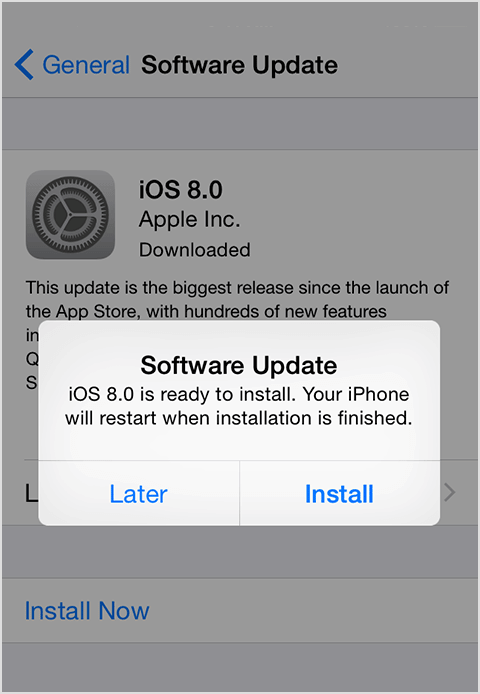
iv. This will pop up an alert for Software Update. Click on Install to install ioS 8 immediately or Later to do it after some time (shown in screenshot 8). If your device is passcode protected, you’ll be prompted to enter it before installing.
Before installation, note that you have sufficient free disk space available. If disk space required for installation is unavailable, you can either update your device using iTunes or manually remove some content from the device.
2. Update your device using iTunes
Another alternative to updating your device is to use iTunes. Below are the steps:
i. Before updating, ensure that iTunes on your computer is the latest version.
ii. Connect your device to the computer using a data cable.
iii. Open iTunes and select your device.
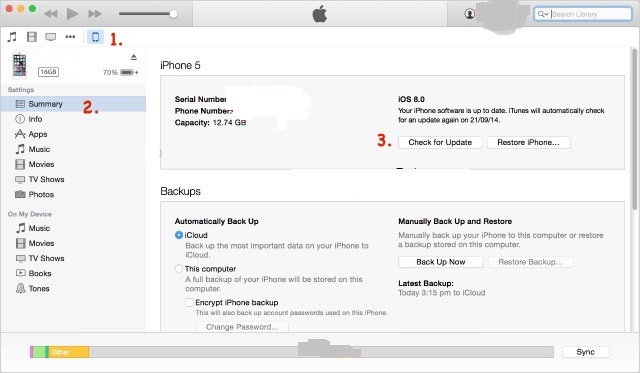
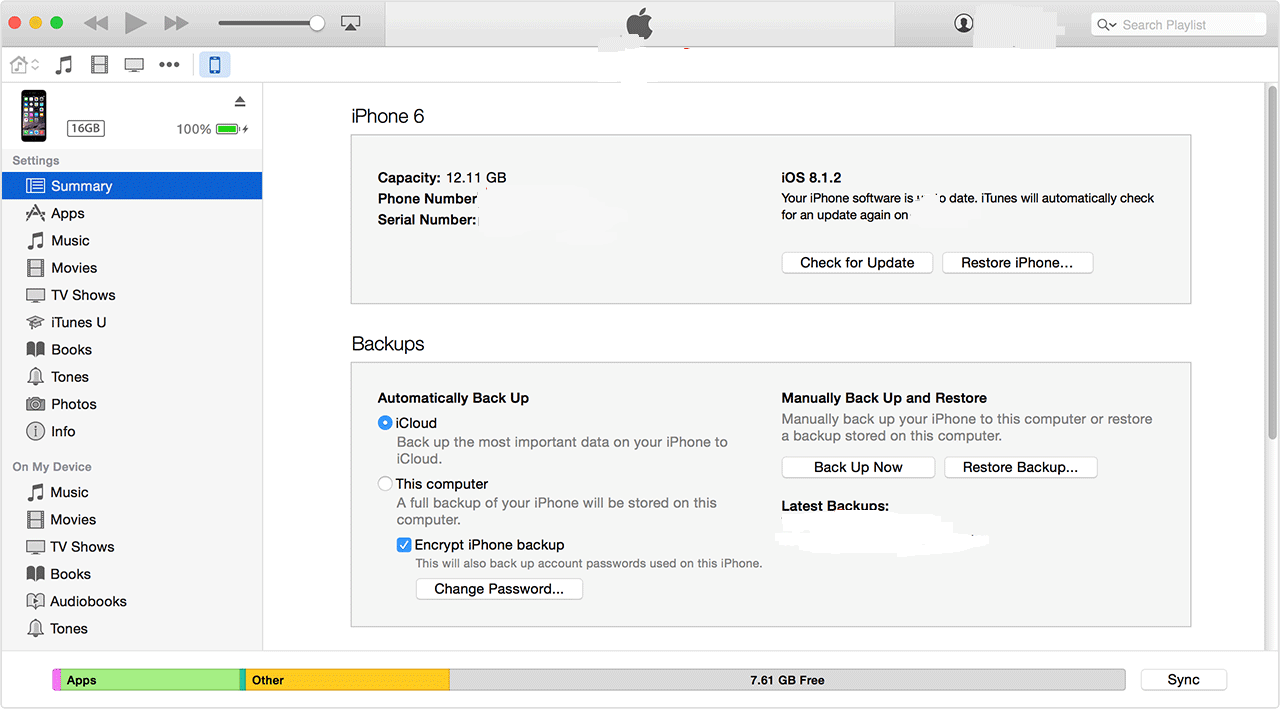
iv. Open the Summary tab. Select Check for Update (shown in screenshot 9).
v. Click on Download and Update
If you are with insufficient disk space available, you must manually delete content from the device from your device.