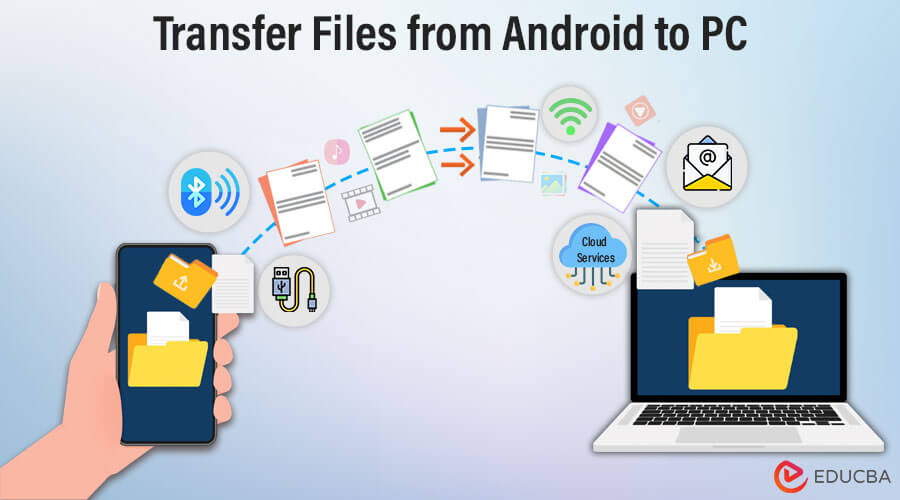
Introduction
Transferring files from Android device to a PC is essential for various reasons, including backing up important data, freeing up storage space on your device, and ensuring smooth workflow continuity. It allows users to safeguard photos, videos, documents, and other crucial files from potential loss. Typical scenarios for transferring files include moving large video files for editing, saving pictures to a more secure location, sharing documents for work or study, and transferring music or media files to enjoy on different devices. Understanding the various methods for file transfer can enhance productivity and ensure data safety.
Understanding the Basics of File Sharing
When working with an Android device for the first time, understanding the key steps involved in file sharing can significantly improve your experience. Basic Android tips for beginners, such as adjusting USB preferences or selecting the file transfer option from the notification panel, enable a smooth connection between the phone and the computer. This streamlined setup simplifies data movement. It also supports better storage management. Users can complete tasks more quickly and with fewer delays.
Table of Contents
Methods for Transferring Files
USB Cable

Requirements
- USB Cable: A suitable USB cable, typically a USB-A to USB-C or USB-A to Micro-USB, depending on the Android device model.
- Compatible Ports on PC and Android: Ensure that both the PC and the Android device have compatible USB ports. Most modern PCs come with USB-A ports, while newer Android devices typically use USB-C. Adapters may be necessary for older devices or ports.
Steps –
- Connecting Devices:
- Connect one end of the USB cable to the Android device.
- Connect the other end of the USB cable to the PC.
- Enabling File Transfer Mode on Android:
- Once connected, You’ll see a notification on your screen.
- Tap the notification that says, “Charging this device via USB.”
- Select “MTP” (Media Transfer Protocol) or “File Transfer” from the list of options.
- Accessing Files on PC:
- On your PC, open “File Explorer” (Windows) or “Finder” (Mac).
- Locate the Android device under “This PC” (Windows) or as a drive in “Finder” (Mac).
- Click on the device to open and view the internal storage or SD card.
- Navigate through the folders to find the files you wish to transfer.
- Drag and drop files from the Android device to the desired location on your PC.
Bluetooth
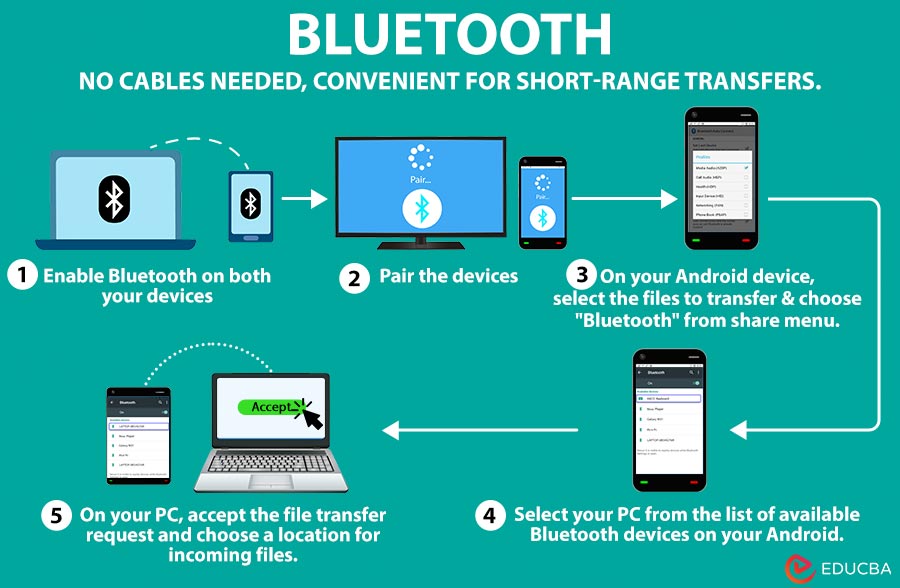
Requirements
- Bluetooth-Enabled PC and Android Device: Ensure your PC and Android device have Bluetooth capability. Most modern devices have built-in Bluetooth, but you may need to enable it in settings.
Steps –
Pairing Devices:
- Enable Bluetooth on Android:
- Go to “Settings” on your Android device.
- Tap on “Connected devices” or “Bluetooth” (depending on your device model).
- Toggle the Bluetooth switch to “On.”
- Enable Bluetooth on PC:
- On a Windows PC, go to “Settings” > “Devices” > “Bluetooth & other devices.”
- Toggle the Bluetooth switch to “On.”
- On a Mac, go to “System Preferences” > “Bluetooth” and turn it on.
- Pair the Devices:
- On your PC, click “Add Bluetooth or other device” (Windows) or click the “+” button (Mac).
- Select “Bluetooth” and await for your PC to detect your Android device.
- Ensure your Android device is discoverable (usually done by staying on the Bluetooth settings screen).
- Once your PC detects the Android device, select it from the list.
- Confirm the pairing request on both devices by ensuring the pairing code matches.
Sending Files via Bluetooth:
- On Android Device:
- Open the “Files” or “Gallery” app.
- Choose the file or files you want to transfer.
- Tap the “Share” button.
- Choose “Bluetooth” from the sharing options.
- Select your paired PC from the list of available devices.
- On PC:
- When prompted, accept the file transfer request.
- Select the location on your PC where you want to save the incoming files.
- The transfer process will begin, and you’ll see a progress indicator.
Wi-Fi Transfer
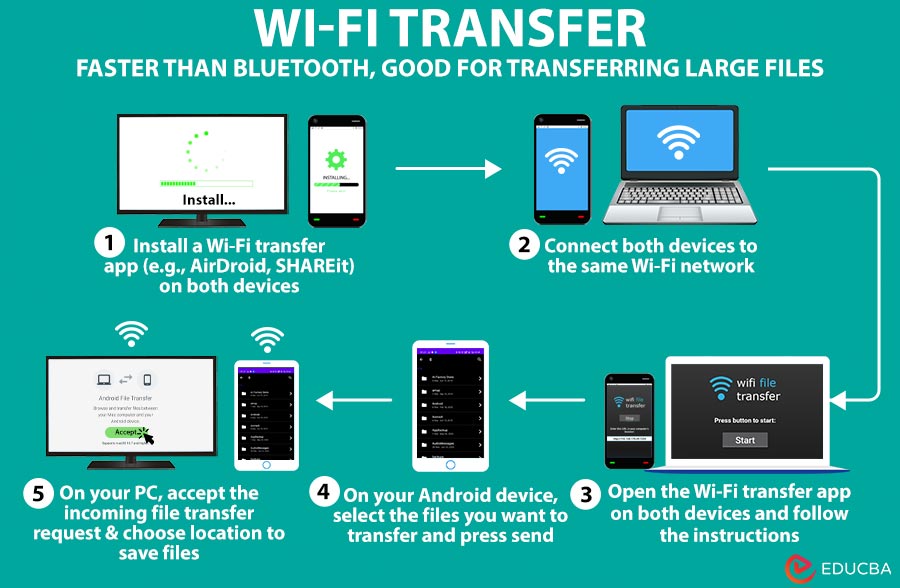
Using Third-Party Apps
Examples of Apps:
- AirDroid: A comprehensive app that allows file transfers, screen mirroring, and remote control features.
- SHAREit: A fast and popular app designed to transfer files across devices.
- Send Anywhere: Known for its ease of use and ability to transfer files without altering their original quality.
Steps –
Installing the App on Both Devices:
- On Android Device:
- Open the Google Play Store.
- Search for and install the chosen app (e.g., AirDroid, SHAREit, Send Anywhere).
- On PC:
- Visit the selected app’s official website.
- Download and install the app’s desktop version (some apps may offer a web version accessible via browser).
Connecting Devices to the Same Wi-Fi Network:
Ensure your Android device and PC are on the same Wi-Fi network. This is crucial for the transfer process to work efficiently.
Transferring Files through the App Interface:
- Launch the App:
- Open the installed app on both your Android device and PC.
- Set Up Connection:
- Follow the on-screen instructions to link the Android device and PC. This may involve scanning a QR code displayed on the PC screen with the Android app or entering a connection code.
- Select Files to Transfer:
- On your Android device, navigate to the section of the app that allows file selection (e.g., “Files,” “Photos,” “Videos”).
- Select the files you wish to transfer.
- Initiate the Transfer:
- Tap the “Send” button or equivalent in the app interface.
- Select your PC from the available devices list within the app.
- Receive Files on PC:
- Accept the incoming file transfer request on your PC if prompted.
- The app will begin transferring the files, you can monitor the progress within the app.
- Once completed, access the received files through the app’s designated download location on your PC.
Cloud Services
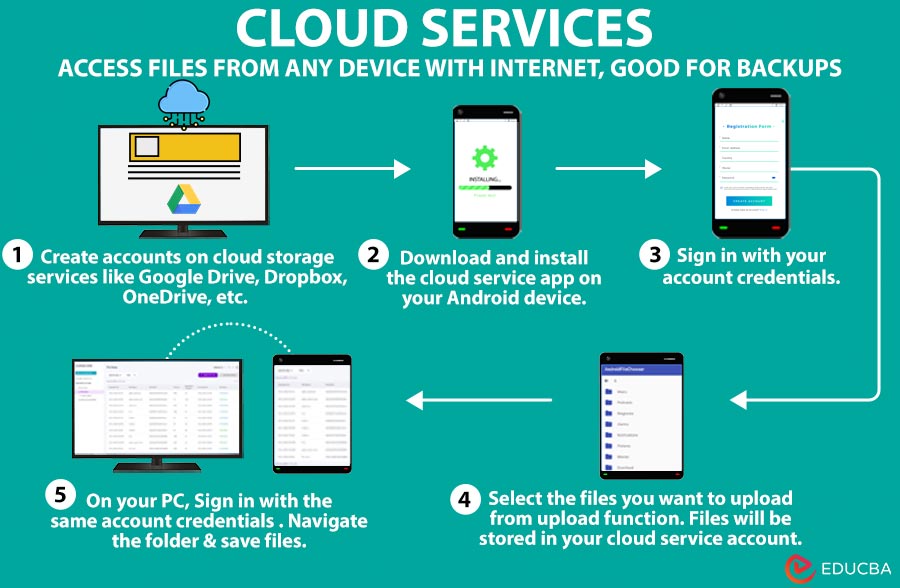
Cloud Service Accounts:
- Create accounts on cloud services like Google Drive, Dropbox, OneDrive, and others.
- Make sure that both your Android device and PC have internet access.
Steps –
Uploading Files to the Cloud from Android:
- Install Cloud Service App:
- Open the Google Play Store.
- Search for and install the cloud service app (e.g., Google Drive, Dropbox, OneDrive).
- Sign In:
- Open the app and sign in with your cloud service account credentials.
- Upload Files:
- Open the app and navigate to the section where you can upload files (often represented by a “+” or “Upload” button).
- Select the files you want to upload from your Android device’s storage.
- Confirm the upload, and the files will be stored in the cloud service.
Accessing and Downloading Files from the Cloud on PC:
- Access Cloud Service:
- Open your web browser on your PC.
- Go to the website of your chosen cloud service (e.g., drive.google.com, dropbox.com, onedrive.com).
- Alternatively, if available, you can install the desktop app for the cloud service.
- Sign In:
- Sign in with same account used on your Android device.
- Locate Files:
- Navigate to the folder where you uploaded the files.
- Download Files:
- Select the files you want to download
- /save to your computer and click “download”.
Additional Considerations
File Size Limitations:
Different cloud services have varying file size limits and storage capacities.
- Google Drive: 15 GB free storage, individual file size limit is 5 TB.
- Dropbox: 2 GB free storage, individual file size limit is 50 GB for Pro users.
- OneDrive: 5 GB free storage, individual file size limit is 250 GB.
Security and Encryption Options:
Cloud services offer different levels of security and encryption to protect your files.
- Google Drive employs AES 256-bit encryption for data at rest and AES 128-bit encryption for files in transit.
- Dropbox employs AES 256-bit encryption for data at rest
- and SSL/TLS for data in transit.
- OneDrive employs AES 256-bit encryption for data at rest and SSL/TLS for data in transit.
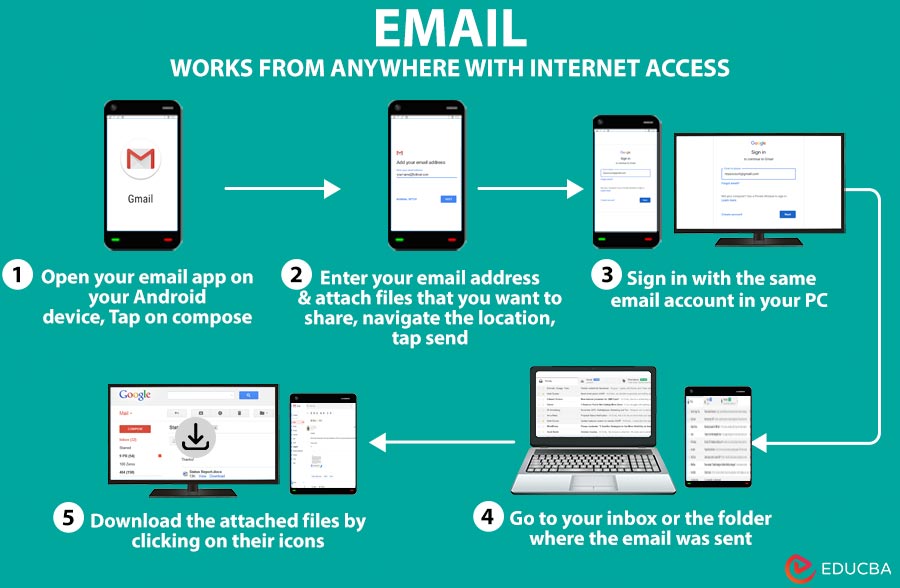
Requirements
Email Account on Android and PC:
- Ensure you have a functioning email account (e.g., Gmail, Outlook, Yahoo) set up on your Android device and PC.
- Both devices must have an internet connection.
Steps –
Attaching Files to an Email on Android:
- Open Email-App:
- Open email application on your Android device (e.g., Gmail, Outlook).
- Compose New Email:
- Tap the “Compose” button, usually represented by a pencil icon or a plus sign.
- Add Recipient:
- Enter your email address in the “To” field.
- Attach Files:
- Tap the “Attach” icon (usually a paperclip) within the compose email window.
- Choose the type of file you want to attach (e.g., images, documents, audio files).
- Navigate to the location of the file on your device and select it.
- Send Email:
- Add a subject and any message content if necessary.
- Tap on “Send” to send the email with the attached files.
Sending and Accessing Email on PC:
- Open Email Client or Webmail:
- Open your email client (e.g., Outlook) or webmail service (e.g., Gmail via web browser) on your PC.
- Sign In:
- Sign in with the same email account used on your Android device if you have not already signed in.
- Locate the Email:
- Go to your inbox or the folder where the email was sent (e.g., the “Sent” folder if you sent it to yourself).
- Download Attachments:
- Open the email containing the attached files.
- Click on the attachment icons to download them to your PC.
- Choose any location to save the downloaded files on your PC.
Troubleshooting Tips
Common Issues and Solutions
Ensuring Devices Are Properly Connected:
- Check Physical Connections: Please ensure you securely connect the Android device and the PC via the USB cable.
- Switch Ports/Cables: Try using a different USB cable/different USB port to rule out faulty hardware.
Checking for Necessary Drivers and Permissions:
- Install Necessary Drivers: You should install the appropriate drivers for your Android on your PC. You can usually download these from the device manufacturer’s website.
- Enable File Transfer Mode: Make sure to set your Android device to “File Transfer” or “MTP” mode, not just “Charging.”
Windows Computer
- Check Settings to Ensure Windows Detects New Hardware:
- Open “Device Manager” (Right-clicking the Start button.)
- Look for your Android device under “Portable Devices” or “Other Devices.” If there is a yellow exclamation mark, there might be an issue with the driver.
- Restart Your Computer:
- Sometimes, a restart can resolve connection issues. Restart the PC and reconnect your device.
- Update Your Android Version:
- Ensure your Android device is on the latest software. Go to “Settings” > “System” > “Software update” to check for updates.
Mac Computer
- Verify OS X Version and Ensure Android File Transfer is Installed:
- Ensure your Mac is running macOS 10.7 or later.
- Download and install the File Transfer app from android.com/filetransfer
- Restart Your Mac:
- Restarting your Mac can often resolve connection issues. After restarting, reconnect your Android device and open Android File Transfer.
- Update Your Android Version:
- Make sure your Android device is up to date. Go to “Settings” > “System” > “Software update” to check for updates.
USB Connections
- Try a Different USB Cable:
- Not all USB cables support data transfer. Ensure you are using a cable that supports this feature. Try a different cable if you experience issues.
- Test USB Ports on Both Your Device and Computer:
- Plug the USB cable into different ports on your PC to rule out port-specific issues.
- Ensure the USB port on your Android device is not damaged or obstructed.
Conclusion
Transferring files from Android to a PC is essential for data management, backup, and efficient workflow. Various methods, including USB cable, Bluetooth, Wi-Fi transfer via third-party apps, cloud services, and email, offer flexibility to suit different needs and scenarios. Understanding each method’s requirements and steps ensures smooth and effective file transfers.
Frequently Asked Questions (FAQs)
Q1. Which method is the fastest for transferring files from Android to PC?
Answer: Wi-Fi transfer via third-party apps, such as AirDroid or SHAREit, is often the fastest method for transferring files wirelessly. However, the transfer speed depends on Wi-Fi network strength and file size.
Q2. Are there any file size limits when transferring files via email?
Answer: Yes, most email services impose file size limits for attachments, i.e., 25 MB per email. If your file exceeds this limit, Google will send it as a Google Drive link.
Q3. Can I transfer files between without an internet connection?
Answer: Yes, USB cable and Bluetooth allows you to transfer files between PC and Android without an internet connection. However, Wi-Fi transfer via third-party apps and cloud services requires an active Internet connection.
Q4. Can I transfer large files via Bluetooth?
Answer: Technically, yes, but Bluetooth is slower than other methods. It’s better suited for smaller files like photos or documents.
