Updated June 30, 2023
Definition of Tkinter Slider
Tkinter is a module that is used to create the GUI in Python. We have many different modules available in Python, by this is the most frequent and easy to use. A slider is available inside this Tkinter module. By the use of it, we can set a value. We can implement the slider vertically or horizontally, depending on requirements.
Syntax:
In Python Tkinter, we can use the scale method to create a slider in Python. By the use of it, we can create it either vertically or horizontally. We will see its syntax to understand better how to use it. See below;
Scale(root, bg, fg, bd, command, orient, from_, to, ..)As you can see here, it takes a lot of variables as parameters. Using it, we can assign the orientation of the slide bar, color, starting and ending value for the slider, and so on.
We can also see one practice syntax example to understand it better. See below;
Scale( parent, variable = v1, from_ = 10, to = 20, orient = VERTICLE)This syntax gives an idea of how to use this in our program.
How does Slider Work in Tkinter?
A slider can be of two types horizontal or vertical. The use of the scale method can implement a slider in Tkinter. We assign a specific value range by using two available parameters.
- Horizontal: If we create a horizontal slider, the value can be selected by moving the indicator from left to right or vice-versa, like normal horizontal looks.
- Vertical: When creating a vertical slider, the user can select the value by moving the indicator from top to bottom or vice versa, resembling a typical vertical appearance.
In the scale method, what it does internally is it will create a graphical object for us, and this graphical object is nothing but an indicator or a knob, we can say. By using this object, we can move the indicator left, right, top, and bottom depending on the orientation of the slider. We can choose the orientation while calling this scaling method. This method also takes the parent object as Tkinter, which is responsible for creating a window for us for GUI. Now we see one practice example to use this slider in our GUI application which will be helpful for beginners also to understand how to proceed with its use. See below;
Example
from Tkinter import *
parent = Tk()
sli = Scale(parent, from_=10, to=20, orient=HORIZONTAL)
sli.pack()
mainloop()
In the above example, we are creating one slider here. In order to use this, we need to import the Tkinter module into our program because the scale is an object available inside this module only. To import this, we are using the import statement here as fromTkinter import *. After this, we are creating the Tkinter object to assign its method and object to create the GUI. In the end, we are calling the mainloop method to initialize the window; before this, we are also calling the pack method, which will be specified the position got the graphical object on the screen.
Constructor
This Scala takes a lot of parameters while calling it. We can assign even color to our slider by proving value to its one of the parameters in the constructor. We will discuss all the parameters in detail. See below for its syntax;
Scale(parent, bg, fg, bd, command, orient, from_, to, ..)- Orient: This parameter is used to assign the orientation for the slider. It can be either of two horizontal or vertical.
- root: It is nothing but the object of Tkinter, which will act as a parent.
- label: This parameter is used to assign a label for this widget.
- state: This parameter is responsible for making our slider unresponsive or responsive.
- from: This parameter decides the starting value for the slider.
- to: This parameter decides the ending value for the slider.
- bg: By using this parameter, we can assign a background color for our widget.
- bd: By using this parameter, we can create a border.
- fg: By using this parameter, we can assign foreground color for our widget.
- sliderlength: This parameter decides the length of our slider.
- tickinterval: By using this parameter, we can assign the interval value for our slider.
Methods
The Scala method provides us with two different methods to access the slider’s value.
- set(value): This method is used to set a value for the slider. If you want to give any default value for your slider, then we can use this method.
- get: As the name suggests, this method is used to get the value from the slider. If we have assigned any value to the slider, we somehow need it for future operation. So by the use of this method, we can assess the value.
Examples of Tkinter Slider
Following are the examples are given below:
Example #1
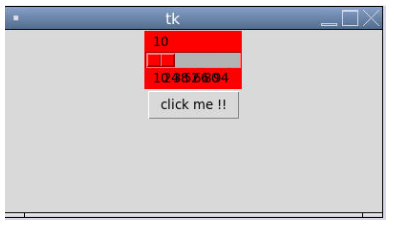
In this example, we are creating a horizontal slider with red color using the scale method in Tkinter.
Code:
from tkinter import *
defshowval(): print (sli1.get())
parent = Tk()
parent.geometry("500x500")
sli1 = Scale(parent, from_=10, to=100, tickinterval=10, orient=HORIZONTAL, bg = "RED")
sli1.place(relx=0.15,rely=0.06,relwidth=10)
sli1.pack()
Button(parent, text='click me !!', command=showval).pack()
mainloop()
Output:
Example #2
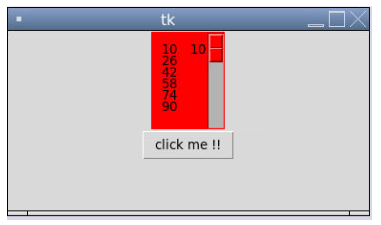
In this example, we are creating a vertical slider with red color using the scale method in Tkinter.
Code:
from tkinter import *
defshowval(): print (sli1.get())
parent = Tk()
parent.geometry("500x500")
sli1 = Scale(parent, from_=10, to=100, tickinterval=10, orient=VERTICAL, bg = "RED")
sli1.place(relx=0.15,rely=0.06,relwidth=10)
sli1.pack()
Button(parent, text='click me !!', command=showval).pack()
mainloop()
Output:
Conclusion
Using this scale method, we can implement a slider in Python. The Tkinter module allows us to place many widgets in the window for users to perform different operations. A slider can be horizontal or vertical with an interval that can be possible in value. Also, color can also be allowed.
Recommended Articles
This is a guide to Tkinter Slider. Here we also discuss the definition and How does Slider Work in Tkinter? along with different examples and code implementation. You may also have a look at the following articles to learn more –
