Updated April 3, 2023
Introduction to Tkinter Menubutton
The following article provides an outline of Tkinter Menubutton. In python, the Tkinter menu button is defined as a menu button that always is a part of a drop-down menu on the screen which stays all the time, and the menu button is associated with a menu widget that provides different options to select from the application when the user clicks on the menu. It is used to create different types of menu’s in applications based on the requirement. It provides options to the user to select from the menu with all the options available in the application is called the Tkinter menu button. A menu button is generally used to create top-level menus in the application.
Syntax of Menu Button with Options
Following are the syntax and menu button with options:
Syntax:
w = tk.menu button(parent, option, ...)
Where the parent is the root window or parent window.
Where the option is a list of commonly used options in the menu widget, which can be used as key-value pairs.
List of Options:
- activebackground: This option gives the background color when the user places the mouse over the menu button.
- activeforeground: This option gives the foreground color when a user places the mouse over the menu button.
- anchor: This option sets the position of the text in the application based on the options set by the user by default, it will be in the center(anchor = tk.CENTER), and by using(anchor =tk.W) will place the text-centered against the left side.
- Background or bg: This option gives the original background when the mouse is not over the user’s menu button.
- Cursor: This option gives the cursor when we place the mouse on the menu button.
- compound: This option will specify where the images should appear relative to the text with different positions as TOP, LEFT, RIGHT, BOTTOM, CENTER, and NONE (in this case, the text won’t display only graphics will).
- Direction: This option will set the menu’s position or direction where it needs to display on the screen. We have three options LEFT, RIGHT, and above of menu button.
- Disabledforeground: This option will show the foreground color on the menu button when it is disabled.
- Forground or fg: This option will show the original foreground color when the mouse is not over the menu button.
- Font: This option specifies the type of font used to display the text on the screen.
- height: This option defines the height of the menu button inline with text, not pixels; by default, it will fit its content.
- Highlightbackground: This option highlights the background color, which is in focus when the cursor is not active.
- Highlightcolor: These options show the color which is in focus when the menu button widget has focus.
- Highlightthickness: This option highlights the focus thickness.
- Image: This option displays images when image objects set with this.
- Justify: This option controls the text to display when it is not in the menu button.
- Menu: This option will associate with the menu button to provide different choices by setting this option to the menu object.
- Padx: This option tells the space that needs to leave towards the menu button’s left and right.
- Pady: This option tells the space you need to leave above and below the menu button.
- Relief: This option enables 3d-effects to the menu button.
- State: This option provides an option to disable the menu button or unresponsive.
- Takefocus: This option enables to add focus using a keyboard by setting take focus=True.
- Text: This option will tell the menu button to display the text string.
- Textvariable: This option enables us to associate a string variable to the menu button.
- Underline: This option enables to underline any of the characters’ text on the menu button.
- Width: This option enables us to set the width of the menu button based on characters; by default, it will fit its contents.
- Wraplength: This option enables to wrap lines by setting this option to a number of characters; all lines will be broken into the pieces exactly as the number.
Examples of Tkinter Menubutton
Given below are the examples metioned:
Example #1
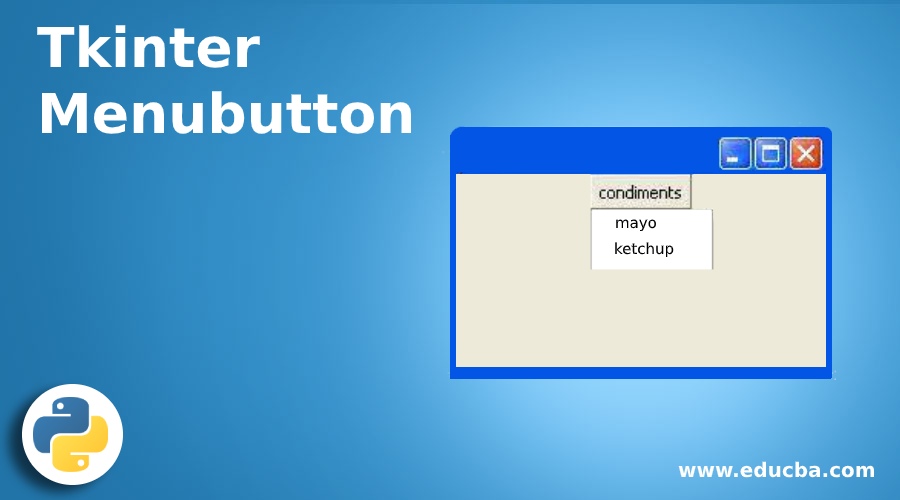
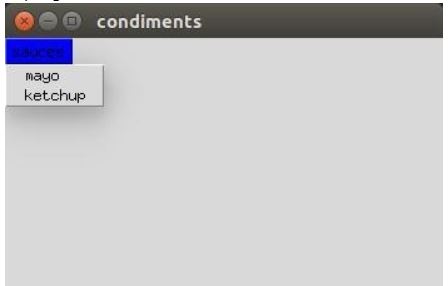
An example of different types of sauces and select one sauce from the available list.
Code:
import tkinter
from tkinter import *
window = tkinter.Tk()
window.title("condiments")
window.geometry('350x200')
menub = menubutton(window, text='sauces', activebackground=’blue’)
menub.grid()
menub.menu = Menu(menub, tearoff=0)
menub["menu"] = menub.menu
mayo_sauce = IntVar()
ketchup = IntVar()
menub.menu.add_checkbutton(label='mayo', variable=mayo_sauce)
menub.menu.add_checkbutton(label='ketchup', variable=ketchup)
window.mainloop()
In the above program example, we have created a parent display named window with the title “condiments” with height and width of 350×200 respectively and created a menu button associated with parent window with text ‘sauces’ and option activebackground as ‘blue’ along with the menu which will show the list of choices available. We have created two choices, mayo_sauce and ketchup and added them to the menu as a list of choices and calling the mainloop() function.
Output:
Example #2
A program to display a menu with a list of speed options as choices and select one option as speed.
Code:
from tkinter import *
import tkinter
j = 1
speed = ['10', '20', '30', '40']
top = tkinter.Tk()
top.title('speed options')
top.geometry('200x100')
top.menubutton_1 = menubutton(top, text='speed', relief='raised')
top.menubutton_1.menu = Menu(top.menubutton_1)
top.menubutton_1.pack()
top.user_choice = IntVar()
top.file_menu = Menu(top.menubutton_1,tearoff=0)
for i in speed:
S = top.file_menu.add_radiobutton(label=i, variable=top.user_choice, value=i)
j += 1
top.menubutton_1.config(menu=top.file_menu)
top.mainloop()
In the above example, we have created a list with the list of speed options and created a parent window called top using Tk() with the title ‘speed options’ and with a height and width of 200×100. We created a menu button with text as speed and with options as a relief with raised as value and called pack() functions and created a user_choice variable and added all speed options from the list using add_radiobutton() function and finally calling the mainloop() function.
Output:

Conclusion
Finally, it is all about the Tkinter menu button. So far, we have seen the menu button’s definition, its syntax, the options with a brief explanation of each and every option, and explained different examples of the menu button with its usage and how to use it to create a menu with a list of choices.
Recommended Articles
This is a guide to Tkinter Menubutton. Here we discuss the introduction of Tkinter Menubutton along with sample code for better understanding. You may also have a look at the following articles to learn more –
