Updated May 31, 2023
Definition of Tkinter OptionMenu
As the name suggests here, OptionMenu represents some options available to the user. We can implement this OptionMenu in our application where we have some fixed type of options that need to be displayed and out of which we can select one. This is similar to the drop-down functionality available in many languages. Here Tkinter is used to create GUI in Python, and it is the most commonly used library we have. By the use of it, we can create a GUI very quickly and very fast.
Syntax
To use OptionMenu, we first need to import the Tkinter package into our program, and we can do this by following some steps mentioned below.
1) First: First, we will import the Tkinter package into our program because we need to pass its object while calling the OPtionMenu construct, so it is necessary for creating the main window.
e.g. :
from Tkinter import *2) Calling constructor: Here, we are preparing our Option menu to represent some options to the user.
e.g. :
OptionMenu(parent, var, ch1, ch2, ch3, ...)This is the basic syntax to create an options menu in Python using Tkinter. We will see some practice examples in the coming section in more detail.
How OptionMenu Works in Tkinter?
As of now, we know that OptionMenu represents options values. This is very important when it comes to selecting from the available values. Also, it represents only one value at a time. This OptionMenu is called a drop-down list, select option, and many more in other languages. They are also helpful when we want to perform some specific operation one select of value from OptionMenu, or we may require to hide or show some fields or values to the user. We can also trigger some events when we select values from the OptionMenu. This is part of Tkinter, so to use this widget in our GUI, we need to have the Tkinter module present in our application or program. This OptionMenu makes our application very much interactive with the user, and also, they are very easy and fast to implement by using the OptionMenu.
Now we will someone a practice example to understand how to create OptionMenu in Python. Below is one example for beginners to start with;
e.g. :
from Tkinter import *
parent = Tk()
varList = StringVar(parent)
varList.set("Red")
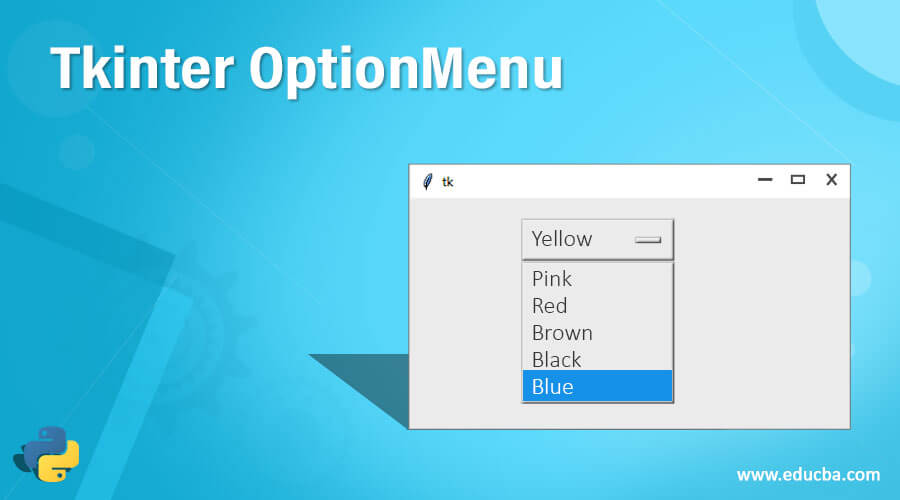
om = OptionMenu(parent, varList, "Yellow", "Pink", "RED", "Brown", "Black", "Blue")
om.pack()1) In the above example, we create one OptionMenu with some values. To create the OptionMenu, we first imported the Tkinter module into our program. After this, we are creating an object for Tkinter; this is important because it will create a window for us inside to have our menus and other stuff available. So this will be the master or the parent window here.
2) After this, we set an initial value for our OptionMenu; it will be that value when the user selects none of the matters, and this is going to show in the OptionMenu as the default value, we can say. But to do so, this value should be present in the list as well when we pass them into the constructor.
3) After this, we call the OptionMenu constructor, which takes a different parameter as the input. So this step will complete our creation for OptionMenu. We will pass all the parameters inside this constructor, i.e., parent our Tkinter object, varList our options list, and choices for the user to select for them.
It also provides us with some methods to get the selected value from the OptionMenu we will discuss in a later section in detail.
Constructor
As we have already seen, its constructor that it takes a number of parameters as the input. Which represent different inputs that it brings. This will contain the object, list, and choices for optionMenu. We will discuss each parameter in detail, what they take, and how they behave. See below;
This is the constructor definition which takes three parameters in the main, which are as follows;
OptionMenu(parent, var, ch1, ch2, ch3, ...)1) parent: This will be the Tkinter object which will be responsible for creating the window for the GUI where we will create and how our menu, OptionMenu, and many more widgets. So it takes the parent object or master object.
2) var: This variable shows the default value of the OptionMenu. We can set the default value here from the OptionMenu. So this will show to the user as the default value without selecting any value.
3) choice1: This is the list of the variable, or we can say a list of the OptionMenu. We can specify any number of choices here, which will be shown in the OptionMenu as the list of variables.
Methods
1) get(): This method of OptionMenu is used to get the value from the OptionMenu, which is selected at the current. It will give us the value from OptionMenu.
2) mainLoop(): This method is used when our application on GUI is ready to run. We can call it at the end when it is ready to run.
3) place (): This method is used to place all the widgets into the specified position in the window.
4) pack(): This method will arrange the OptionMenu into the specified position and then arrange them into the master or parent window.
Example of Tkinter OptionMenu
In this example, we are creating OptionMenu.
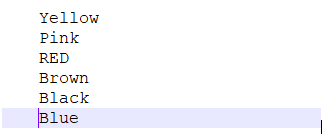
from Tkinter import *
parent = Tk()
varList = StringVar(parent)
varList.set("Red")
om = OptionMenu(parent, varList, "Yellow", "Pink", "RED", "Brown", "Black", "Blue")
om.pack()
Output:
Conclusion
We can give any number of variables as the list. This is part of the Tkinter module. we can use different widgets to make it interactive for the user also, we can perform many events to trigger delete, save, and many more operations.
Recommended Articles
This is a guide to Tkinter OptionMenu. Here we discuss the definition and working of Tkinter OptionMenu along with examples and code implementation. You may also have a look at the following articles to learn more –
