Introduction to Tkinter place
Tkinter is used to create GUI in python, and it is the most commonly used library we have. By the use of it, we can create a GUI very easily and very fast. As the name suggests, it is used to specified someplace for the GUI component. Tkinter has many layout manager places is one of them. By the use of place, we can assign the size or position of the window. It is a geometry manager position widget we have in the Tkinter module.
Syntax
To make use of the place, we first need to import the Tkinter package into our program. We can use this to place buttons, labels, and many other GUI stuff to place them properly into the window. Now we will see the syntax to use this in our program;
Example:
place(relx = val, rely = val, anchor = VAL)In order to use this, we need to pass three parameters inside it. Which are named as relax, rely and anchor to place our widgets on the screen. We can call this method on any widgets we have available in the Tkinter module to develop our GUI for users. Let’s see one practice syntax to understand it better see below;
button1.place(relx =1, rely =1, anchor = N)Here we call this method on the button widget and place the variables here 1,1, and N to relax, rely, and anchor, respectively.
How does the place method work in Tkinter?
As of now, we know that we use a place to place our widgets on the window. Which can be relative or absolute position on the window. We have three different layouts available in Tkinter are named as place, pack, and grid. These all three are based on different positioning. The place is based on absolute positioning; we will discuss absolute positioning in details see below;
Absolute positioning: This can be termed as fixed positioning, not relative. Suppose we have some different sizes of our window that encapsulate all our widgets in the right position in the past. But suppose we want to resize our window in the future, so the widgets will not be moving from their position irrespective of the window size. Also, the size of every widget will be in pixels. This means the look and feel of the application will be different from one platform to another one, as we see in many web applications where it looks different on chrome, firefox, and other browsers. The same is the case is here the GUI will be different on Mac, Linux, and windows, and many more. By using this, we can place our widgets on the window like labels, buttons, text, etc. Now we will see one example of how to use this and how it internally works to place the widgets on the window. We will see one simple example that will be under stable by the beginners as well see below;
Example:
from tkinter import *
parent = Tk()
parent.geometry("150x150")
button1 = Button(parent, text = "Hi I am button! Click me to start!!")
button1.place(relx = 1, relay =1, anchor = N)
mainloop()
In the above code lines, we create one GUI for users and display them one button. The first thing to get started with the place is to import the Tkinter module into the program to use all its methods and widgets properly; it will help us to create the GUI very faster and in the easy way possible. After the import has been done, we are creating one window here by using the Tkinter object and assign a size for the window, which is here as 150pixels. After that, we are creating one button by using the Button widgets available and passing parameters inside it. The one parameter that it takes is the parent object, i.e., Tkinter here. After that, we are assigning text to the button that will be displayed on the button. Also, we can call or trigger some events by clicking the button that is called events. Immediately after this, we call the place method here to give the position to this button on the window by initializing all the variables. In the end, we have called mainloop() to initialize the window.
Constructor
As we have already seen, this takes different parameters like height, anchor, relx, rely, and so on. We will discuss these parameters more in detail see below;
Here is the syntax for its constructor see below;
place(relx = val, rely = val, anchor = VAL)- height: By using this parameter, we can specify the height in pixels.
- width: By using this parameter, we can specify the width in pixels.
- anchor: By using this parameter, we can specify the original position of the GUI component, or we can say widget on the window. It comes up with so many different options for positioning the widget like S, W, E, N, SW, WE, EN. This position will indicate the corners, and it also has one default position that is NW.
- relax: This parameter represents the horizontal offset between 0.0. to 1.0.
- relay: This parameter represents the vertical offset between 0.0. to 1.0.
- Y: This is the vertical offset that comes in pixels.
- X: This is the horizontal offset that comes in pixels.
Methods
We have some of the method available which can be used with the place which is as follows see below;
- pack (): This method is used to format or positioning our GUI widgets in vertical and horizontal boxes.
- grid (): As the name suggests, it can handle the list data and is defined as the method that manages to show the widgets in two-dimensional ways.
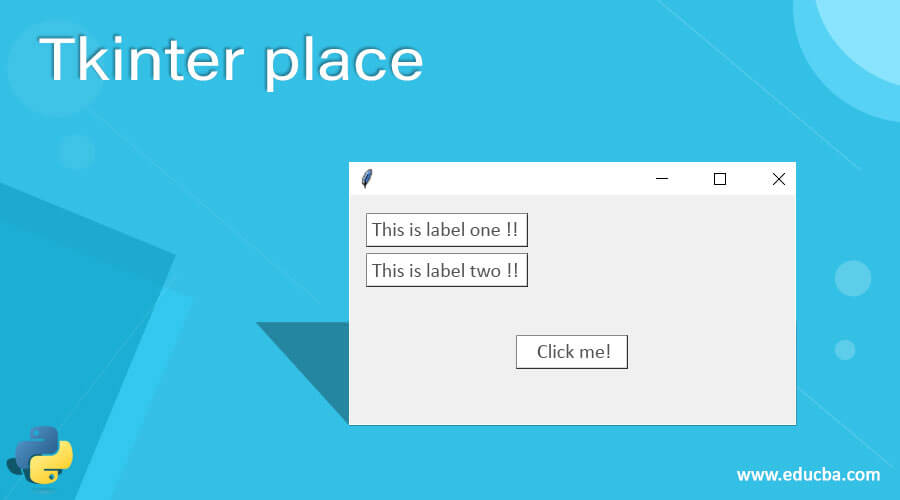
Example of Tkinter place
In this example, we are creating two labels one will show at the center one other one will show at the upper left corner of the window.
Example:
from tkinter import *
parent = Tk()
master.geometry("300x300")
#label one creating
l = Label(parent, text = "This is label one !!")
l.place(relx = 1, rely = 1, anchor = NW)
#label two creating
l = Label(parent, text = "This is label two !!")
l.place(relx = 1, rely = 1, anchor = CENTER)
mainloop()
Output :
Conclusion
By using this place method, we can place our widgets on the GUI window. Bypassing various parameters to its constructor, we can place them at right, left top, and bottom. Also, we can place them at the corner of the window as well. But to use this, we would require the Tkinter module to be imported into our application.
Recommended Articles
This is a guide to Tkinter place. Here we discuss How does the place method work in Tkinter along with the Constructor, Methods, and Example. You may also have a look at the following articles to learn more –
