Updated May 31, 2023
Introduction to Tkinter after
The Tkinter after() is one of the methods for the Tkinter package, and this method is used to calculate the time intervals for the functions in the application parallel. It calculates the time using milliseconds format whether the widget seems delayed since the Tkinter is a GUI-based library. If we have no particular values of the explicit statement, it goes to the default state behavior.
Syntax
The most powerful GUI-based widget has the most advanced library methods in Python. It has more global strategies; hence after(), one of the international methods can be used directly on the specific root functions of the widget or application. It has its own syntax and default parameters.
from tkinter import Tk //import the library in python
from tkinter.ttk import Button //import the library in python
variablename =functionName() //Tk library function
variablename.after(time(if it’s in delay status or not),callback)
--some python code logics---
In the above code, we used first to import the specific libraries, and we declared one variable name with the specific function. If it is in delay, then it will be executed at another time interval.
How does it Work?
Tkinter package has a set of built-in functions that have been used for covering the UI parts in the web application. It has the most interactive and advanced library. Basically, we want to decorate the UI has buttons, views, scroll box, etc most buttons will be the UI area to navigate the web pages or applications. Once we click the button, it operates and works the backend areas. We also calculate the time intervals in Chrome or some other browsers if it seems to be a web-based application. For example, we have not given delay times or callback argument values. The callback has taken the None value delay argument as a default called sleep() method of the Python code. Also, it has taken milliseconds as the time format instead of the seconds.
The after() method also calls all the widgets of the Python apps. It will be supported on multiple OS like Windows, Linux, etc. It is a standard library also; we can create desktop-based applications using Python Tkinter also; it’s not a complex task. We can use the Tkinter basic widgets like “Button,Canvas,Checkbutton,Frame,Label,Listbox,Menu,Message,Radiobutton,Text, etc” These widgets are mostly covered in the UI part, and these widget packages utilize the method called after() in all the widgets. Mostly time-related logic has been covered, and the multi-threading applications are also the most important part of this particular method in the library. It has separate modules, and it has its own interface.
Examples of Tkinter after
Lets us discuss the examples.
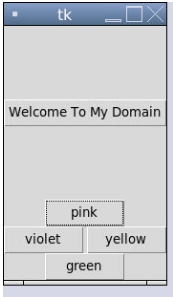
Example 1
from tkinter import *
from time import time
from tkinter.ttk import Button
demos= Tk()
b = Button(demos, text = 'Welcome To My Domain')
b.pack(pady = 77,side = TOP)
pink = Button(demos, text = "pink")
pink.pack( side = TOP)
green = Button(demos, text = "green")
green.pack( side = BOTTOM )
violet = Button(demos, text = "violet")
violet.pack( side = LEFT )
yellow = Button(demos, text = "yellow")
yellow.pack( side = RIGHT)
print('The Tk Widget is running on the screen...')
startingtime = time()
demos.after(200000, demos.destroy)
demos.mainloop()
endingtime = time()
print('The Tk Widget is closed after % d seconds' % (endingtime-startingtime))
Output:
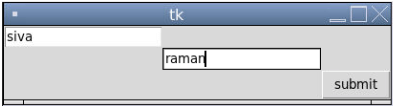
Example 2
from tkinter import *
user = Tk()
uname = Label(user,text = "uname").grid(row =0, column = 0)
un= Entry(user).grid(row = 0, column = 0)
passw = Label(user,text = "pass").grid(row = 1, column = 1)
ps = Entry(user).grid(row = 1, column = 1)
result = Button(user, text = "submit").grid(row = 3, column = 3)
user.mainloop()
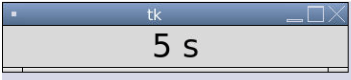
try:
import tkinter as tk
except ImportError:
import Tkinter as tk
class Timer:
def __init__(first, second):
first.seconds = 1
first.label = tk.Label(second, text="1s", font="Arial 25", width=17)
first.label.pack()
first.label.after(3000, first.demo)
def demo(first):
first.seconds += 1
first.label.configure(text="%i s" % first.seconds)
first.label.after(2000, first.demo)
if __name__ == "__main__":
demos = tk.Tk()
tme = Timer(demos)
demos.mainloop()
Output:
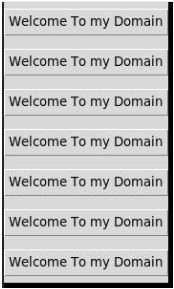
Example 3
from tkinter import Tk, mainloop, TOP
from tkinter.ttk import Button
from tkinter.messagebox import _show
sample = Tk()
btn = Button(sample, text = 'Welcome To my Domain')
btn.pack(side = TOP, pady = 7)
b2 = Button(sample, text = 'Welcome To my Domain')
b2.pack(side = TOP, pady = 7)
b3 = Button(sample, text = 'Welcome To my Domain')
b3.pack(side = TOP, pady = 7)
b4 = Button(sample, text = 'Welcome To my Domain')
b4.pack(side = TOP, pady = 7)
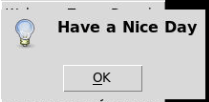
sample.after(3400, lambda : _show('user', 'Have a Nice Day'))
sample.after(5400, sample.destroy)
btn.pack(side = TOP, pady = 7)
b5 = Button(sample, text = 'Welcome To my Domain')
b5.pack(side = TOP, pady = 7)
b6 = Button(sample, text = 'Welcome To my Domain')
b6.pack(side = TOP, pady = 7)
b7 = Button(sample, text = 'Welcome To my Domain')
b7.pack(side = TOP, pady = 7)
mainloop()
b8 = Button(sample, text = 'Welcome To my Domain')
b8.pack(side = TOP, pady = 7)
b9 = Button(sample, text = 'Welcome To my Domain')
b9.pack(side = TOP, pady = 7)
b10 = Button(sample, text = 'Welcome To my Domain')
b10.pack(side = TOP, pady = 7)
mainloop()Output:
Conclusion
The after() method is a function available in the Tkinter library of Python that allows the creation of various GUI presentations. Tkinter is a popular library for building graphical user interfaces (GUIs) in Python. It provides a user-friendly approach to GUI development. Likewise, the Python library has default methods to create UI widgets in desktop and web-based applications.
Recommended Articles
This is a guide to Tkinter after. Here we discuss the Introduction and working along with different examples and code implementation. You may also have a look at the following articles to learn more –
