Updated June 15, 2023
Introduction to Tkinter Notebook
In Python, the Tkinter notebook widget from the ttk library provides a tabbed interface for controlling tabs. This tabbed widget enables navigation between different pages, achieved using the index tab. The notebook widget is an area or tab allowing users to select specific content pages. Users can accomplish this selection by clicking or pressing on the tabs in the parent notebook’s top section. Once you have set up the parent notebook, adding and removing tabs becomes straightforward. With each click on these tabs, the notebook widget will display the associated child pane.
Working of Tkinter Notebook with Example
In this article, we are discussing the notebook widget of Tkinter in Python. This widget acts as a tab, or, we can say, a tabbed notebook. The ttk library provides this widget, which is useful for managing a set of windows and displaying one window at a time. Therefore, users can select the slave window related to the tab to change the present displaying window. This notebook widget uses a few methods to add and remove tabs, such as add() for adding tabs and some other methods for temporarily hiding or deleting tabs. This widget additionally offers a variety of options for each tab, commonly utilized to control the appearance and behavior of the tabs within the widgets. These options fall into three categories: standard, widget-specific, and tab options. The notebook widget employs tab IDs to reference other tabs within the widgets, facilitating the switching from one page to another.
Let’s explore the syntax of the Tkinter notebook in two forms: the command form and the method form.
Syntax:
ttk.notebook(root, options)In the above syntax, note that we obtain the notebook widget from the ttk module, which has two parameters. The first parameter is the root parameter, which specifies the parent or master window. The second parameter options are classified into standard options, tab options, widget options such as class, cursor, weight, padding, state, text, image, etc.
There are a few methods provided by the notebook widget, such as add() for adding tabs, cget() can obtain the current value of the configuration option, hide() to hide the tabs, index() to obtain the index in the numeric value of the specified tab, etc.
Python developers use the Tkinter module for developing GUI-based applications. On the other hand, the notebook widget is obtained from the ttk module, which can be seen as an extension or improvement of the Tkinter module. When utilizing the notebook widget, it is necessary to import the ttk module. This widget allows the creation of tabs within windows, enabling the display of one window at a time. Each tab is associated with a child window and is commonly used when the user wants to display messages or content within the window.
Let’s look at a simple example of creating tabs in the window with the ttk module’s notebook widget.
Example
Code:
from Tkinter import *
import Tkinter as tk
import ttk
import tkMessageBox
master = tk.Tk()
master.geometry('500x200')
def func():
    tkMessageBox.showinfo( "Hello Educba", "Click on the tabs to view the content")
b1 = Button( master, text='Click me for next step', background = 'Red', fg = '#000000', command = func)
b1.pack()
tc = ttk.Notebook(master)
t1 = ttk.Frame(tc)
t2 = ttk.Frame(tc)
tc.add(t1, text ='Notebook tab1')
tc.add(t2, text ='Notebook tab2')
tc.pack(expand = 1, fill ="both")
ttk.Label(t1,
		text ="Hello Educba Technology Institute").grid(column = 3,
							row = 3)
ttk.Label(t2,
		text ="Notebook widget demonstration").grid(column = 3,
									row = 3)
master.mainloop()
Output:
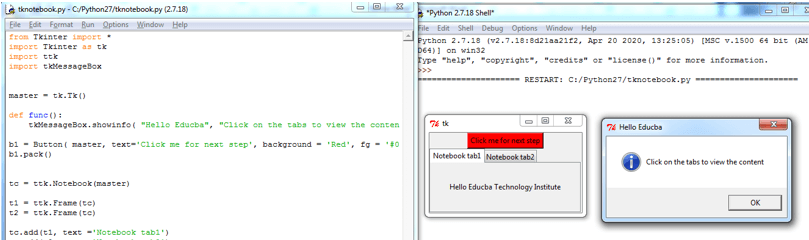
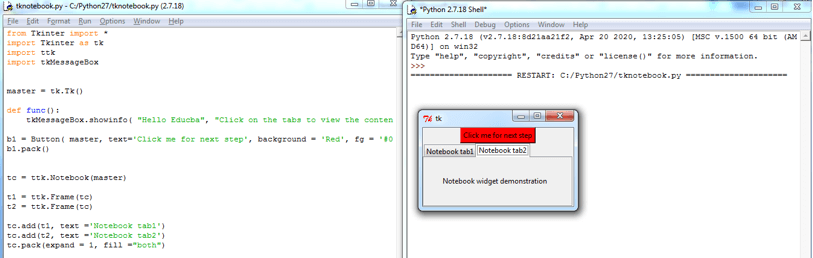
In the above article, we first import the modules Tkinter for developing GUI, ttk module for using notebook widget to create tabs within the parent window, tkmessagebox module for displaying any message on the pop-up dialogue box. The above example will pop up the message when we click the button widget on the window. It will display as “click on the tabs t view the content” so that the user can switch between Windows one at a time using these created tabs using the notebook widget. In this program, we have passed the parent window to the notebook() so that we can control the tabs to switch and display the content. It would be best to create separate frames for each tab to create tabs in the notebook widget. Therefore for each tab, we have used the frame method and have passed the tab names to this frame() method. Then by using the add() function, we add the name to each tab by using text argument, and we have named the tabs as t1 as “Notebook Tab1” and t2 as “Notebook tab2”. Then to display the content by clicking each tab, we have for the tab “Notebook tab1” we display the content as “Hello Educba Technology Institute,” and for the tab “Notebook tab2” we display “Notebook widget demonstration,” and this content is displayed using a label() function where it also takes text argument for the content and where the content should be displayed can be used by grid() function. Here we have to display the message on column 3 and row 3 for both tabs. The above screenshots display the output of the entire program.
Conclusion
In this article, we can conclude that developers use the Python ttk module to extend or enhance the capabilities of the Tkinter module. In ttk module, it provides some new widgets. We discussed a widget known as the notebook widget, which enables the creation of tabs. With the notebook widget, you can toggle between different windows one at a time and display the content of each window. In this article, we have seen the syntax of the notebook widget and the options such as a cursor, weight, height, etc., and a few methods like add(), Label, etc. In this article, we also encountered a simple example where we had two tabs within the same parent window. However, when the tabs were clicked, we would switch from one window to another, displaying them one at a time.
Recommended Articles
We hope that this EDUCBA information on the “Tkinter Notebook” was beneficial to you. You can view EDUCBA’s recommended articles for more information.
