Updated April 10, 2023
Introduction to Tkinter image
A class in Tkinter called PhotoImage class is used to display grayscale images or real color images in Tkinter. And the format of these images can be of various types including png, jpeg, gif, tif, ppm, bmp, etc. and image.open(file to be opened) method is used to open the file which searches for the specified file in the program directory and PhotoImage class, image.open(file to be opened) method to work, Python Imaging Library or PIL must be installed which allows loading of images and the corresponding module is present in PyPi which can be installed using the pip package manager.
The syntax for the tkinker image function in Python is as follows:
import tkinter as tk
from PIL import ImageTk, Image
ImageTk.PhotoImage(Image.open(path_of_the_image))
where path_of_the_image is the path where the image to be displayed is present.
Working of the image in Tkinter
- A class in Tkinter called PhotoImage class is used to display grayscale images or real color images in Tkinter.
- The format of these images can be of various types including png, jpeg, gif, tif, ppm, bmp, etc.
- The image.open(file to be opened) method is used to open the file which searches for the specified file in the program directory.
- For the PhotoImage class, image.open(file to be opened) method to work, Python Imaging Library, or PIL must be installed which allows loading of images.
- The corresponding PIL module is present in PyPi which can be installed using the pip package manager.
Constructor
__init__(self, name=None, cnf={}, master=None, **kw)The above constructor creates an image with a name and the resources that values are data, file, format, gamma, width, height, and palette.
Methods
- __init__(self, name=None, cnf={}, master=None, **kw)
This method is used to create an image with a name.
- blank(self)
A transparent image can be displayed using this method.
- cget(self, option)
The value of the option is returned using this method.
- copy(self)
A new photo image is returned which is the same image as the widget using this method.
- zoom(self, x, y=’ ’)
A new photo image is returned which is the same image as the widget but the image is zoomed with x and y, using this method.
- subsample(self, x, y=’ ’)
A new photo image is returned which is based on the same image as the widget but the image uses only xth or yth pixel, using this method.
- get(self, x, y)
The colors red, green, and blue at the pixel x and y is returned using this method.
- put(self, data, to=None)
The row formatted colors are put to the image which begins from the position specified from to, using this method.
- write(self, filename, format=None, from_coords=None)
The image to file specified as the filename in the specified format is written beginning from the position specified as from_coords.
Examples of Tkinter image
Here are the following examples mention below
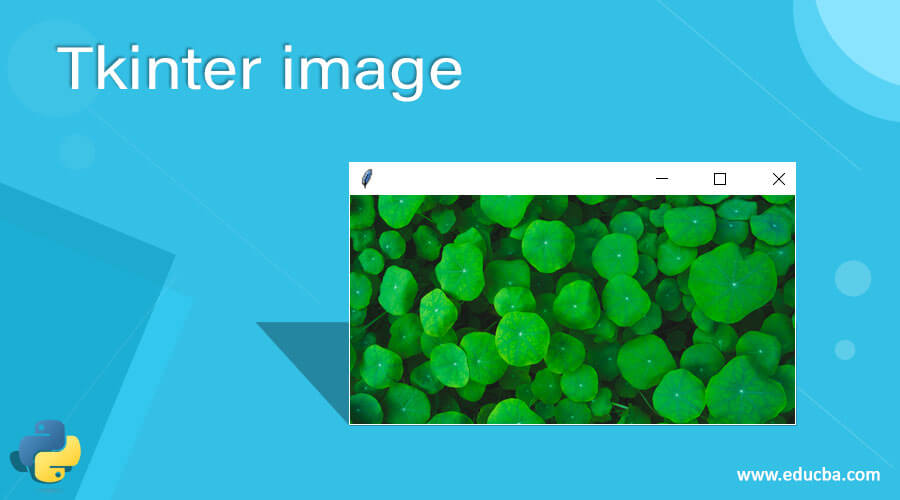
Example #1
Tkinter program to display an image whose path is specified by making use of PhotoImage class and image.open() function.
Code:
#importing tkinter package
from tkinter import *
#importing ImageTK, Image from PIL package
from PIL import ImageTk, Image
#specifying the path of the image to be displayed
pathoftheimage = 'C:\\Users\\admin\\Desktop\\quote1.png'
root = Tk()
#specifying the title of the tkinter window within which the specified image is displayed
root.title("QUOTES")
#using image.open function and PhotoImage function to open the spcified image and display on the screen
img = ImageTk.PhotoImage(Image.open(pathoftheimage))
panel = Label(root, image = img)
panel.pack(side = "bottom", fill = "both", expand = "yes")
root.mainloop()
Output:

In the above program, the Tkinter package is imported and then the ImageTK, Image packages are imported from the installed PIL package. Then the path of the image to be displayed is specified. Then the title of the Tkinter window within which the image is displayed is specified. Then image.open function and photoimage function is used to open the specified image and display it on the screen.
Example #2
Tkinter program to display an image whose path is specified by making use of PhotoImage class and image.open() function.
Code:
#importing tkinter package
from tkinter import *
#importing ImageTK, Image from PIL package
from PIL import ImageTk, Image
#specifying the path of the image to be displayed
pathoftheimage = 'C:\\Users\\admin\\Desktop\\Mario.jpg'
root = Tk()
#specifying the title of the tkinter window within which the specified image is displayed
root.title("MARIO")
#using image.open function and PhotoImage function to open the spcified image and display on the screen
img = ImageTk.PhotoImage(Image.open(pathoftheimage))
panel = Label(root, image = img)
panel.pack(side = "bottom", fill = "both", expand = "yes")
root.mainloop()
Output:
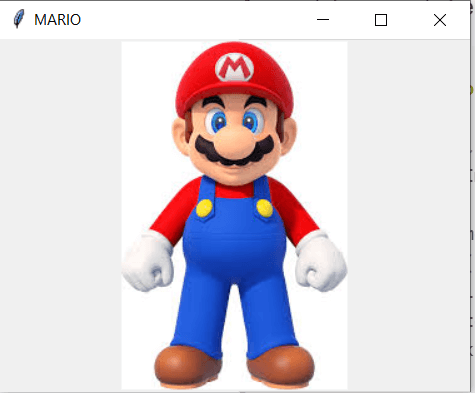
In the above program, the Tkinter package is imported and then the ImageTK, Image packages are imported from the installed PIL package. Then the path of the image to be displayed is specified. Then the title of the Tkinter window within which the image is displayed is specified. Then image.open function and photoimage function is used to open the specified image and display it on the screen.
Example #3
Tkinter program to display an image whose path is specified by making use of PhotoImage class and image.open() function.
Code:
#importing tkinter package
from tkinter import *
#importing ImageTK, Image from PIL package
from PIL import ImageTk, Image
#specifying the path of the image to be displayed
pathoftheimage = 'C:\\Users\\admin\\Desktop\\duck.png'
root = Tk()
#specifying the title of the tkinter window within which the specified image is displayed
root.title("DONALD_DUCK")
#using image.open function and PhotoImage function to open the spcified image and display on the screen
img = ImageTk.PhotoImage(Image.open(pathoftheimage))
panel = Label(root, image = img)
panel.pack(side = "bottom", fill = "both", expand = "yes")
root.mainloop()
Output:
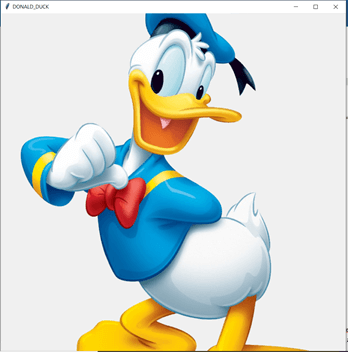
In the above program, the Tkinter package is imported and then the ImageTK, Image packages are imported from the installed PIL package. Then the path of the image to be displayed is specified. Then the title of the Tkinter window within which the image is displayed is specified. Then image.open function and photo image function is used to open the specified image and display it on the screen.
Recommended Articles
This is a guide to the Tkinter image. Here we discuss the concept of Tkinter image through definition, syntax, working of Tkinter image through programming examples, their outputs, then the constructor and methods of Tkinter image. You may also have a look at the following articles to learn more –
