Updated April 10, 2023
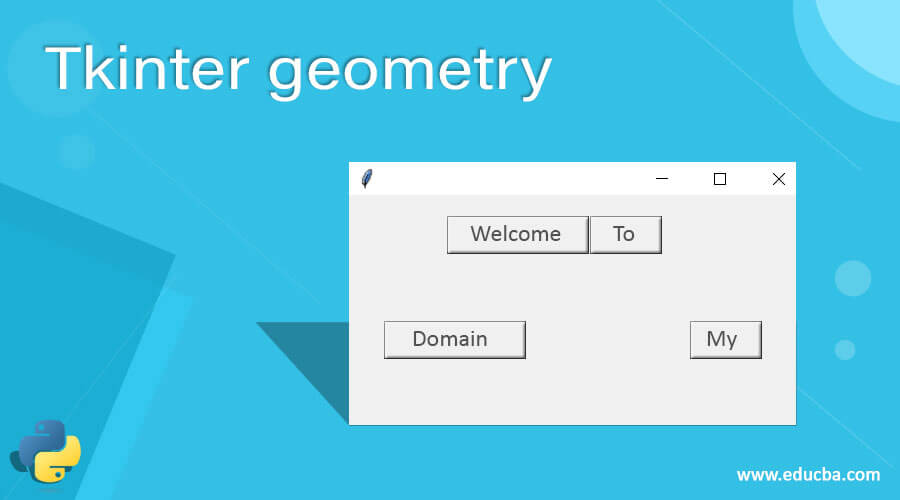
Introduction to Tkinter geometry
The Tkinter geometry is one of the built-in methods and it is used to set the dimensions while we used the Tkinter widget windows is mainly used to set the dimension length for the application window. It may be the desktop-based application widget these geometry() method also used for the basic fundamental thing while the passing the some of the arguments like size and position of the windows even the font and its style, colors are also used in the screen layouts of the geometry the widget method contains set of rows and columns that will be more presentation of the application.
Syntax
The Tkinter most powerful GUI based widget it has the most advanced library methods in the python programming language. It has n number of methods it has been used across globally hence geometry() also one of the default methods and it can be used directly in the specific requirement widget and these functions will call wherever it requires. It has its own syntax and default parameters.
import webbrowser
from tkinter import * //import all the library of the tkinter module
variable name=Tk()
variable name.geometry(“rows x columns”)
variable name.mainloop()
The above codes are the basic algorithm for creating the geometry function in the Tkinter library and these modules will utilize all other widgets for presenting the desktop application more secure and powerful.
How does the geometry method work in Tkinter?
The Tkinter package has a set of built-in functions that have been used for covering the UI parts in both desktop and web applications. It has more interactive and advanced library scripts it can be calculated for the time, space functionalities in the real-time world, and even though some AI-based application scenarios this will be covered across the widget methods. Basically, we want to decorate the UI has textbox, labels, buttons, views, scroll box, etc mostly button will be the UI area to navigate the web pages. Once we clicked the button it performs the application logic and it works in the backend areas. The geometry() method is one of the UI decorative based widget method and it will pass the arguments in the set of rows and columns area of the application window. The geometry() method has geometry manager also known as pack manager and these packages will be a set of pre-defined methods and these have been covered among all the situations for the widgets. We used a different set of methods in the code along with inside of the UI-related functionalities like iframe and it will cover the entire window frame.
Each frame has a different set of patterns for creating a normal and complex layout screen it forms the group for including along the widgets functions like Extra frames etc. The rows and columns contain the set of grid values and these values used in the grid manager. Using the fill option to fill the values automatically in the widget is one of the option to reduce the unwanted spaces and it fills the space values then it shows on the screen. If we use Both methods it should cover the entire rows and columns will be the horizontal and vertical positions on the screen. If we use Both=X and Both=Y the X will denote the Horizontal layout of the screen and Y denotes the Vertical positions of the screen.
Constructor
The Tkinter geometry() constructor has a default set of arguments that will be passed into throughout the programming. Rows and Columns have a set of values and these arguments should be passed along the runtime.
class classname(tk.Tk):
def _init_(variable name,first arguments,second arguments)
variable name.geometry(“rows x columns”) we can also use these methods along with the GUI widgets like GUI.geomtery(“r x c”)
The above codes will be used to create and passed the arguments in the geometry constructor which helps to create the object and it calls the other defined methods.
Methods
We already discussed in the previous paragraphs the geometry() method has a geometry manager and these packages will more ever be compared to the other pack widgets. And these package managers will use some default options like fill, side, expand, etc. These options will use to controls the geometry method.
variable name.geometry(“rows x columns”)
variable name.pack(fill=X,expand=2)//example method along with the pack method it comes with the geometry manager.
Examples of Tkinter geometry
Here are the following examples mention below
Example #1
Code:
import tkinter as tk
from tkinter import ttk
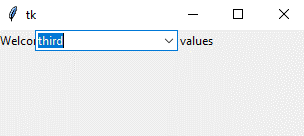
def demo(events):
print("Please select the new events from the list")
first = tk.Tk()
first.geometry('310x110')
def month():
example["values"] = ["first",
"second",
"third",
"four"
]
lists = tk.Label(first,
text = "Welcome User please select list of values")
lists.grid(column=5, row=5)
example = ttk.Combobox(first,
values=[
"first",
"second",
"third",
"four"],
postcommand=month)
example.grid(column=5, row=5)
first.mainloop()Output:
Example #2
Code:
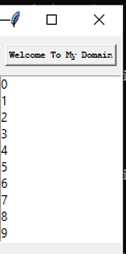
from tkinter import *
first = Tk()
first.geometry('120x213')
second = Button(first, text = 'Welcome To My Domain', font =('Courier',7, 'bold'))
second.pack(side = TOP, pady = 8)
lists = Listbox(first)
lists.pack()
for i in range(12):
lists.insert(END, str(i))
mainloop()
Output:
Example #3
Code:
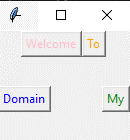
from tkinter import *
import tkinter as tk
from tkinter import ttk
first = Tk()
first.geometry("132x110")
frm = Frame(first)
frm.pack()
frm1 = Frame(first)
frm1.pack(side = RIGHT)
frm2 = Frame(first)
frm2.pack(side = LEFT)
butn = Button(frm, text="Welcome", fg="pink",activebackground = "green")
butn.pack(side = LEFT)
butn1 = Button(frm, text="To", fg="orange", activebackground = "red")
butn1.pack(side = RIGHT)
butn2 = Button(frm1, text="My", fg="green", activebackground = "violet")
butn2.pack(side = RIGHT)
butn3 = Button(frm2, text="Domain", fg="blue", activebackground = "yellow")
butn3.pack(side = LEFT)
comb = tk.Label(first,
text = "Welcome Back",background = 'pink', foreground ="pink",
font = ("Times New Roman", 17))
result = Button(first, text = "Have a Nice Day")
example = ttk.Combobox(first,
values=[
"first",
"second",
"third",
"four"])
first.mainloop()
Output:
The above three examples we used geometry() method in different scenarios. While we passed the arguments in the function it also utilised the other different options and its usages. And these options will come under the geometry manager package it will be utilised with the other default widgets.
Conclusion
The geometry() method is used for the basic and advanced purpose of the applications and also utilized with the other Tkinter libraries that can be used to create the different types of GUI representations along with the user-friendly environment. It supports most of the Operating systems and these libraries will be imported whenever we used in the python script.
Recommended Articles
This is a guide to Tkinter geometry. Here we discuss How does the geometry method work in Tkinter and Examples along with the Codes and Outputs. You may also have a look at the following articles to learn more –
