Updated July 10, 2023
Introduction to Python Tkinter
Python Tkinter is the standard Graphical User Interface (GUI) supported in Python. When Tkinter is used alongside Python, it results in the creation of a GUI very conveniently and quite fast. The main advantage of using Tkinter is that it has an object-oriented interface. The success of any application or website depends on how well it interacts with the user, i.e., an attractive graphical interface helps to create a good application. Well, Python Tkinter does that for us.
Syntax:
The following are the steps for creating a Tkinter application along with the syntax:
- First, we need to import the Tkinter module.
- Secondly, we need to create a container window.
- Then we add any number of widgets to the container window.
- Lastly, we apply the event trigger on the widgets.
# Here, we import the Tkinter module
import tkinter# Here, we create a container window object
c = tkinter.Tk()# widgets that need to be added
# This executes the application until and unless it is stopped
c.mainloop()Why do we use Python Tkinter?
Python Tkinter is the most preferred package used for creating nice GUIs for applications as it has a variety of methods like pack(), grid(), and place() for geometry management. It has standard attributed dimensions, fonts, colors, cursors, anchors, and bitmaps for a better GUI. Moreover, it has a vast array of widgets to choose from and is by far the easiest to use. The combination of all these features makes Python Tkinter makes it very popular among Python developers and makes it a good tool to use.
Methods of Python Tkinter
The following are the methods used in Python Tkinter for geometry management:-
1. pack()
It places the child widget in blocks before placing it inside the parent widget.
Syntax:
widget.pack(pack_options)The possible options for pack_options are the following:
- Expand: It is a Boolean, which can be True or False. When set to True, the child widget expands to fill the parent widget’s full space.
- fill: The default value is none. The other values are X (fill only horizontally), Y (fill only vertically), and both (fill both horizontally and vertically)
- side: It determines the side of the parent widget against which the child widget packs against. The default value is the top. The other values are bottom, left, and right.
Example:
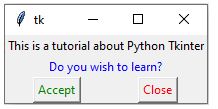
from tkinter import *
root = Tk()
label1 = Label(root,text="This is a tutorial about Python Tkinter")
label1.pack(side=TOP,expand=True)
label2 = Label(root,text="Do you wish to learn?",fg="blue")
label2.pack(side=TOP,expand=True)
button1 = Button(root, text="Accept", fg="green",command=root.destroy)
button1.pack(side=LEFT,expand=True)
button2 = Button(root, text="Close", fg="red",command=root.destroy)
button2.pack(side=RIGHT,expand=True)
root.mainloop()
Output:
2. grid()
It places the child widget in grids before placing it inside the parent widget.
Syntax:
widget.grid(grid_options)The possible options for grid_options are the following:
- column: It determines the column to put the child widget inside the parent widget. The default value is 0, which signifies the leftmost column.
- columnspan: It determines the number of columns the widget occupies. The default value is 1.
- ipadx, ipady: It signifies the horizontal and vertical padding for the child widget inside the parent widget’s border in terms of pixels.
- padx, pady: It signifies the horizontal and vertical padding for the child widget outside the parent widget’s border regarding pixels.
- row: It signifies the row to put the widget in.
- rowspan: It determines the number of rows the widget occupies. The default value being 1.
Example:
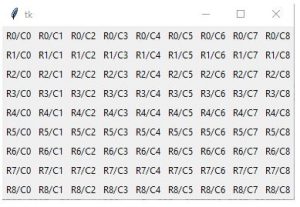
from tkinter import *
root = Tk()
for r in range(9):
   for c in range(9):
       Label(root , text = 'R%s/C%s'%(r,c),
             borderwidth = 1).grid(row = r , column = c , rowspan = 1 , columnspan = 1 , padx = 3 , pady = 3)
root.mainloop()
Output:
3. place()
It organizes the widgets by placing them in a specific position, as the developer indicates.
Syntax:
widget.place(place_options)The possible options for place_options are the following:
- anchor: This determines the exact position of the widget. The values correspond to the different directions available in the compass. The possible values are N,S,E,W,NE,NW,SE and SW. The default value is NW which is in the upper left corner.
- bordermode: The possible values are inside and outside. The default is inside.
- height, width: This indicates the height and weight in pixels.
- relheight, relwidth: This indicates the height and width relative to the parent widget’s height and width. This is a floating-point number between 0.0 and 1.0
- relx, rey: This indicates the offset of the child widget relative to the parent widget. It is a floating-point number between 0.0 and 1.0
- x, y: This indicates the vertical and horizontal offset of the child widget in pixels.
Example:
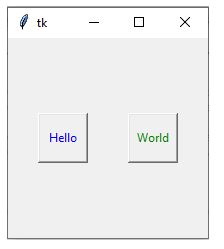
from tkinter import *
root = Tk()
button1 = Button(root, text ="Hello" , fg="blue")
button1.pack(side = TOP)
button1.place(anchor = E , relheight = 0.25 , relwidth = 0.25 , relx = 0.4 , rely = 0.5)
button2 = Button(root, text = "World" , fg = "green")
button2.pack(side = BOTTOM)
button2.place(anchor = W , relheight = 0.25 , relwidth = 0.25 , relx=0.6 , rely= 0.5)
root.mainloop()
Output:
Conclusion
It is finally time to draw closure to this article on Python Tkinter. In this article, we have discussed briefly the basics of Python Tkinter. We’ve mentioned why we’re using Python Tkinter, and we’ve seen its syntax. Last but not least, we saw the process used in Python Tkinter, along with Examples. So next time you decide to create a user-friendly interface, remember to use Python Tkinter.
Recommended Articles
This is a guide to Python Tkinter. Here we discuss the introduction and different methods of Python Tkinter with syntax and examples. You may also have a look at the following articles to learn more –
