Updated June 17, 2023
Introduction to PowerShell Rename-Item
The rename-Item cmdlet in PowerShell renames items like files, folders, registry, certificates, etc. This cmdlet renames items but not their actual content or cannot move items to a different location.
Syntax:
Rename-Item

[-Path] <String>

[-LiteralPath] <String>

[-NewName] <String>

[-Force]
[-PassThru]
[-Credential <PSCredential>]
[-WhatIf]
[-Confirm]
[-UseTranscation]
[<CommonParameters>]
Parameters in PowerShell Rename-Item
Following are the parameters for the PowerShell Rename-Item:
- Path: Source path of the item. This path should be in a string format and must be identical. You can specify wildcard character (*), but the path should resolve only one item instead of multiple items.
- NewName: Destination file name. By default, it will take the same source path; explicitly specifying different paths will generate an error. You cannot use a wildcard (*) character in a new name. It is possible to rename multiple files and extensions.
- Force: Renames item names that cannot be changed. For files or folders which are read-only or hidden, this parameter allows them to rename forcefully. This parameter cannot change the constant alias or the variable.
- PassThru: By default, Rename-Object doesn’t generate any output. This parameter allows the output to display in the console.
- Credential: If your destination item is in a different domain or work group, you can use this parameter to connect the destination path with different credentials.
- Whatif: This parameter is used to notify what operation will perform if this command runs without actually running the command.
- LiteralPath: This parameter also specifies the path of an item to rename. No characters are interpreted as wildcard characters. If the path includes a unique character, they must be enclosed in a single quotation so PowerShell will not interpret any character as escape sequences.
- Confirm: This parameter prompts the user before performing the rename operation on the item.
- UseTranscation: This parameter includes the command in the active transaction. This parameter is valid only when the transaction is in progress.
- <CommonParameters>: The below parameters are supported by common parameters. ErrorAction, ErrorVariable, WarningAction, WarningVariablem OutBuffer, PipelineVariable, and OutVariable.
Examples to Implement PowerShell Rename-Item
Below is the example of implementing in PowerShell Rename-Item:
Example #1 – Rename-Item
Code:
Rename-Item D:\Temp\Putty.log -NewName Putty1.log
In the above example, when you don’t provide the destination path for the file to rename, it will, by default, take the same source path. You can also rename items without specifying –Newname parameter. To do so, provide the space between the old and new names. For example,
Rename-Item D:\Temp\Putty.log Putty1.log
You can also rename the folder, as shown below.
Rename-Item D:\Temp -NewName Temp1
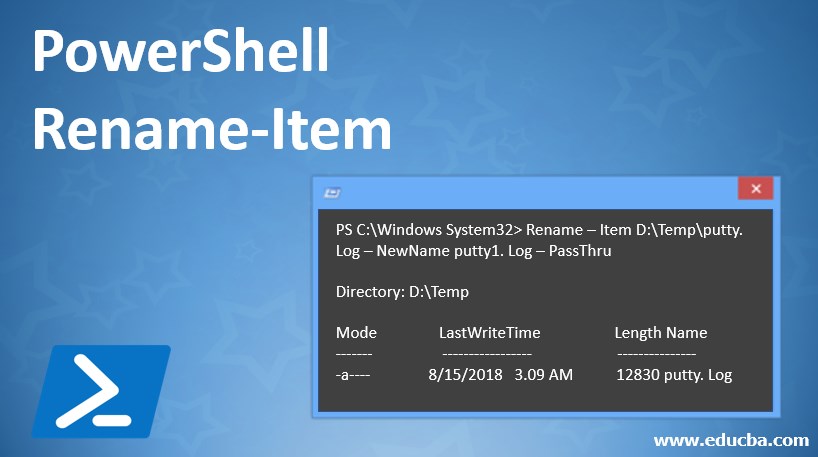
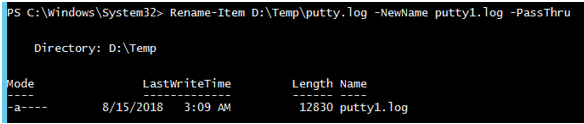
Example #2 – Rename-Item with Passthru parameter
To check the command output in the console, use the -Passthru parameter.
Code:
Rename-Item D:\Temp\Putty.log -NewName Putty1.log -PassThru
Output:
Providing a different destination path will generate an error because this cmdlet can’t perform the move operation.
Rename-Item D:\Temp\putty.log -NewName D:\putty1.log -PassThru
Output:

Example #3 – Rename-ChildItem with Whatif Parameter
When you use the whatif parameter, it will show you the action command will perform without actually running the command.
Rename-Item D:\Temp\cars.xml -NewName cars1.xml -PassThru -WhatIf
Output:

Example #4 – Rename-ChildItem with Confirm parameter
This parameter will ask for user confirmation before renaming the item.
Code:
Rename-Item D:\Temp\cars.xml -NewName cars1.xml –Confirm
Output:

You can also provide the value $true or $false to confirm the parameter. When the $true value is provided, it will prompt for user confirmation. When your $false value is provided, it will not prompt for the user confirmation and directly rename the item, and this is the default option in the –confirm parameter.
Rename-Item D:\Temp\cars.xml -NewName cars1.xml -Confirm:$true
Rename-Item D:\Temp\cars.xml -NewName cars1.xml -Confirm:$false
Example #5 – Rename registry value
Like file rename, you can also rename registry values.
Code:
Rename-Item HKLM:\SYSTEM\CurrentControlSet\Control\test -NewName Test2
Rename-Item HKLM:\SECURITY\Policy\Data -NewName Data1
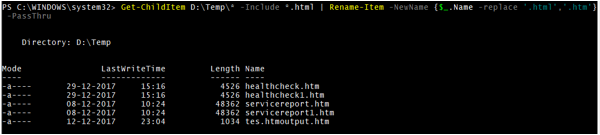
Example #6 – Rename multiple files extension with Rename-Item
To rename multiple files extension, you can use the below command to replace them.
Code:
PS C:\WINDOWS\system32> Get-ChildItem D:\Temp\* -Include *.html | Rename-Item -NewName {$_.Name -replace '.html','.htm'} -PassThru
To rename multiple files or folders, you need to use the loop.
Output:
Conclusion
Rename-Item is an excellent tool to rename single or multiple files, extensions, folders, registry, etc. But it cannot move or copy the files. For them, there are different cmdlets available.
Recommended Articles
This is a guide to PowerShell Rename-Item. Here we discuss the basic introduction, parameters, and examples to implement with appropriate codes and outputs. You can also go through our other related articles to learn more –
