EDUCBA

EDUCBA

MENUMENU
  • Free Tutorials
  • Free Courses
  • Certification Courses
  • 280+ Courses All in One Bundle
  • Login

Patch Tool in Photoshop

Home » Design » Design Tutorials » Photoshop Tutorial » Patch Tool in Photoshop

Patch-Tool-in-Photoshop

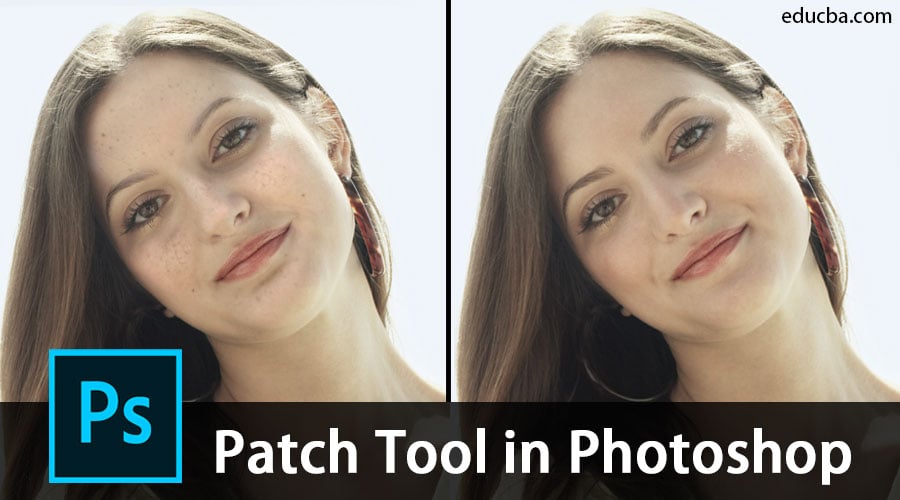
What Exactly is the Patch Tool for?

The patch tool is used for retouching or repairing photos that are damaged. It is found as a part of healing brush tools. You can also use it for removing components from your image. It offers an effective method to fix any large or small part of the image. There are similarities to the healing brush tool as the patch tool also matches the coloring, texture, and lighting of the selected area to the source. In this topic, we are going to learn about the Patch Tool in Photoshop.

The difference is that unlike the brush, it only works based on the selection. One aspect of the patch tool is that it renders a slightly different outcome as you use it multiple times. You can effortlessly work on larger areas of an image with great results. One can clone or duplicate parts of a photo using the destination mode along with the patch tool. We will discuss how to do that further in the article. Furthermore, users can also use transparent or pattern options as well.

Start Your Free Design Course

3D animation, modelling, simulation, game development & others

Although some of them might not be used quite frequently, it still is good to be aware of the option. Before the release of Photoshop CS6, there was no option to work on empty layers with the patch tool. Therefore, users had to duplicate the layers and then work on the images. With Photoshop CS6, the new feature introduced is content-aware which can better the results when combined with the patch tool. Thus, the patch tool has become more effective and useful than the earlier versions.

Where is the Patch Tool located?

The patch tool can be selected from the tools panel under the healing brush tool. It is third in the row.

Patch Tool in Photoshop 1.1

How does the Patch Tool Work?

  1. First of all, you need to select an area after choosing the patch tool. Its functionality is similar to the lasso tool if you are already familiar with it.
  2.  Next, you simply have to hover the cursor around and drag to any direction.
  3.  Once you opt for the source or destination mode in the options bar, you can find a preview of an image while dragging.
  4. As soon as you release the mouse, Photoshop would blend the pixels evenly in such a way as to match the original photo condition. If you need to deselect, use the shortcut: Ctrl + D on Windows and Cmd + D on Mac.

You have to be careful in selecting the object as even a tiny border can impact the result significantly.

For Removing Unwanted Elements from the Image

You can also use the patch tool in normal mode to remove things from an image instantly and easily. However, it will not guarantee a 100 percent result always. Also, ensure that you are not working on the original layer. Use a duplicate BG layer or an empty layer. Note: You can make use of any selection tool other than the patch tool to define a selection.

Popular Course in this category
Photoshop Training (9 Courses, 12+ Projects)9 Online Courses | 12 Hands-on Projects | 78+ Hours | Verifiable Certificate of Completion | Lifetime Access
4.9 (7,071 ratings)
Course Price

View Course

Related Courses
Adobe Premiere Pro Tutorial (2 Courses, 7+ Projects)All in One Design Bundle (280+ Courses, 100+ projects)

Below is an example of an object removed using the patch tool.

Step 1: Navigate to the File menu and select Open. After this, you will see a pop up like the below image.
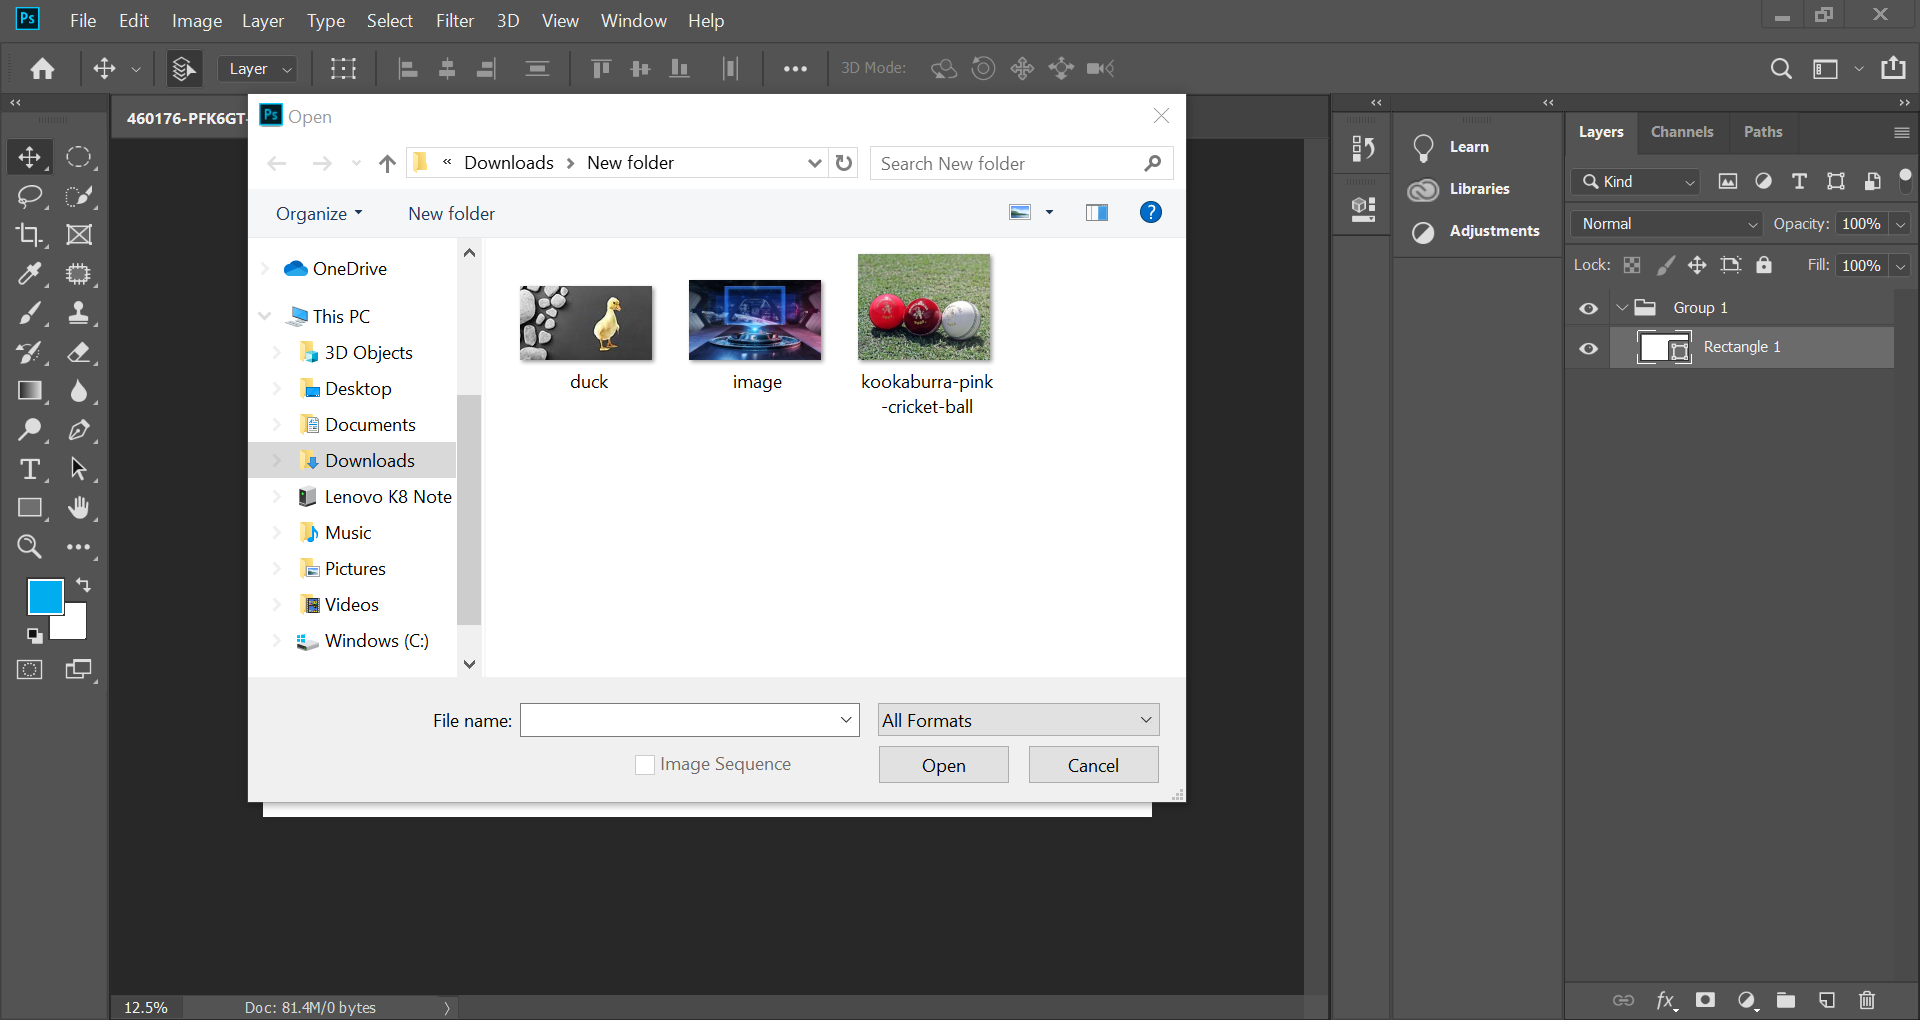
Patch Tool in Photoshop 1.2

Step 2: Next you have to choose the image you want to rework

Patch Tool in Photoshop 1.3

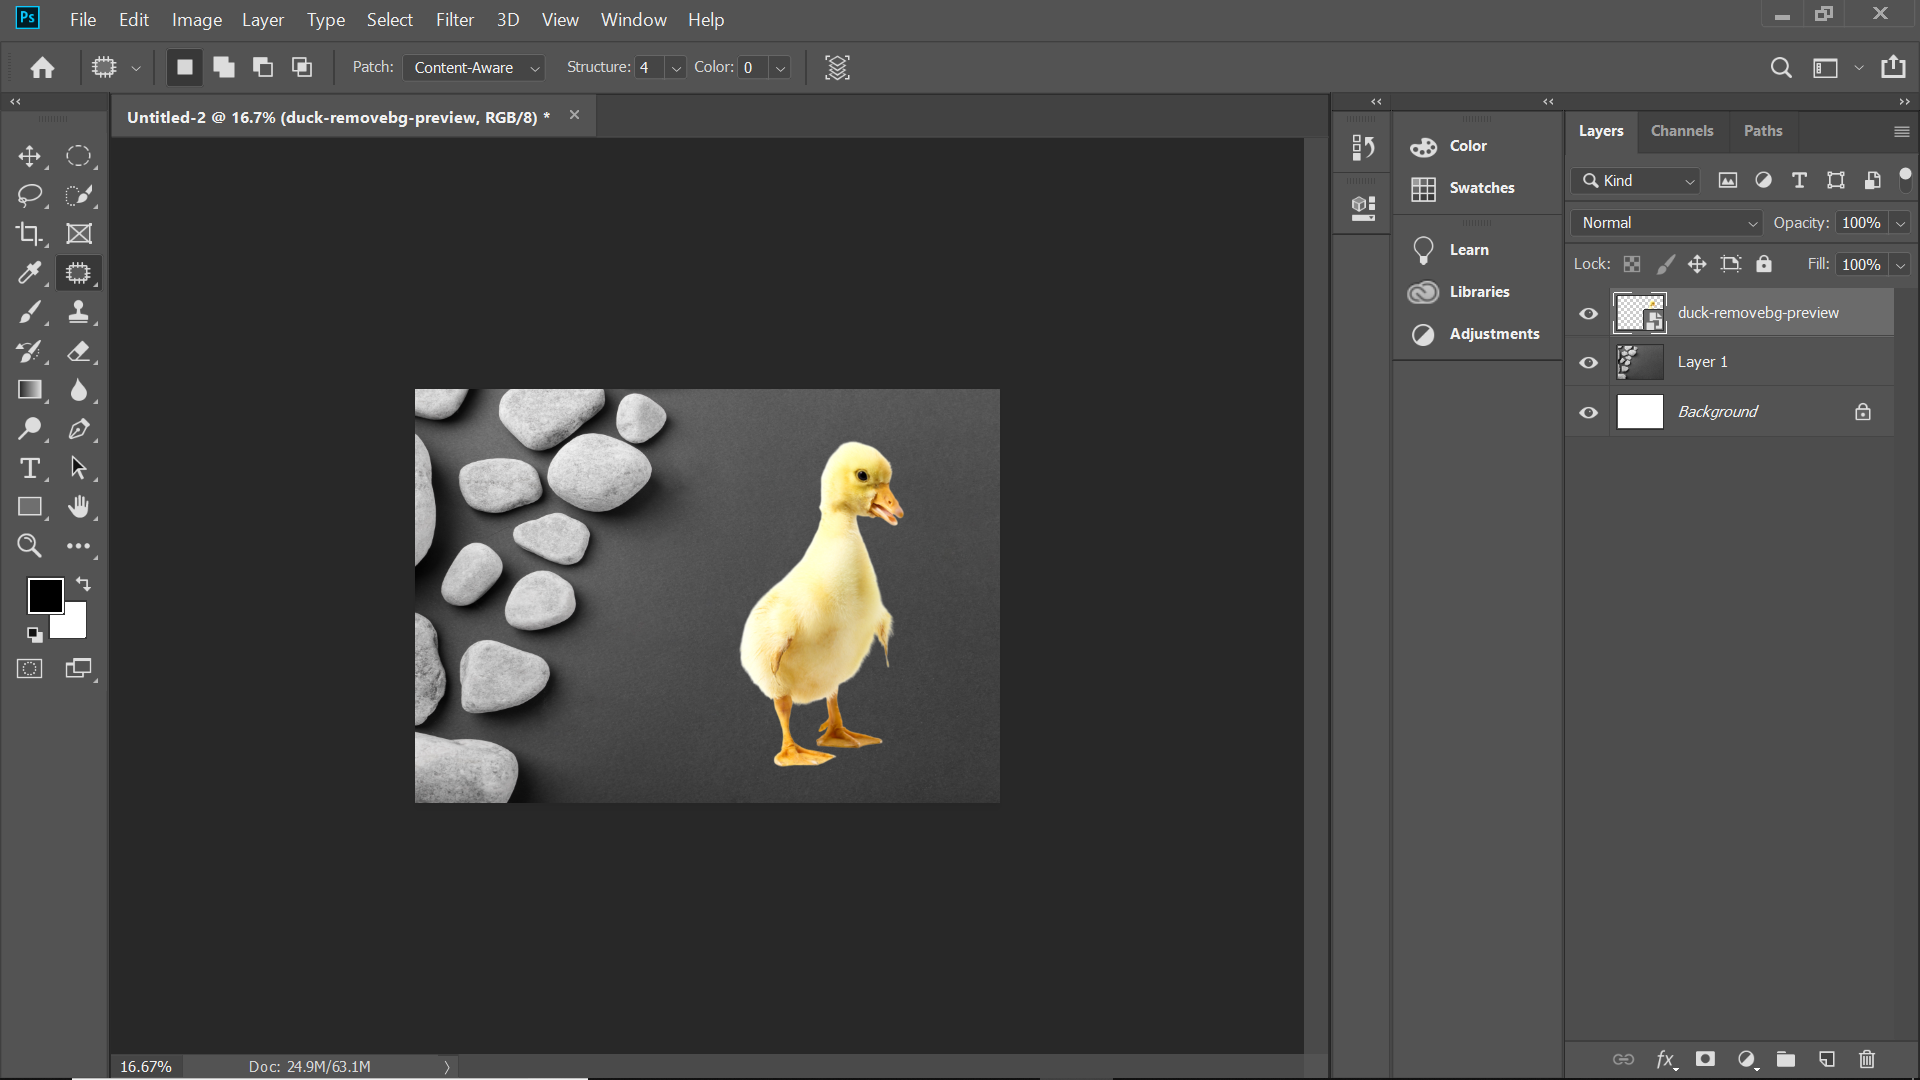
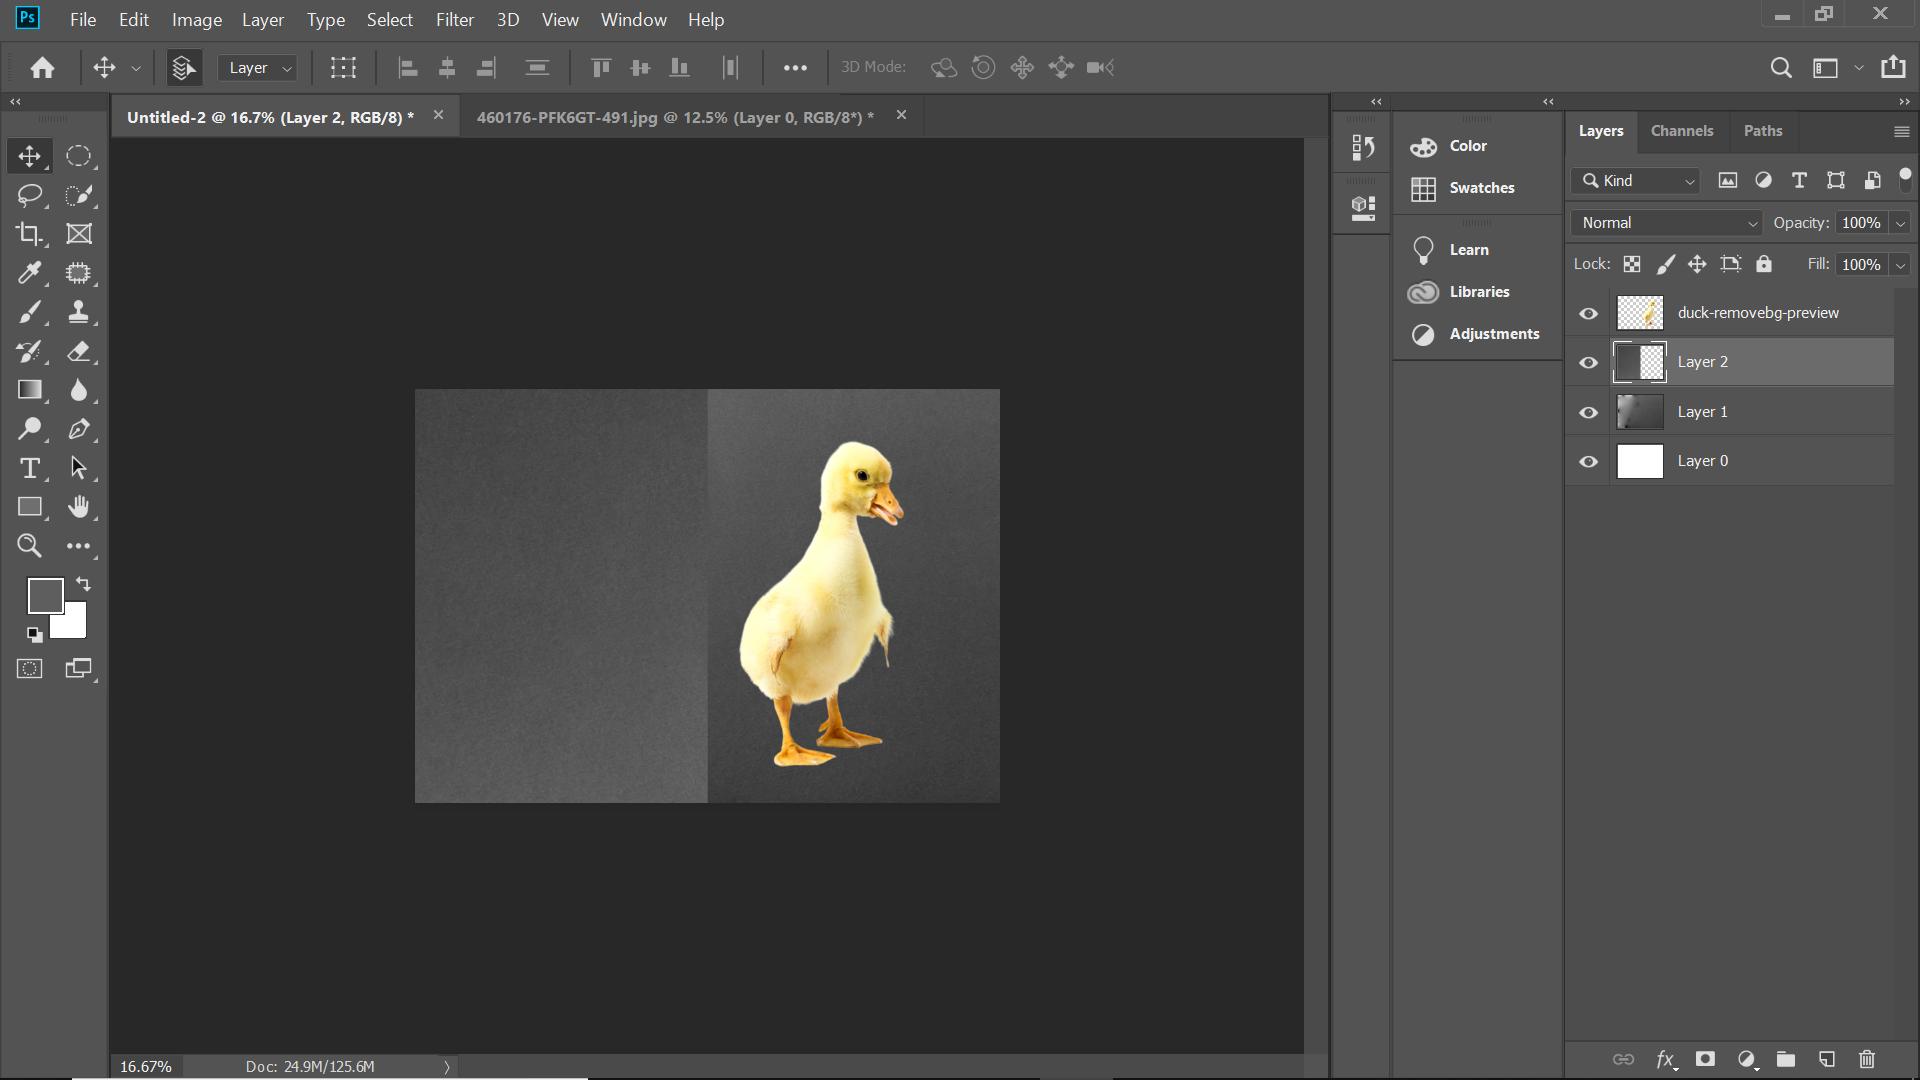
Step 3: After the image opens, select the unwanted area from the image using the patch tool

Patch Tool in Photoshop 1.4

Patch Tool in Photoshop 1.5

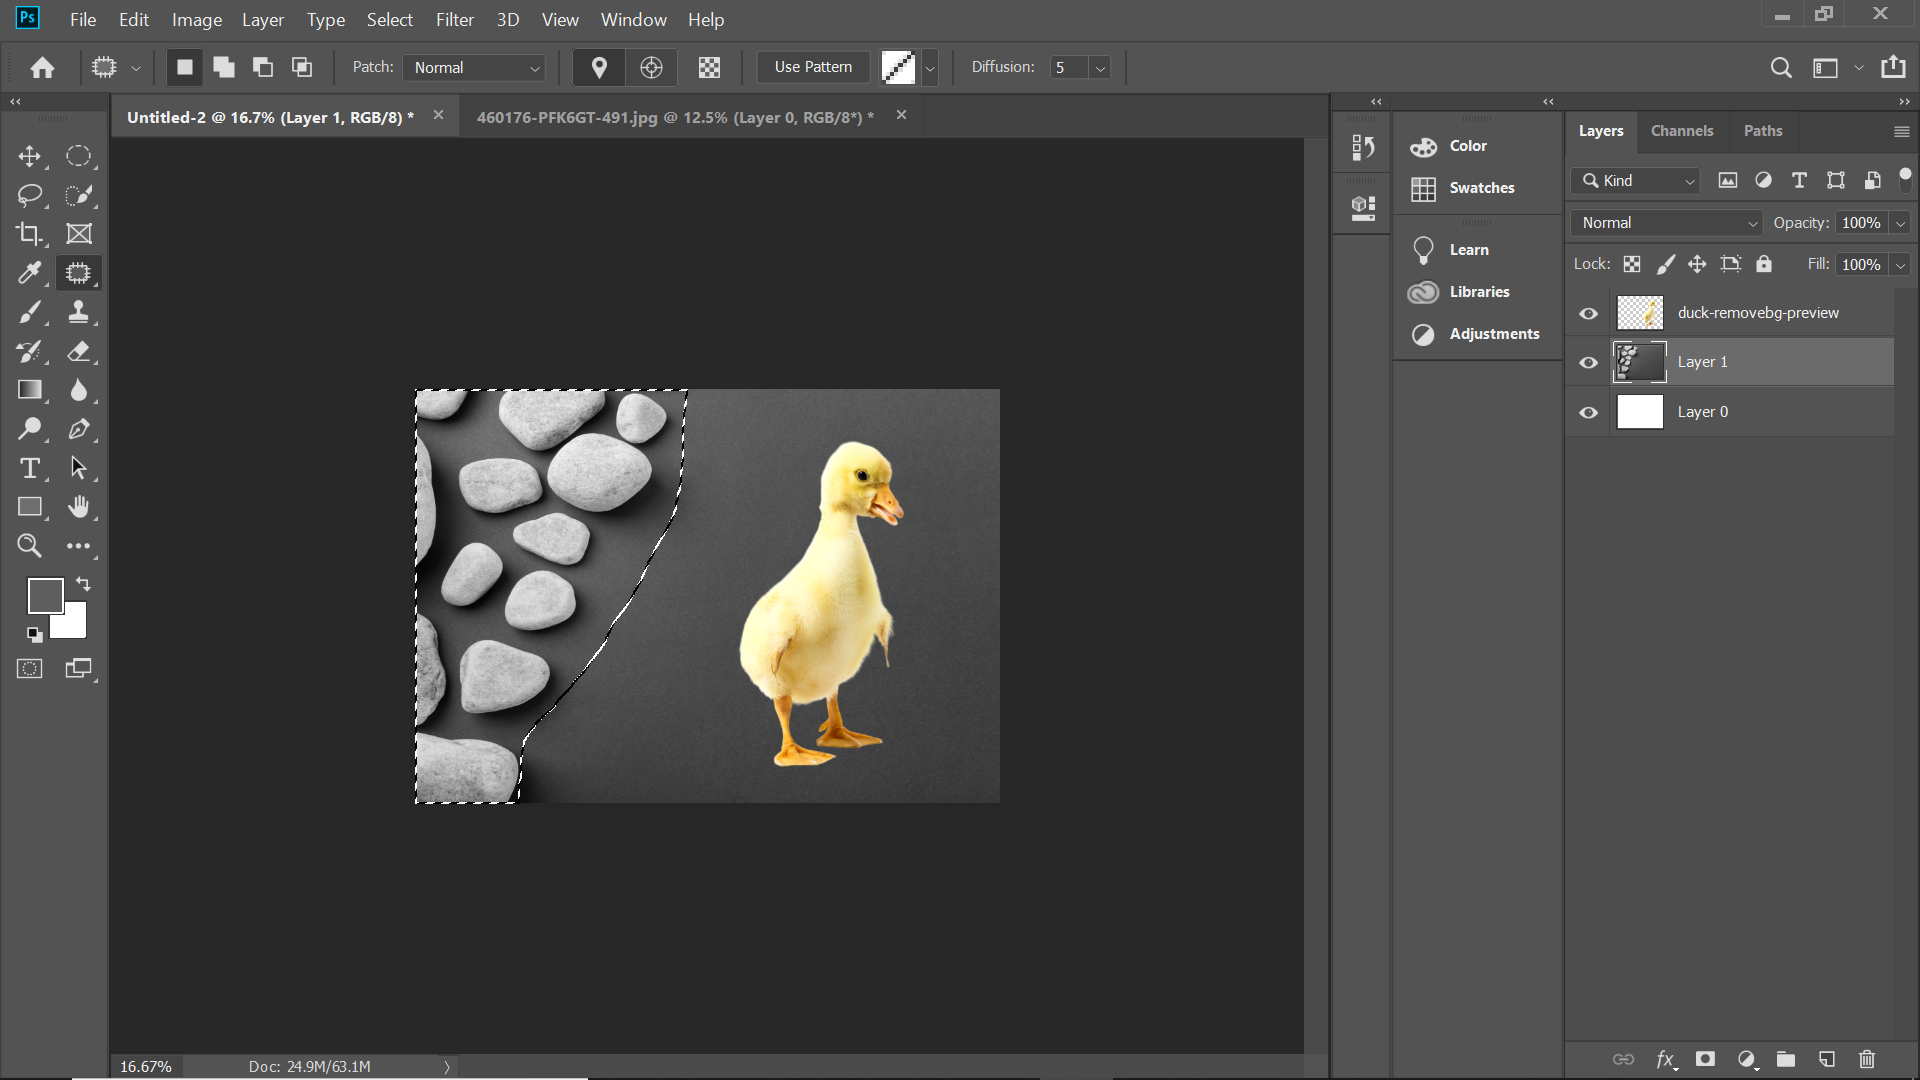
Step 4: Using the patch tool, move the selected area to match the background you want it to be as shown in the below image.

Patch Tool in Photoshop 1.6

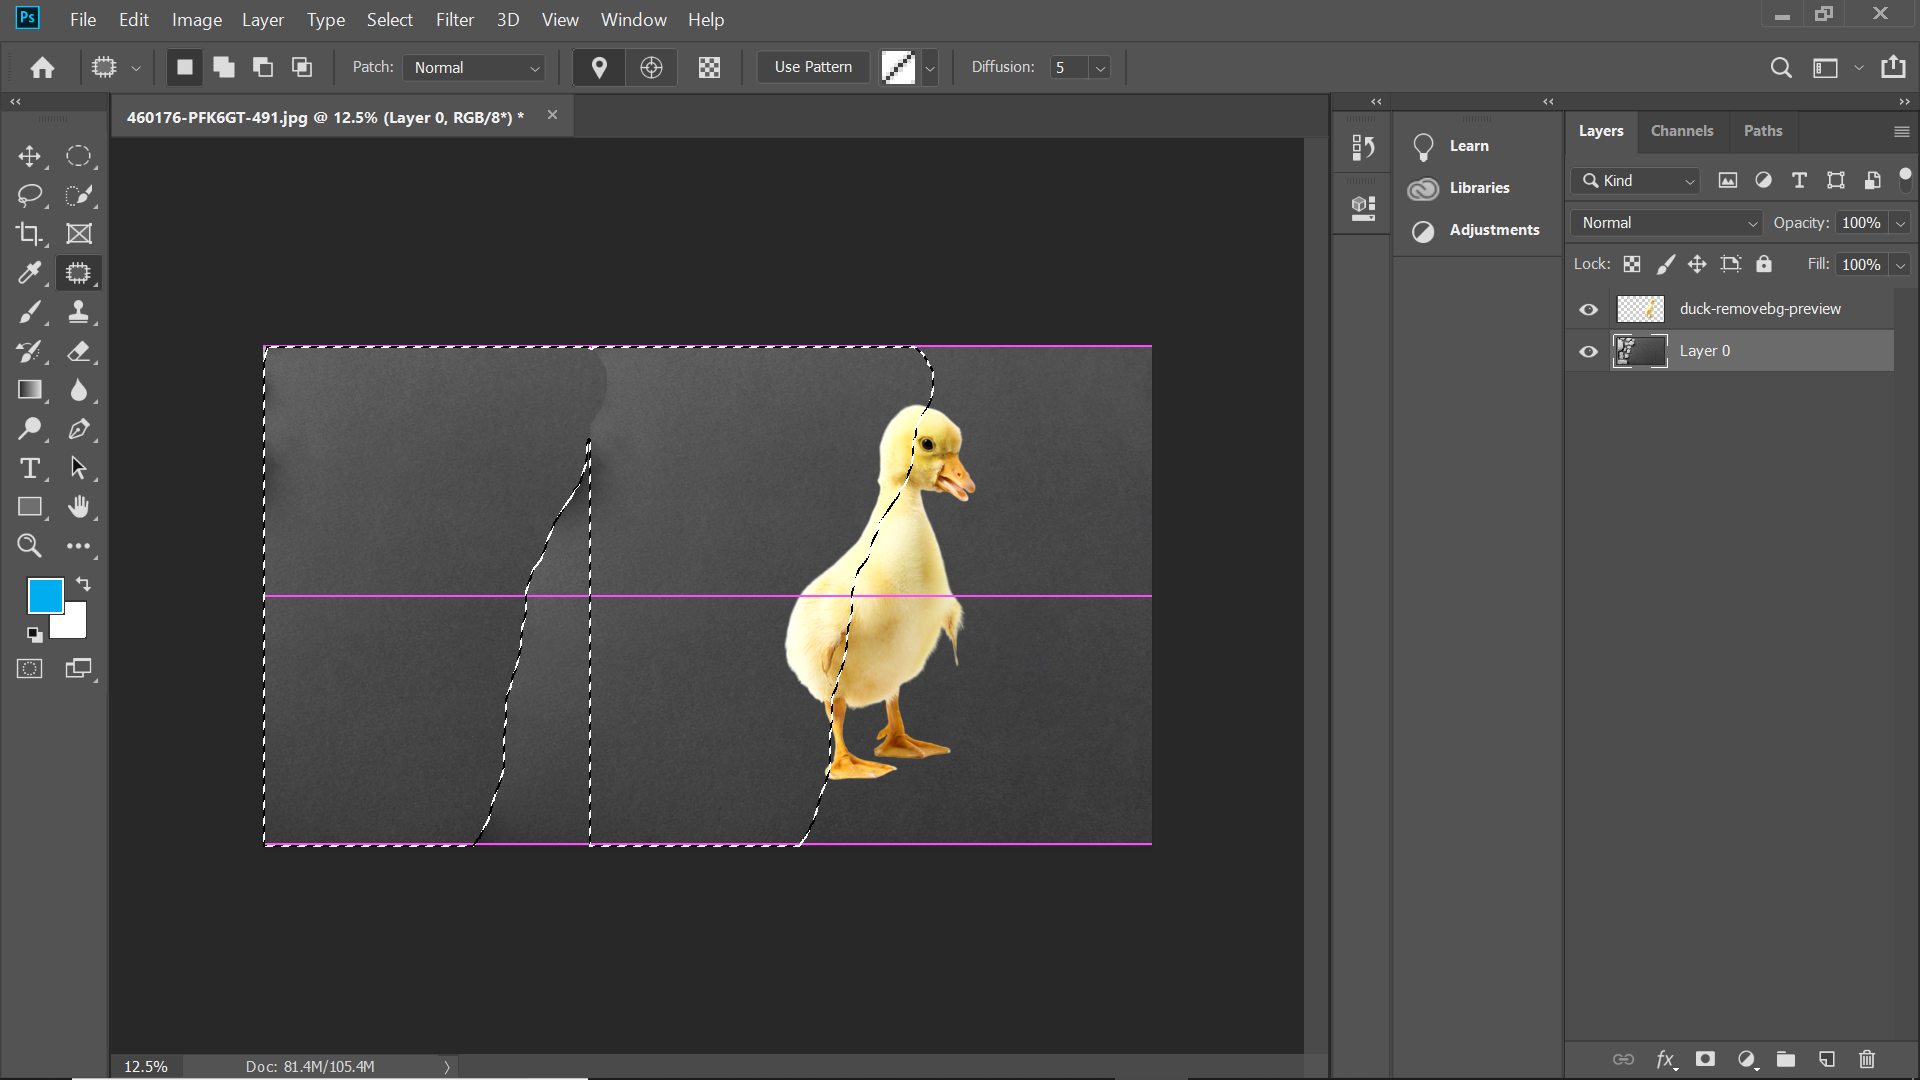
Now you will see that the image part with pebbles has been removed completely.

Patch Tool in Photoshop 1.7

Clone Parts of an Image

Let us see how we can duplicate parts of an image using the patch tool.

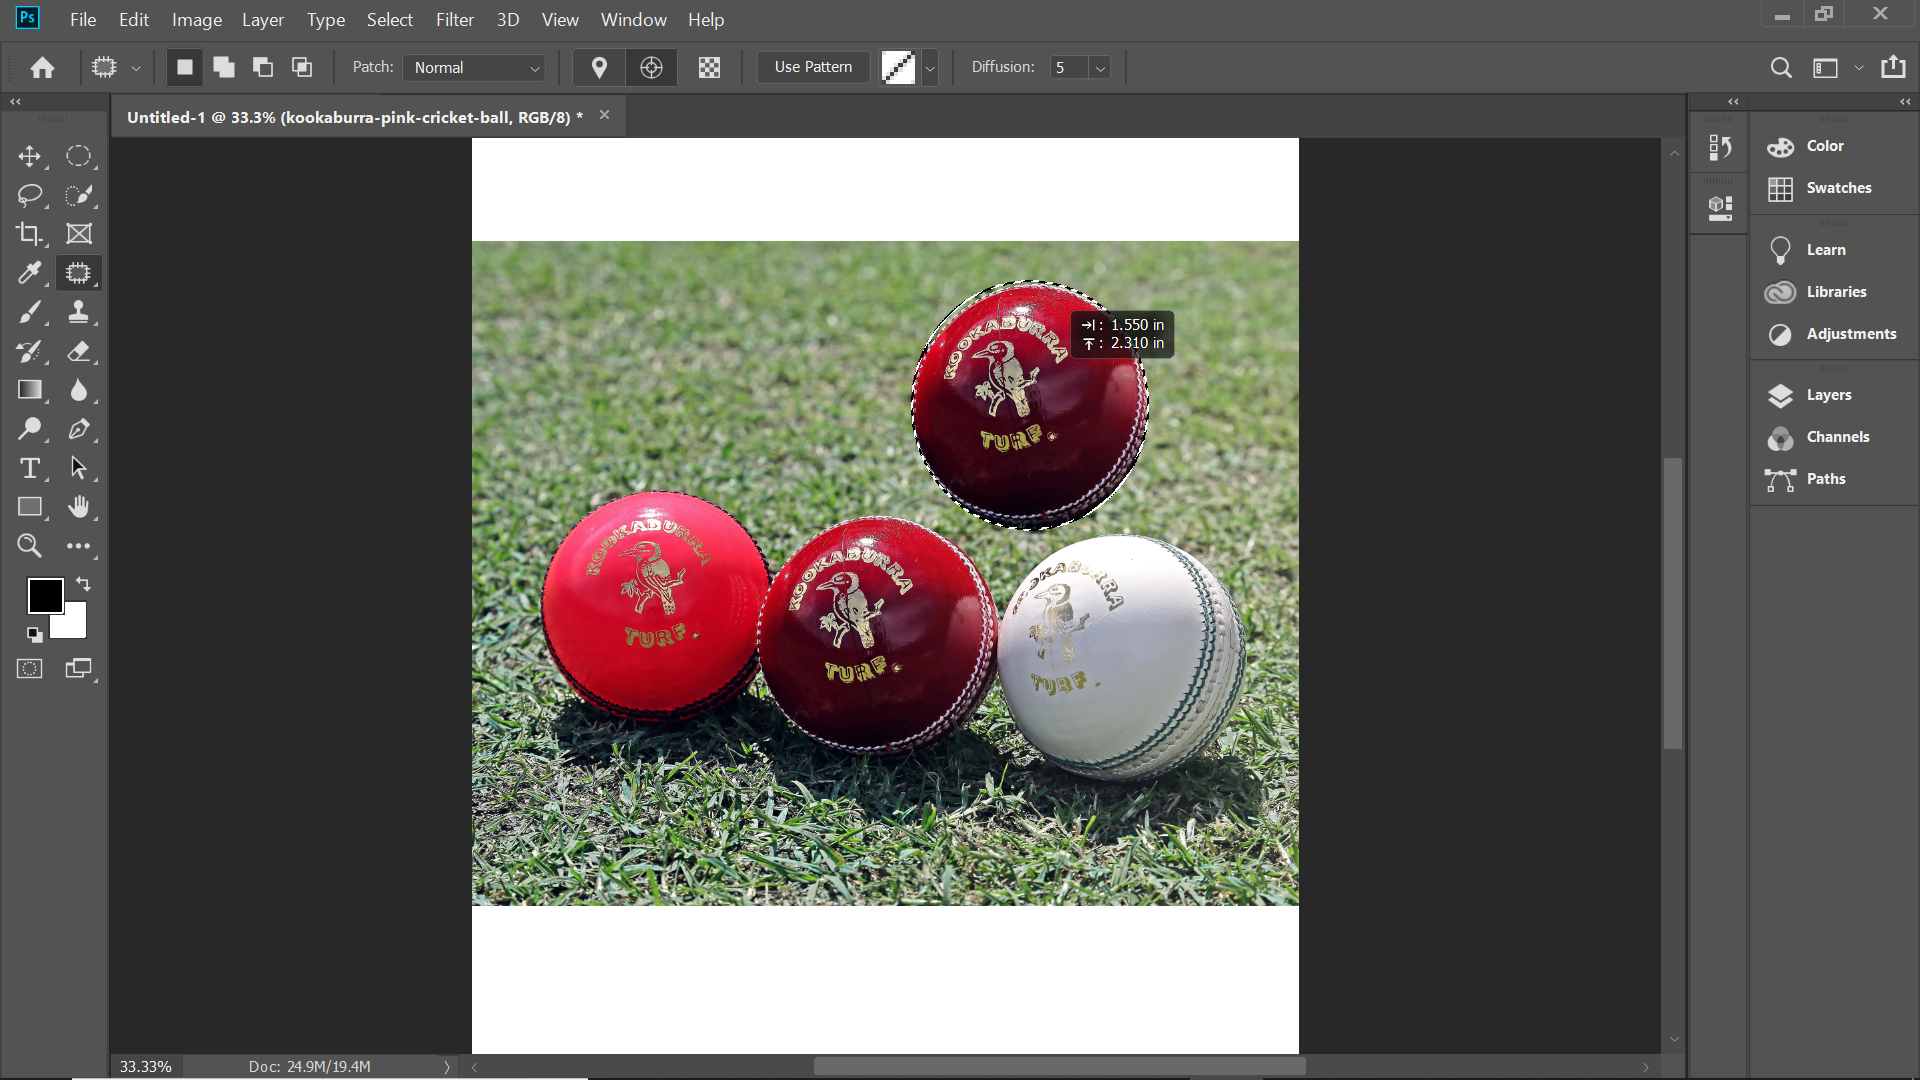
In the below example, we have duplicated the red cricket ball and added a new one

Let’s see the method to do that in a stepwise manner

Step 1: Make a selection around the cricket ball

cricket ball

Step 2: From the options bar, select destination

Step 3: Using the patch tool, move the selection over the position.

moving selection over the postion

Select the destination radio button to clone or copy a particular field. With the help of the patch, tool copy the image. But the edges might get pixelated. There is a better method with superior results. After making the selection, hit Ctrl + Alt + T in Windows and Cmd + Alt + T on a Mac. This activates the free transform tool. After that move the selection into a new place. To make it work, click on the tick box or you can press the enter key. You will still notice the selection tool as the dotted line is visible. Now you have to move the mouse over the selected area, then move the area slightly and release the cursor. This will make the surrounding pixels to blend better.

Patch Tool in Content-Aware Mode

content aware mode

There is another method of using the free transform tool with the destination mode active on the patch tool. Patch tool can be used in normal as well as the content-aware mode. The former is great for general photo editing when you work on images with sharp contrast or with edges. However, the later outshine when it comes to close edge clean up. For using the patch tool in the content-aware mode, you have to navigate to the Options bar. From there you have the option to change from normal to content-aware mode. Also note that for working on an empty layer, ensure to check “sample all layers”. You also can choose between various range options that you can select based on your blending requirements.

Conclusion

The patch tool is an effective tool in Photoshop used to restore damaged images to its original condition. You can also clone things from the images as per your needs. Once mastered, it is a very easy method for working on images. Irrespective of the area of a photo you can work on large or small parts. Provided you have some area as a source in the image. Hope you have found this article helpful in understanding a new tool in Photoshop.

Recommended Articles

This is a guide to Patch Tool in Photoshop. Here we discussed the basic concept, how does Patch Tool work in Photoshop and its Steps with Screenshots. You can also go through our other suggested articles to learn more –

  1. Eyedropper Tool in Photoshop
  2. Rectangle Tool in Photoshop
  3. Selection Tool in Illustrator
  4. Lasso Tool in Photoshop

Photoshop Training (9 Courses, 12+ Projects)

9 Online Courses

12 Hands-on Projects

78+ Hours

Verifiable Certificate of Completion

Lifetime Access

Learn More

0 Shares
Share
Tweet
Share
Primary Sidebar
Photoshop Tutorial
  • Tools
    • Adobe Photoshop Tools
    • Clone Stamp Tool in Photoshop
    • Eraser Tool in Photoshop
    • Selection Tool in Photoshop
    • Blur Tool in Photoshop
    • Eyedropper Tool in Photoshop
    • Move Tool in Photoshop
    • Paint Bucket Tool in Photoshop
    • Patch Tool in Photoshop
    • Pencil Tool in Photoshop
    • Line Tool in Photoshop
    • Color Replacement Tool in Photoshop
    • Background Eraser Tool in Photoshop
    • Burn Tool in Photoshop
    • Custom Shape Tool in Photoshop
    • Magic Wand Tool in Photoshop
    • Quick Selection Tool in Photoshop
    • Red Eye Tool in Photoshop
    • Ruler Tool in Photoshop
    • Sharpen Tool in Photoshop
    • Smudge tool in Photoshop
    • Sponge Tool in Photoshop
    • Rectangle Tool in Photoshop
    • Lasso Tool in Photoshop
    • Adobe Photoshop Elements tools
    • Photoshop Mixer Brush Tool
    • Watercolor Brushes in Photoshop
    • Artboard in Photoshop
    • Crop Tool in Photoshop
    • Healing Brush Tool in Photoshop
    • Transform Tool Photoshop
  • Basic
    • Introduction to Photoshop
    • What is Photoshop
    • Career in Photoshop
    • Install Adobe Photoshop
    • Plugins in Photoshop
    • Photoshop Versions
    • Uses Of Photoshop
    • Adobe Photoshop Shortcut Keys
    • Adobe Photoshop Commands
    • Adobe Photoshop
    • Is Photoshop Free
    • Top 10 Features in Adobe Photoshop
    • Layers in Photoshop
    • 10 Free UI Kits For to Download
    • Smart Objects in Photoshop
  • Effects
    • Text Effects in Photoshop
    • Metal Text Effect in Photoshop
    • Reflection Effect in Photoshop
    • Snow Effect in Photoshop
    • Mirror Effect in Photoshop
    • Motion Effect in Photoshop
    • Oil Paint Filter in Photoshop
    • Plastic Effect in Photoshop
    • Rain Effect in Photoshop
    • Gold Text Effect in Photoshop
    • 3D Text in Photoshop
    • 3D Text Effect in Photoshop
    • Clipping Mask in Photoshop
    • Fill Color in Photoshop
    • Delete Background in Photoshop
    • Transparent Text in Photoshop
    • Make Logo in Photoshop
    • Blend Images in Photoshop
    • Website Layout in Photoshop
    • Change Hair Color in Photoshop
    • Change Color in Photoshop
    • Highlight Text in Photoshop
    • Change Text Color in Photoshop
    • Change Shirt Color in Photoshop
    • Filters in Photoshop
    • Portrait Effect in Photoshop
    • Fire Effect in Photoshop
    • Ice Effect in Photoshop
    • Metallic Effect Photoshop
    • Photoshop Font Effects
    • Glow Effects in Photoshop
    • Tree Brush Photoshop
    • Shiny Effect Photoshop
    • Morphing in Photoshop
    • Dispersion Effect in Photoshop
    • Photoshop Distort Effect
    • Typography in Photoshop
    • Photoshop Cinemagraph
    • Glitch Effect in Photoshop
    • Photoshop Straighten Image
    • Stamp Effect in Photoshop
    • Warp Image Photoshop
    • Fix Perspective in Photoshop
    • Vanishing Point in Photoshop
    • Fisheye Effect in Photoshop
    • Distortion Effect Photoshop
    • Resize Object in Photoshop
    • How to Paint in Photoshop?
    • How to Print in Photoshop?
    • Perspective Correction in Photoshop
    • Photoshop Sun Effect
    • Photoshop Gold Gradient
    • Night Effect in Photoshop
    • What is Masking
    • Photoshop Polaroid
    • Pixel Effect Photoshop
    • Vaporwave Photoshop
    • Vintage Effect Photoshop
    • Photoshop hologram effect
    • Templates in Photoshop
    • MP4 to GIF Photoshop
    • Photoshop Cheat Sheet
  • Interview Questions
    • Photoshop Interview Questions

Related Courses

Photoshop Training Course

Adobe Premiere Pro Training Course

Design Training Course

Footer
About Us
  • Blog
  • Who is EDUCBA?
  • Sign Up
  • Corporate Training
  • Certificate from Top Institutions
  • Contact Us
  • Verifiable Certificate
  • Reviews
  • Terms and Conditions
  • Privacy Policy
  •  
Apps
  • iPhone & iPad
  • Android
Resources
  • Free Courses
  • Photoshop Tutorial
  • 3ds Max Tutorial
  • All Tutorials
Certification Courses
  • All Courses
  • Design Course - All in One Bundle
  • Photoshop Course
  • Maya Course
  • Unreal Engine Course
  • Unity Course
  • DaVinci Resolve Course
  • Pro Tools Course

© 2020 - EDUCBA. ALL RIGHTS RESERVED. THE CERTIFICATION NAMES ARE THE TRADEMARKS OF THEIR RESPECTIVE OWNERS.

EDUCBA Login

Forgot Password?

EDUCBA
Free Design Course

3D animation, modelling, simulation, game development & others

*Please provide your correct email id. Login details for this Free course will be emailed to you
Book Your One Instructor : One Learner Free Class

Let’s Get Started

This website or its third-party tools use cookies, which are necessary to its functioning and required to achieve the purposes illustrated in the cookie policy. By closing this banner, scrolling this page, clicking a link or continuing to browse otherwise, you agree to our Privacy Policy

EDUCBA

*Please provide your correct email id. Login details for this Free course will be emailed to you
EDUCBA
Free Design Course

3D animation, modelling, simulation, game development & others

*Please provide your correct email id. Login details for this Free course will be emailed to you

Special Offer - Photoshop Training (9 Courses, 12+ Projects) Learn More