EDUCBA

EDUCBA

MENUMENU
  • Free Tutorials
  • Free Courses
  • Certification Courses
  • 280+ Courses All in One Bundle
  • Login
Home Design Design Tutorials Photoshop Tutorial Eyedropper Tool in Photoshop
Secondary Sidebar
Photoshop Tutorial
  • Basics and Advanced
    • What is Photoshop?
    • Install Adobe Photoshop
    • Introduction to Photoshop
    • Career in Photoshop
    • Uses of Photoshop
    • Adobe Photoshop Commands
    • Is Photoshop Free?
    • Website Layout in Photoshop
    • Adobe Photoshop
    • Top Features in Adobe Photoshop
    • Adobe Photoshop Elements tools
    • Free UI Kits For Photoshop Download
    • Layers Panel in Photoshop
    • Photoshop Moon Brushes
    • Ripple Effect Photoshop
    • Action in Photoshop
    • Photoshop Color Match
    • Photoshop color picker
    • Photoshop split toning
    • Photoshop GIF
    • Photoshop Extend Background
    • Photoshop template flyer
    • Photoshop content aware fill
    • Photoshop Overlays
    • Photoshop vignette
    • Photoshop Textures
    • Photoshop liquify
    • Photoshop automate
    • Photoshop presets
    • Layer effects in Photoshop
    • Photoshop hologram effect
    • Vintage Effect Photoshop
    • Vaporwave Photoshop
    • Photoshop Polaroid
    • Pixel Effect Photoshop
    • Photoshop Creative
    • MP4 to GIF Photoshop
    • Templates in Photoshop
    • Night Effect in Photoshop
    • Photoshop Sun Effect
    • Photoshop Gold Gradient
    • Perspective Correction in Photoshop
    • VHS Effect Photoshop
    • Halftone in Photoshop
    • Puppet Warp in Photoshop
    • Photoshop Cheat Sheet
    • Resize Object in Photoshop
    • Distortion Effect Photoshop
    • Clone Stamp Tool in Photoshop
    • Fisheye Effect in Photoshop
    • Vanishing Point in Photoshop
    • Fix Perspective in Photoshop
    • Warp Image Photoshop
    • Transform Tool Photoshop
    • Photoshop Straighten Image
    • Glitch Effect in Photoshop
    • Photoshop Cinemagraph
    • Stamp Effect in Photoshop
    • Typography in Photoshop
    • Photoshop Distort Effect
    • How to Print in Photoshop?
    • Morphing in Photoshop
    • Glow Effects in Photoshop
    • Tree Brush Photoshop
    • 3D Text Effect in Photoshop
    • Shiny Effect Photoshop
    • Photoshop Font Effects
    • Metallic Effect Photoshop
    • Ice Effect in Photoshop
    • Dispersion Effect in Photoshop
    • Healing Brush Tool in Photoshop
    • Crop Tool in Photoshop
    • Artboard in Photoshop
    • Fire Effect in Photoshop
    • Photoshop Versions
    • Portrait Effect in Photoshop
    • Quick Selection Tool in Photoshop
    • How to Highlight Text in Photoshop?
    • How to Change Text Color in Photoshop?
    • Change Color in Photoshop
    • Filters in Photoshop
    • Change Hair Color in Photoshop
    • How to Change Shirt Color in Photoshop?
    • Watercolor Brushes in Photoshop
    • How to Blend Images in Photoshop?
    • Plastic Effect in Photoshop
    • Ruler Tool in Photoshop
    • How to Fill Color in Photoshop?
    • How to Delete Background in Photoshop?
    • Plugins in Photoshop
    • Photoshop Mixer Brush Tool
    • Color Replacement Tool in Photoshop
    • Eraser Tool in Photoshop
    • Motion Effect in Photoshop
    • How to Make Logo in Photoshop?
    • Lasso Tool in Photoshop
    • Reflection Effect in Photoshop
    • Metal Text Effect in Photoshop
    • Gold Text Effect in Photoshop
    • Smart Objects in Photoshop
    • Text Effects in Photoshop
    • Layers in Photoshop
    • 3D Text in Photoshop
    • Selection Tool in Photoshop
    • Patch Tool in Photoshop
    • Eyedropper Tool in Photoshop
    • Rectangle Tool in Photoshop
    • Background Eraser Tool in Photoshop
    • Rain Effect in Photoshop
    • Oil Paint Filter in Photoshop
    • Clipping Mask in Photoshop
    • Burn Tool in Photoshop
    • Paint Bucket Tool in Photoshop
    • Snow Effect in Photoshop
    • Mirror Effect in Photoshop
    • Adobe Photoshop Alternatives
    • Transparent Text in Photoshop
    • Sharpen Tool in Photoshop
    • Custom Shape Tool in Photoshop
    • Adobe Photoshop Tools
    • Red Eye Tool in Photoshop
    • Adobe Photoshop Shortcut Keys
    • Pencil Tool in Photoshop
    • Blur Tool in Photoshop
    • Smudge tool in Photoshop
    • Sponge Tool in Photoshop
    • Magic Wand Tool in Photoshop
    • Move Tool in Photoshop
    • Line Tool in Photoshop
    • Photoshop Interview Questions
    • Lightroom New Presets

Eyedropper Tool in Photoshop

sAMAAN

Introduction to Eyedropper Tool in Photoshop

Eyedropper tool is a very useful tool used in Photoshop to get the precise color in the artwork; using the eyedropper tool, the users can match a particular object color to the new object just by dropping the tool on to the source object, and it makes the task effortless and quick even if you do not know the color value; also users can employ the Eyedropper to assign that detailed shadow to the color palette when they link a print that is already available in the file and can be used anywhere else in the image.

Steps to Use the Eyedropper Tool in Photoshop

If you want to record color or anything, you can do it with the eyedropper; that is, you can see it on a blog or a journal you are studying on your desktop. The advice saves you trouble getting screen grabs to figure out color characteristics and bring them to Photoshop.

Start Your Free Design Course

3D animation, modelling, simulation, game development & others

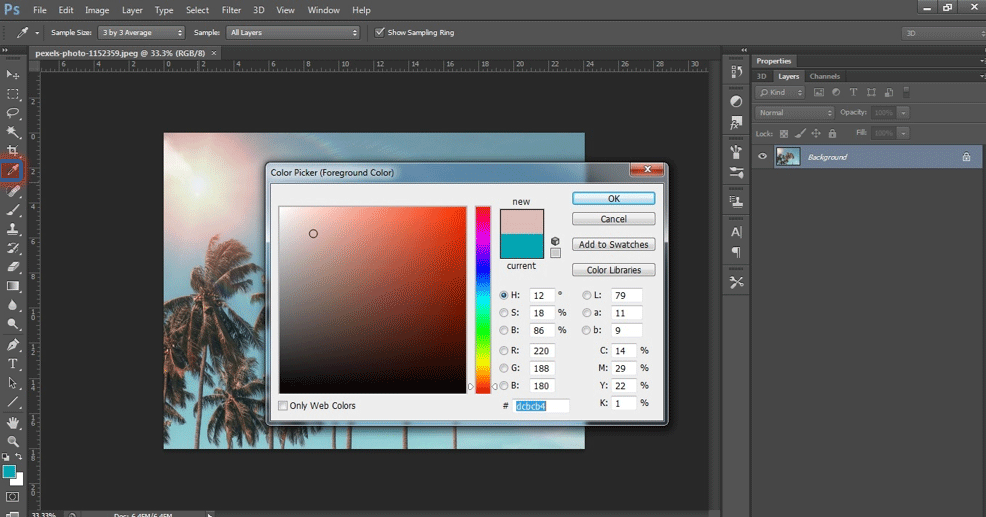
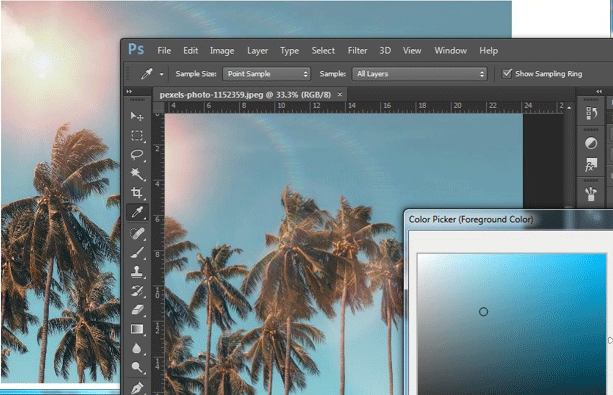
Step 1: In a Tools Panel or Color Panel, select the foreground (or context).

Tool Box EyeDropper

Step 2: In the Tools board, choose the Eyedropper device (or click the’ I ‘ button). The Eyedropper feels like a true eye dropper, fortunately.

Step 2 EyeDropper Tool

Step 3: In your image, click the color you want to use.

Step 3 EyeDropper Tool

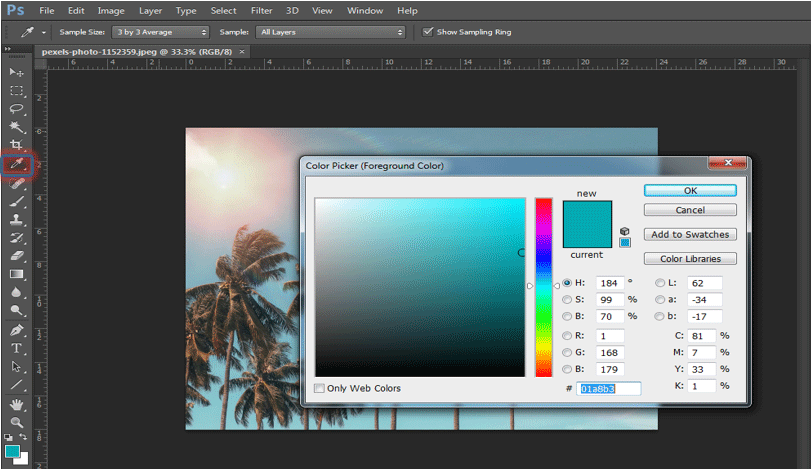
Step 4: This color will be your fresh color in the foreground.

Step 4 Eye Dropper Tool

Tips for using a tool with Eyedropper

Below are some helpful suggestions to use the Eyedropper color sucking device from one location and use in your picture elsewhere:

  1. From any sort of picture that is accessible, select any color you want. You can press inside an image you’re not operating with if you have many pictures closed. Even with information in an extra request or from your computer, you can increase any type of color. Just press and bring the eyedropper to the color you want to show from the picture panel. Make sure both app house screens can be seen.
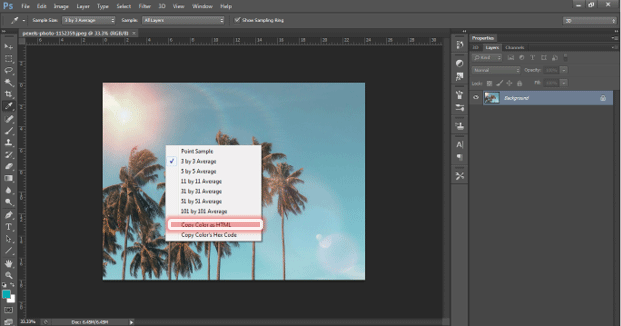
  2. Choose your region of the sample. When using the Eyedropper device, you only have two decisions (on the Options Bar). The color of the pixel that you just tap can be chosen (Sample point). Or Photoshop standards for pixel colors at a distance of three-x-3, five-x-5, eleven-x-11, 31-x-31, 51-x-51 or ten1-x-101. You can also decide to just sample your energy coating or all parts at present.
  3. Right-click on your mouse to create web colors. You can also use the Duplicate Color HTML choice to add to your page if your picture is right-clicked (control-click on the Mac) to increase the range of background products. It transforms the color of the sample into a hexadecimal color code and also copies it to the clipboard to make sure that the code can be pasted into HTML information. You may also use the Copy Color’s Hex Code to get dispose of the”=” portion of the label for CSS people.

Eyedropper Tool in Photoshop (HTML Color)

  1. Flip between the Eyedropper and other instruments as well. For your efficient paint fulfillment, retaining Alt (Option on Mac) allows you to quickly reach Eyedropper when using the brush, pencil, color substitute, gradient, paint pail or forming instrument. Remove the button to the initial instrument.
  2. Toggle between bottom and foreground. If the instance of the first color is vigorous, the Eyedropper instrument lifts the fresh backdrop color by Alt-click (Optional click Mac). When the color swatch backdrop is vigorous, the brand new foreground color is raised with the option of clicking the Mac.

How can we use Eyedropper?

The Eyedropper Tool specifies the first/secondary color.

1. Choose the tool in the tool kit.

2. To indicate the first color, click somewhere on your picture. See how the first marker adjusts for the toolkit.

3. To press the backdrop color, press Alt (press hold the[ Alt] button). Look at the Toolbox Settings context marker.

4. The sample size (the Eyedropper range) can be transformed in the Options bar:-

  • the “Point Example” records the color from the pixel that you tap on.
  • all the other instances examined typical numbers from wider fields.

Other Tips:

1. A color can be collected from the image in the workspace of Photoshop and other applications.

See the following image. The Photoshop screen has been decreased in volume. We want a web page (Internet Explorer) to capture the color of the sky from an image.

Decrease the Volume

Turn on the tool, placed the cursor on the picture, click the left button on the mouse, and spin the cursor to show the sky color outside Photoshop.

2. To clarify the color selection, tap CapsLock on the keyboard, and the Eyedropper will become a target to collect an accurate pixel of a picture.

3. To sample a given color is the Eyedropper tool. What you want to do should be just below the eyedropper with a stamp or healing brush. Once one of the above is selected, choose the pen type and go to the sample region and click Alt+. Now you can paint the same device wherever you are on paper.

The final output is:

Final Out Put of Eye Dropper

Conclusion

For every color you want to use, you might know the exact RGB or CMYK values. The Eyedropper is not needed in this situation. But if you don’t know the exact color values, the Eyedropper finds these for you immediately. You can use the instrument to determine your precise color. You can match the colors of an existing picture. In the corresponding color, you can then insert writing or images.

Photoshop does have several helpful instruments, but the Eyedropper is the most helpful instrument for some customers. The Eyedropper is easy to use and has a lot of significance.

To sample a given color with the Eyedropper instrument. What you want to do should be just below the eyedropper with a stamp or healing brush. Once one of the above is selected, choose the pen type and go to the sample region and click Alt+. Now you can paint the same device wherever you are on paper.

Recommended Articles

This has been a guide to Eyedropper Tool in Photoshop. Here we discussed how to use the Eyedropper Tool in Photoshop. You can also go through our other suggested articles to learn more –

  1. Adobe Photoshop Commands
  2. Blur Tool in Photoshop
  3. Magic Wand Tool in Photoshop
  4. Pencil Tool in Photoshop
Popular Course in this category
Photoshop Training (10 Courses, 12+ Projects)
  10 Online Courses |  12 Hands-on Projects |  80+ Hours |  Verifiable Certificate of Completion
4.9
Price

View Course

Related Courses

Adobe Premiere Pro Tutorial (4 Courses, 7+ Projects)4.9
All in One Design Bundle (280+ Courses, 100+ projects)4.8
Primary Sidebar
Footer
About Us
  • Blog
  • Who is EDUCBA?
  • Sign Up
  • Live Classes
  • Corporate Training
  • Certificate from Top Institutions
  • Contact Us
  • Verifiable Certificate
  • Reviews
  • Terms and Conditions
  • Privacy Policy
  •  
Apps
  • iPhone & iPad
  • Android
Resources
  • Free Courses
  • Photoshop Tutorial
  • 3ds Max Tutorial
  • All Tutorials
Certification Courses
  • All Courses
  • Design Course - All in One Bundle
  • Photoshop Course
  • Maya Course
  • Unreal Engine Course
  • Unity Course
  • DaVinci Resolve Course
  • Pro Tools Course

ISO 10004:2018 & ISO 9001:2015 Certified

© 2023 - EDUCBA. ALL RIGHTS RESERVED. THE CERTIFICATION NAMES ARE THE TRADEMARKS OF THEIR RESPECTIVE OWNERS.

EDUCBA

*Please provide your correct email id. Login details for this Free course will be emailed to you

Let’s Get Started

By signing up, you agree to our Terms of Use and Privacy Policy.

EDUCBA

*Please provide your correct email id. Login details for this Free course will be emailed to you
EDUCBA

*Please provide your correct email id. Login details for this Free course will be emailed to you
EDUCBA Login

Forgot Password?

By signing up, you agree to our Terms of Use and Privacy Policy.

This website or its third-party tools use cookies, which are necessary to its functioning and required to achieve the purposes illustrated in the cookie policy. By closing this banner, scrolling this page, clicking a link or continuing to browse otherwise, you agree to our Privacy Policy

Loading . . .
Quiz
Question:

Answer:

Quiz Result
Total QuestionsCorrect AnswersWrong AnswersPercentage

Explore 1000+ varieties of Mock tests View more