What is a Rectangle Tool in Photoshop?
What is a Rectangle tool, and why is this tool in Photoshop so important till date? Drawing Vector Shapes in Photoshop is something we could do using a vector shape, and through this content, it will help us know how it differs from a pixel-based shape.
The Rectangle Tool is the one that’s visible by default, but if we click and hold on to the tool’s icon, a fly-out menu appears, showing us the other tools we can choose from. We have something called the Rectangle tool, which is also known as a shape tool, a drawing tool and a type tool to alter or change objects or something which we create in our designs or images.
As we look into these things to know more, we need to understand the uses and that these drawing tools are used to work on vector paths. These vector paths are nothing but vector-based outlines, which can also be used to turn into selections. While such a tool is to be used, we go to the Options bar to choose whether to draw paths or shape layers. For these to be worked upon, the type is well created in type layers that can then transform, scale, rotate, skew, distort, perspective, and even warp as we go along further to set our outputs through the paths.
This tool is useful to create shapes for various banners, leaflets, menu cards, website designs, online advertisements, etc. Using this tool, we are actually drawing a basic geometric shape using the Rectangle tool, which we can later develop this shape using options and methods through the properties given in Photoshop.
How to use the Rectangle Tool?
To know more and learn in-depth about how we use the Rectangle tool so we can draw any shapes, we first need to talk to Photoshop about what kind of shape we want to create. This makes us aware that our Photoshop sets a thing for us to draw three different kinds of shapes. So to our understanding, we get to visualize what we can draw using vector shape, path, or pixel shapes.
Steps to Use the Rectangle Tool in Photoshop
To begin with, we start by following with these steps to know how we can use the Rectangle tool; we should also begin by understanding how we can also start our work using the shortcuts given to us, which could help us deliver our work faster in a short timeframe.
First, we have to start by pressing the shortcut key (V) on the keyboard, which activates the Move tool. This tool helps us with navigating through our Photoshop options while we are going through various options. The Move tool can also be found in the side Toolbar, i.e. at the top left-hand corner in the side Toolbar.
Moving on, we start our steps to elaborate more as to how we can go about using the Rectangle Tool through these steps below:
Step 1: For us to start using the Rectangle Tool, first, we go to the option by selecting the “Rectangle Tool” from the toolbox and Tool Options Bar.
To our surprise, we first think we need first to click the toolbox and where the Rectangle tool is or why it is hidden somewhere.
We can also use the shortcut key (U) on the keyboard like we on the image below, which activates the Rectangle tool. This shortcut key (U) can also be used for the shape tools as well.

Step 2: Our next step right after we have looked into the rectangle tool, its settings would be more fun to use.
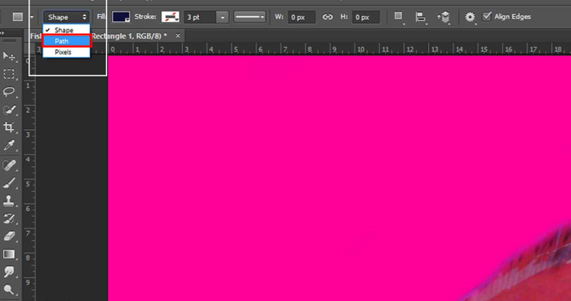
At the top left-hand corner, we have the three options we see, i.e. Shapes, Path, or Pixels shapes which we have in the image. Also, to make sure that we are drawing shapes and not a path or pixels, we first select the Shape option from the option above along the top left-hand corner of the screen.
What we should always remember is that the Pixels options aren’t the same as the Shapes options. This can help us draw them in any size we like, edit and scale them as much as we want, and even print them at any size without losing their quality.
This could always mean that when we’re viewing them on screen or in print, the edges of these shapes will always remain sharp and detailed.
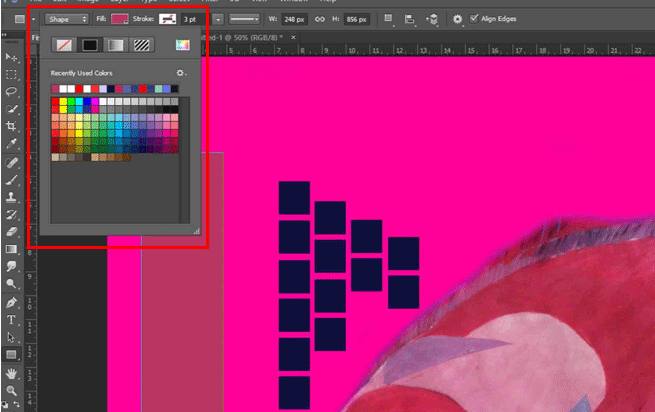
Step 3: When we need to add colors into our shape what we draw, we want to pick a color from the Fill color swatch by clicking the option in the Options Bar.
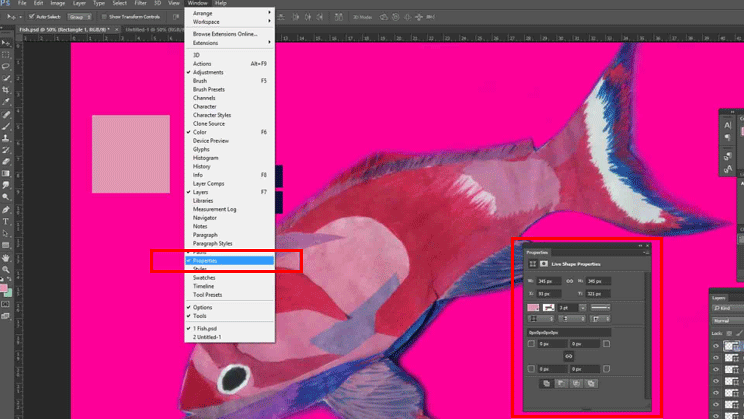
We can go to the Windows options on the top. Once we click on it, we see the Properties option. Once clicked, it opens up a box with a list of properties for us to go around with it, such as the “Width x Height”, “Fill and Stroke options”, “set the shape stroke-width”, “set the shape stroke type”, etc.
Step 4: Go to the properties and change the Width and Height of the rectangle.
Step 5: Further on, we can also use some keyboard shortcuts to draw our shapes:
- Press and hold the Alt (in Windows) key on your keyboard; when you drag the shape, you see that you are drawing it from its center.
- Press and hold the Shift (in Windows) key on your keyboard; when you drag the shape, you see that you are drawing it from its corner.
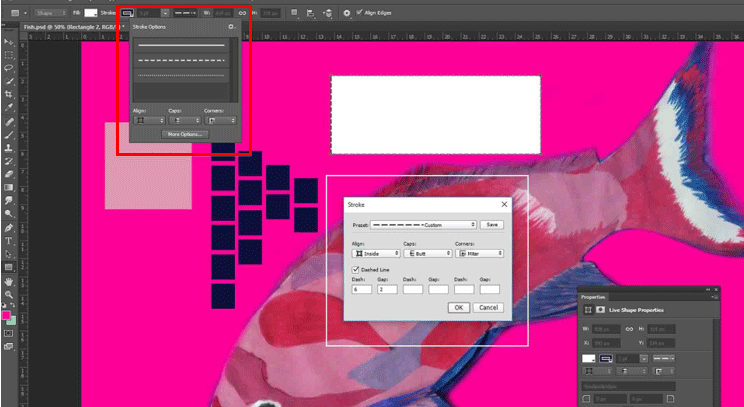
These shortcut keys are effective with the Rectangle tool and any of the shape tools listed which we choose. As we see in the image below, we can also adjust the dash and gap size for our shape, just like the way we can increase the stroke size.
Conclusion
Coming to our conclusion after we have all the essentials that we need to know about the Rectangle tool, we can use this to our advantage, knowing how we use this tool to create our designs or elaborate more with the importance of details and textures while using it. That’s why we have all the publishers, graphic artists, photographers, website builders and apps creators knowing its value using it to create more values to their product or artistic features that maybe their clients or customers.
Recommended Articles
This has been a guide to Rectangle Tool in Photoshop. Here we discussed how to use Rectangle Tool in Photoshop. You can also go through our other suggested articles to learn more –
