Updated February 14, 2023
Introduction to Nginx Authentication
Nginx authentication is used to restrict access from the unauthenticated user. For example, we can limit access to our websites by using authentication of username and password; we are taking username and password from a file populated from a creation tool. Moreover, the basic authentication of http is also combined with the restriction methods of others, like restricting access by using an IP address. Therefore, Nginx authentication is very useful and essential.

What is Nginx Authentication?
Nginx will authenticate each request to our website using an external service or server. For performing the authentication, nginx will make a sub-request of http for a server of external where our sub-request is verified. If we assume that our subrequest will return a response code of 2xx, then we can say that it will allow access. On the other hand, if suppose the subrequest will return 403 or 401, then we can say that the access is denied. The nginx authentication allows us to implement various authentication schemes, such as the OAuth authentication of multifactor authentication.
Use to Add Nginx Authentication
We can use the nginx auth_request module to add the nginx authentication. The nginx auth_request module is shipped using nginx, but it requires enabling when compiling the nginx. The request module of auth is sited between the internet and our backend server, which nginx will pass the request. Any time the request comes, it will first forward the request to a separate server for checking whether the user is authenticated, and it uses the response of http to decide to allow the request to work in the backend.
We can also use the auth proxy in an nginx authentication; this server is used to handle the request and, after handling the request, return the http 400 or 200, depending on whether our user is logged in. If suppose a user is not logged in, then we will know how the user can be logged in.
Basic http authentication contains the security mechanism used to restrict our website or application by using passwords. It is used to protect the whole server of http, location blocks, or server blocks, which are individual. But as the name suggests, it is not a secure method; we can also use it the conjunction with other security measures.
If suppose our web application is running on HTTP, then our user credential will be transmitted in a plain text format, so we need to enable the https in that scenario to implement the basic authentication for the whole web server, which applies to all applicants. The below example shows how we can configure the nginx http authentication as follows.
Code:
http {
  auth_basic "User access restricted";
  auth_basic_user_file /etc/nginx/conf.d/.htpasswd;
}
Output:

How to Set Up Password Nginx Authentication?
Below steps shows how to set up password nginx authentication as follows:
First, we need to install nginx in our system to set up password authentication.
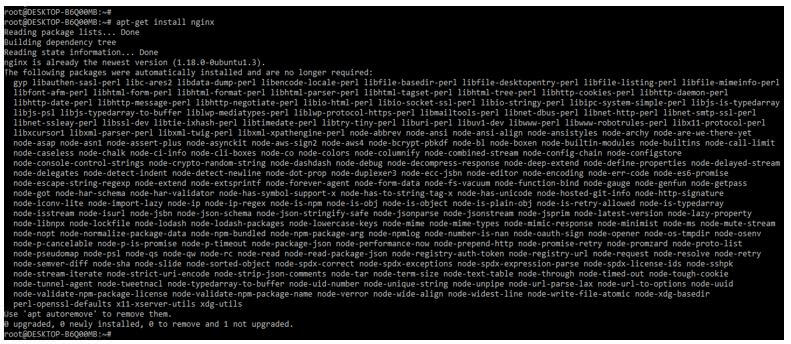
1. In this step, we install the nginx server on the ubuntu system. We are installing the nginx server by using the apt-get command.
Code:
apt-get install nginxOutput:
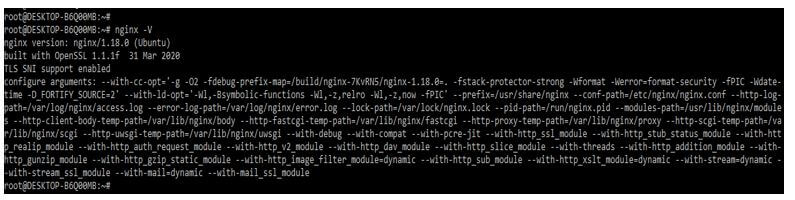
2. After installing the nginx server, we check the nginx installed version by using the following command. We can check the nginx version and the running status of the nginx server.
Code:
nginx –VOutput:
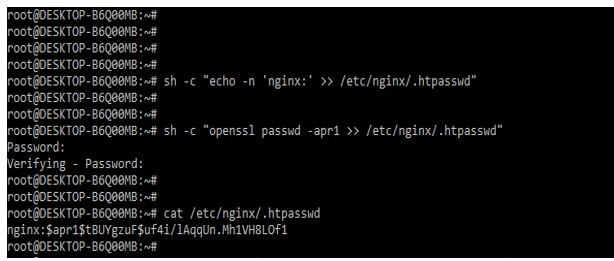
3. In this step, we create the password file and make the password file by using the openssl utilities. We are adding the username and password by using the following command as follows. We can create the password file without additional packages if we have already installed openssl on our server. In the example below, we are making the hidden file name .htpasswd. Into the /etc/nginx configuration directory to store the username and password combination. In the below example, we are using the username as nginx and keeping the password in an encrypted format. We can see in .htpasswd that the password of the nginx user is stored in an encrypted form.
Code:
sh -c "echo -n 'nginx:' >> /etc/nginx/.htpasswd"
sh -c "openssl passwd -apr1 >> /etc/nginx/.htpasswd"
cat /etc/nginx/.htpasswd
Output:
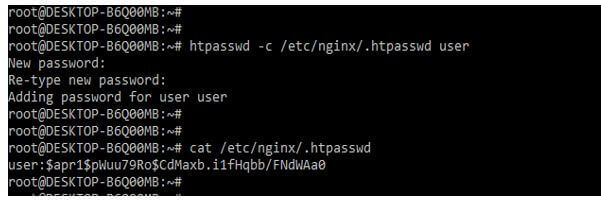
4. To set the authentication, we must decide which context to restrict. Among all the choices, nginx uses the default method. However, we can also create the password file using the apache utilities; the below example shows to create a password file using apache utilities.
Code:
htpasswd -c /etc/nginx/.htpasswd user
cat /etc/nginx/.htpasswd
Output:
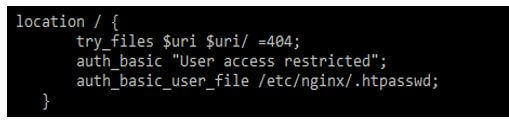
5. After creating the password file, we configure the nginx password authentication. First, we are opening the server block on which we need to add the restriction for the specified block. Then, we need to add the following line to the configuration files to set the authentication.
Code:
location / {
  try_files $uri $uri/ =404;
  auth_basic "User access restricted";
  auth_basic_user_file /etc/nginx/.htpasswd;
}
Output:
How to Set Up HTTP Authentication Work?
Below steps shows how to set up http authentication work as follows:
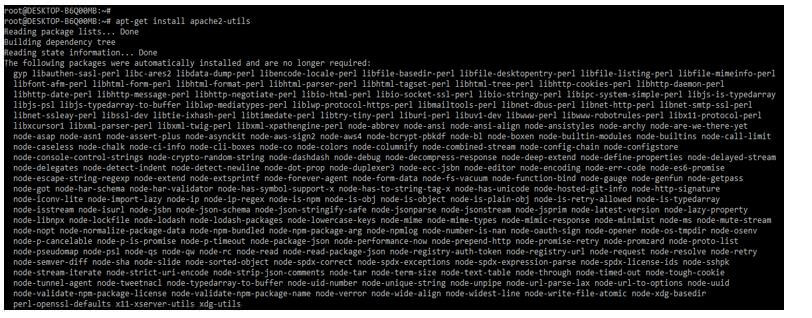
To set up http authentication, first, we need to install the apache2-utils package in our system.
1. In the first step, we install the package of apache2-utils by using the apt-get command.
Code:
apt-get install apache2-utilsOutput:
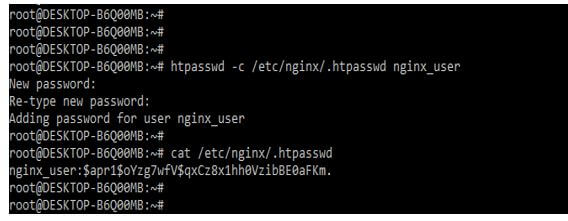
2. In this step, we create the password file using apache utilities as follows. The below example shows to create a password file using apache utilities. We are using the htpasswd command to create a password file using apache utilities. We can see that we have made the password file name as .htpasswd. We have provided the username as nginx_user and supplied the password while creating the file.
Code:
htpasswd -c /etc/nginx/.htpasswd nginx_user
cat /etc/nginx/.htpasswd
Output:
3. After creating the password file in the below example, we are configuring the authentication below into our configuration file. We are using the http block for the same.
Code:
http {
  auth_basic "User access restricted";
  auth_basic_user_file /etc/nginx/.htpasswd;
}
Output:

Conclusion
Basic authentication of http is also combined with the restriction methods of others, like restricting access by using IP addresses. Nginx authentication allows us to implement various authentication schemes, such as the OAuth authentication of multifactor authentication. Therefore, Nginx authentication is very useful and essential for restricting the user.
Recommended Articles
This is a guide to Nginx Authentication. Here we discuss the introduction, use to add nginx authentication, set up a password, and HTTP authentication. You may also have a look at the following articles to learn more –
