Updated July 17, 2023
Guide to Microsoft Word Features – All of us adore the benefits Microsoft Office has provided us. Microsoft Word is the most used digital word processor, universally accepted by students, professionals, and businesses. If you’re migrating from another tool or if this is your first stint with the newer versions of Microsoft Word features software, welcome. You’ll find your tryst with Microsoft Word software application a multi-dimensional affair, ideal for beginners and advanced users and for making complex formatting changes.
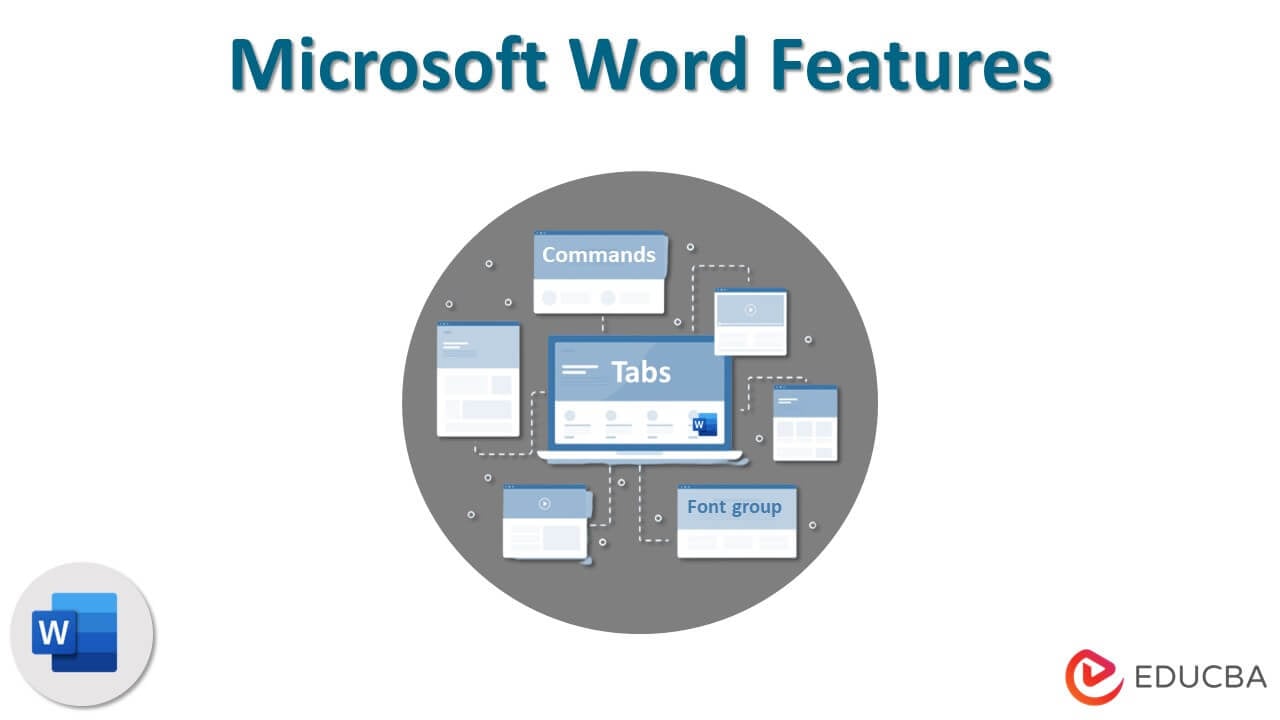
Guide to Get Started With Microsoft Word Features
In this post, we outline a Beginner’s Guide to Microsoft Word.
-
Documents, Blog Posts, and Microsoft Word Templates
The first time you open this tool, you’ll be prompted to “create” a blank document, a blog post, or a new/existing Microsoft Word template.
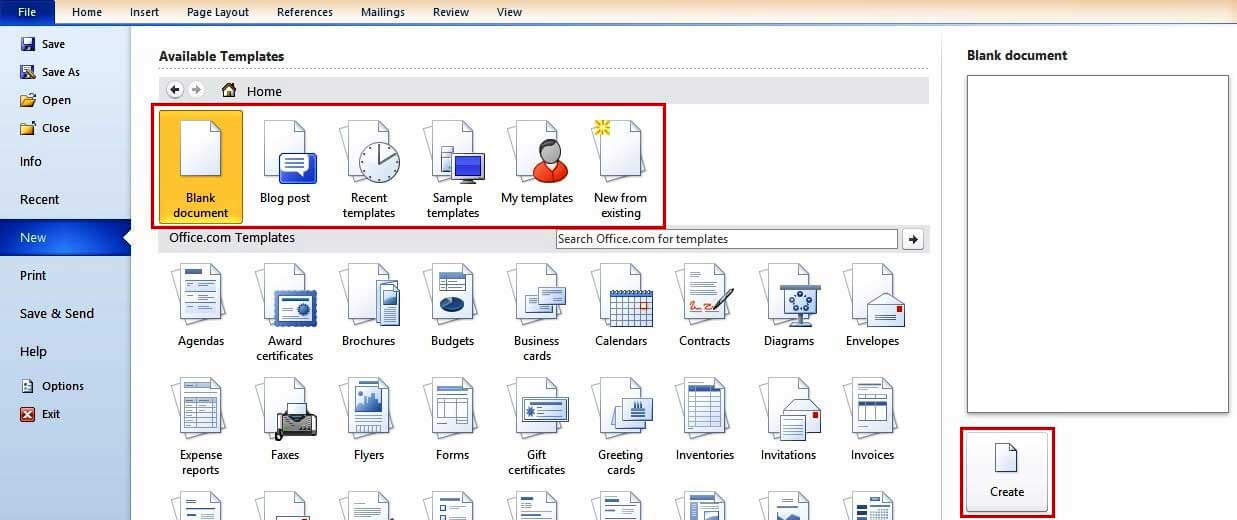
- Documents are essentially like text files that support complex formatting. Each format has a page size and a layout.
- Blog posts are essentially for passionate bloggers. To ensure seamless uploading of your posts, a prompt will appear asking for your blog account details.
- Microsoft Word templates are essentially pre-defined formats.
As a new user, we suggest you create a blank template to get started on your journey to discover Microsoft Office Word.
-
The Tabbed Ribbon in newer versions of Microsoft Word Features
Newer versions of Microsoft Word features (2007 and above) come with the now-famous “Ribbon,” a sequence of Screens that capture all the capabilities of your Microsoft Word templates Software application.
Through this, MS Word makes its utilities available to use. The Ribbon, in turn, contains:
-
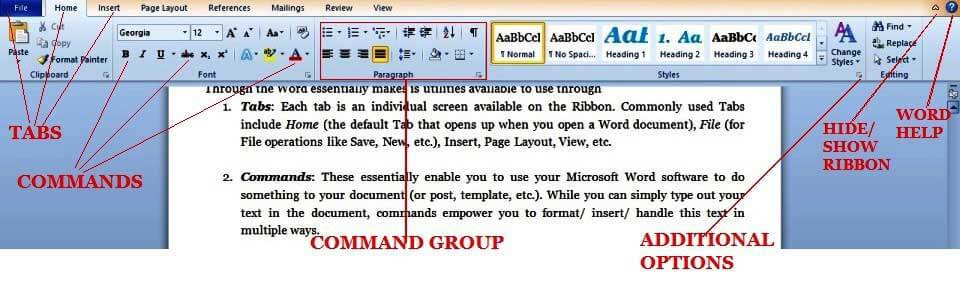
Tabs:
Each Tab is an individual screen available on the Ribbon. Commonly used Tabs include Home (the default Tab that opens up when you open a Word document), File (for File operations like Save, New, etc.), Insert, Page Layout, View, etc.
-
Commands:
These enable you to use your Microsoft Word templates software to do something to your Word document (or post, template, etc.). While you can type out your text in the document, commands empower you to format/ insert/ handle this text in multiple ways.
-
Command Groups:
Commands are grouped based on their functionality for easy access. For instance, basic text-formatting commands are put together in one group, paragraph formatting commands in another group, and so on. Sometimes, you’ll see a tiny arrow at the bottom of the group. You can click on it to open up additional commands and options related to the group.
In addition, here are some special commands available on the Ribbon:
- The caret symbol (^) at the top right-hand side corner of the Ribbon can be used to hide/show the command/groups. This is useful when reviewing your Word document in a larger screen space without distractions.
- The question symbol in blue (?) brings up Microsoft Word features Help utility. (Alternately, you can use the F1 keyboard shortcut to bring this up.) You can either browse through existing categories or use the search text box to type out what you want to find.
You can customize this Ribbon anytime: add new commands to an existing group, create a new tab with your favorite commands, etc. To do this, right-click on any part of the Ribbon and choose “Customize the Ribbon….”
You will become familiar with the File, Home, Page Layout, and View tabs through the rest of this post, as these are most commonly used for editing Word documents.
-
The FILE Tab
Clicking on the File Tab immediately takes you to the “Backstage View,” which provides comprehensive information about your document, including all the intricate details. This basic tutorial will keep it simple and introduce you to the frequently used file-related commands.
-
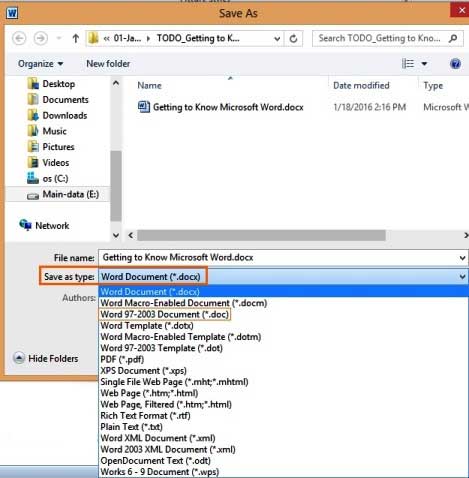
Save and Save As:
This is possibly the first command you should use when typing text. It lets you save your document on the hard disk as a .docx file (by default). Take note of the type of file here. To open your Word document with older versions of Microsoft Word features, you must explicitly choose a backward-compatible file type. You can save your file as a PDF, self-contained web, text file (.txt or .rtf, formatting changes are lost), etc.
-
New, Open, Close:
Names are self-explanatory as they enable you to open/close or create a new document/ blog post or template.
-
Recent:
This stores the list of recently accessed documents and folders so you can quickly open the last record you worked on.
-
Options:
This dialog box houses the master preferences for your document and controls your display and editing options. The default setup will do nicely for most documents, so you must alter this only on rare occasions. But explore each dialogue when you’re more familiar with an advanced understanding of Office Word.
-
The HOME Tab
The Home Tab is perhaps the most commonly used Tab in Microsoft Word features. And it looks like this:
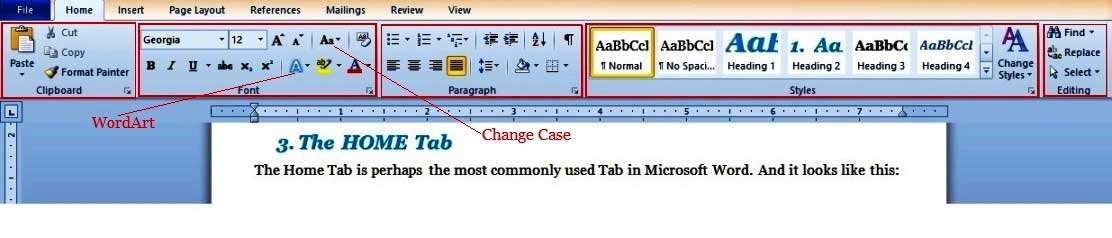
As you can see, this contains five formatting command groups. And there lies its most significant utility: formatting. This is where Microsoft Word features win over any other Word processing software tool (including Microsoft’s own WordPad). It provides users with complex formatting features with a mouse click or two.
Before digging in more deeply, we suggest you play around with a document. Please compose sentences and freely modify and arrange them to your liking. Once you’re done, the Command groups in the Home tab can be used as below.
-
Clipboard group:
This has the mandatory copy-and-paste commands. The paste command has additional options (click on the bottom-arrow symbol below) to paste formatted/ unformatted text/pictures. Also, spend time with Office Word’s special command, “Format Painter,” which allows you to paste formatting across text blocks. Try it now to experience its magic.
- Select a portion of text from anywhere in your document (using the Shift Key).
- Use the Keyboard shortcut (Control + B + I). This will make the selected text bold and italicized. Copy this selected text using the (Control + C); this copies everything in Word, text, and formatting.
- Select some other portion of (plain) text in your document and click on the Format Painter command. And voila, the formatting (alone) gets copied!
This is especially useful when formatting long documents with complex styles; you don’t have to repeat your special formatting needs across document pages. Capture them through the copy command and then “paste” them all over using the Format Painter command!
-
Font group:
Here, we’ll tell you to highlight text in your document and have free play with this group. (There’s no better way to become familiar with Microsoft Word introduction font options). You can set the font typeface for text (based on your system’s inbuilt fonts), change its look (includes size, bold, italics, underline, superscript, subscript, color highlight, etc.), and use Microsoft Word Introduction Art to add instant drama to your text. Also, explore the command that changes the casing of selected text with just one click to uppercase, lowercase, sentence case, etc. (refer to pic above for details).
Microsoft Word introduction also provides more advanced options through a single right-click of your mouse. Again, try this now as you select some text, right-click, and choose the “Font…” option.
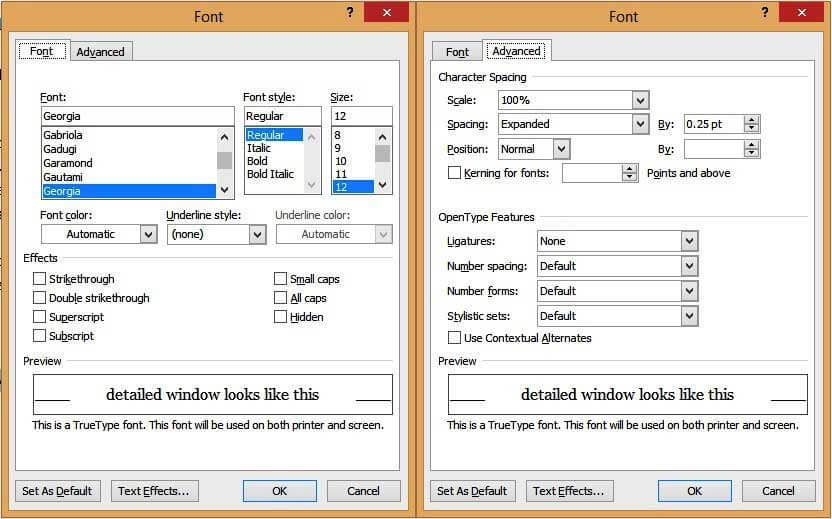
This window has advanced options that give you greater control of your text. The “Text Effects” and “Advanced” tabs are of special interest to capture Microsoft Word introduction coveted formatting features. You can add shadows and reflections to your text, give it an outer glow, change the spacing between letters, and more.
-
Paragraph:
The Paragraph command group allows you to control the alignment, numbering, and line spacing of paragraphs in your document.
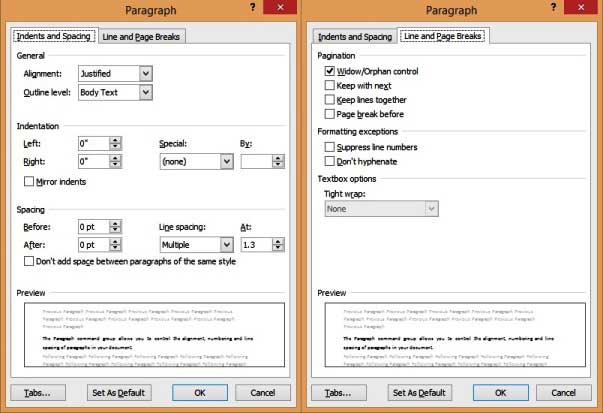
Do take note of the following:
- Text alignment: The setting affects how the text appears on your page by default, and you can change it to align it differently.
- Line spacing: The space between lines is single by default.
- Line and Page Breaks: This determines how a Style spawns across pages. For instance, if you check the “Widow/Orphan control” option, when text with a Heading style falls towards the end of a page, it will automatically be bumped to the top of the next page.
-
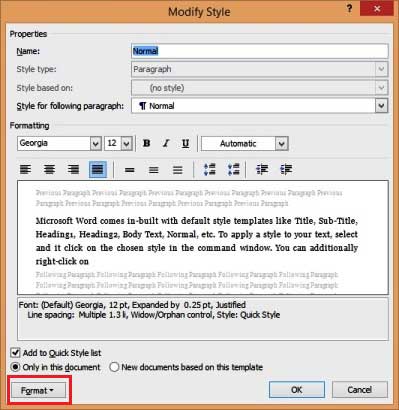
Styles:
Styles are formatting templates used within a document. For instance, you’ll notice that all the Major Headings in this document are in blue, Georgia font size 16, bold and italicized, and have a light shadow. Likewise, all Minor Headings are in Italics, Georgia size 14. Imagine you want to consistently capture these format “styles” through a large text document (say 100 pages). Even with the Format-Painter command, it’s a lot of work. It’s also prone to manual error. With styles, you can do this with minimal effort.
Microsoft Word introduction comes in-built with default style templates like Title, Sub-Title, Heading1, Heading2, Body Text, Normal, etc. To apply a style to your text, select text and click on the chosen style in the command window. You can also right-click the style and “modify” it as desired. You can alter the font settings, text effects, paragraph settings (explained below), and other options in your document, all through the “Format tab” of the Style edit window.
Word also allows you to add your custom styles. For this:
- Select formatted text.
- Right-click and select Styles…
- Choose the option “Save Selection as a New Click Style.”
- Name your custom style.
However, custom styles are limited within the document in use (not available as a template in other documents).
-
Editing:
The final command group available in the Home Tab is the Editing tab. Like any good word processor, Microsoft Word introduction allows you to easily select, find easily, and find-and-replace text blocks across your document. Of this, you can bring up the much-used find-replace dialog box with the Keyboard shortcut (Control + H), and it looks like this:
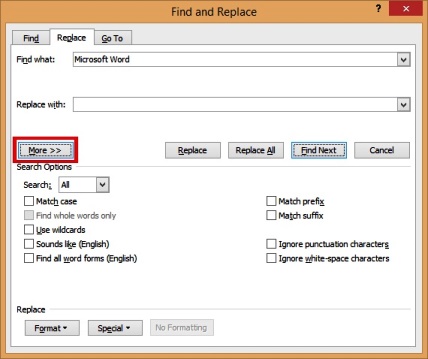
Click the “More>>” button to bring up additional options. You can choose the “Format” and “Special” boxes to find text based on specific formatting criteria.
So that was the Home Tab in a nutshell. Phew! But as you will surely have noticed, over 50% of your most used commands lie in this Tab. Explore this thoroughly until you’re comfortable with it, as this will determine your success with the Microsoft Word introduction.
-
The Page Layout Tab
This Tab contains a host of commands (groups) to control the behavior of each page in your document. And it roughly looks like this:

We will keep it simple here and discuss (only) the Page Setup command group, as this houses two commands you will most likely need to play with.
-
Size:
By default, Microsoft Word sets the document size to a letter size (8.5″ X 11″). You can change this to A4, A3, Executive, or other standard sizes or even define a custom size. Changes will apply to the whole document.
-
Orientation:
By default, this is set to “Portrait”; you can alternatively set it to Landscape. Again, the orientation applies to the whole document by default. (You can alter this by setting specific “Section Breaks,” but this is outside the scope of this Beginner’s guide).
-
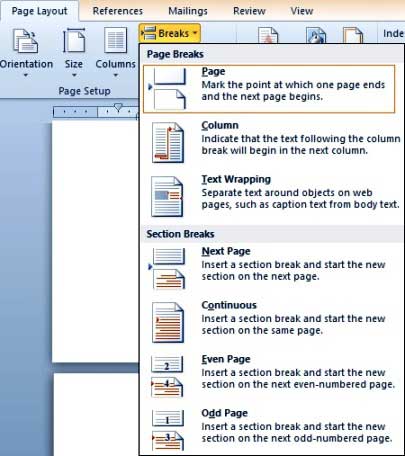
Breaks:
The most commonly used “break” in a Microsoft Word document is a page break. Inserting a page break causes the subsequent text to move to a new page; This is immensely useful when you want to start new chapters/ headings on a new page.
-
The View Tab
The View Tab is the final list of commands (groups) we will visit in this guide. Note the “Document Views” command group here, as this is perhaps the most reviewed group.

Highlights of this view are captured below.
- The “Print Layout” command allows you to showcase your text page at the center and view it much like how it would appear when printed on paper.
- In this view, you can further use the “Zoom” command (group) to increase or decrease the size of your page (impacts only the view and not the actual page size).
- Users can remove all toolbar distractions using the Full-Screen Reading view, which is best for reviewing a document. Pressing the Escape key will return you to the (default) Print Layout view.
- People typically use the Web Layout view to review blog posts.
- You can also toggle views of the Ruler, Gridlines, and Navigation Pane (useful for searching key text in your document) using the “Show” command group.
And that marks the end of our Beginner’s guide to knowing Microsoft Word features!
-
Next Steps
As a beginner, your tryst with Word will open up endless possibilities for better formatting, a cleaner layout and alignment, and an overall superior experience with any digital word processing tool. We encourage you to explore Microsoft Word features software independently, even as you look to more advanced micro-tutorials for guidance. Your efforts will be well worth it!
Recommended Articles
Here are some articles that will help you get more detail about Microsoft Word, arguably the most used digital word processor, so go through the link.
