Updated April 15, 2023
How to Install WordPress?
The following article provides an outline for Install WordPress. Word press installation is really easy, and it takes very less time to install. Many other sites are being used for automatic installation. The following instructions will help you with installing WordPress.
Before Installing WordPress, the below things you have to do:
- Access to a web server
- Ability to create a database
- A text editor
- An FTP client
- Web browser
Basic Instructions to Install WordPress
Given below are the basic instructions to install WordPress:
- Download and extract the WordPress package.
- Create a database for WordPress on a web server.
- Upload the WordPress files to the desired location.
- Run the WordPress installation script by browsing the URL in a web browser and where the files should be uploaded for WordPress.
Steps for Installing WordPress
The steps for installing WordPress are given below:
Step 1: Download and Extract
- Download and unzip the WordPress package from https://wordpress.org/download/.
- If the user wants to upload the WordPress to another server or remote web server, the individual has to download and install the WordPress package to the computer with the help of a web browser and unzip the package.
- If the user has to use FTP, please skip to the next step, as uploading of files will be discussed later.
- If the user has access to the webserver, and are comfortable using console-based tools, then the user can download WordPress directly to a web server using get (or lynx or another console-based web browser).
- When the user has to avoid using FTP: wget https://wordpress.org/latest.tar.gz.
- Then unzip the package using:
tar -xzvf latest.tar.gz. - After installing, the WordPress package will be extracted into a folder named WordPress in the same directory that you downloaded tar.gz.
Step 2: Create the Database and a User
If the user has to use the hosting provider(https://codex.wordpress.org/), the user has to make sure that the WordPress database should also be set up for them, or there is one automated solution that helps in achieving the same. The one has to make sure that the hosting provider’s support pages. The control panel provides information about whether support or not; if not, then you need to create one manually.
If the user has to create that manually, please use the below steps for using phpMyAdmin to create and install the new WordPress user name and database. The user can install WordPress, where the user has to work on one database, and that is already in use.
Using phpMyAdmin
When the webserver is already ready with phpMyAdmin installation and has to create the username and password, the user must use the below steps. If the user is working on his/ her own computer, and in most Linux distributions, installation of PhpMyAdmin can be done automatically.
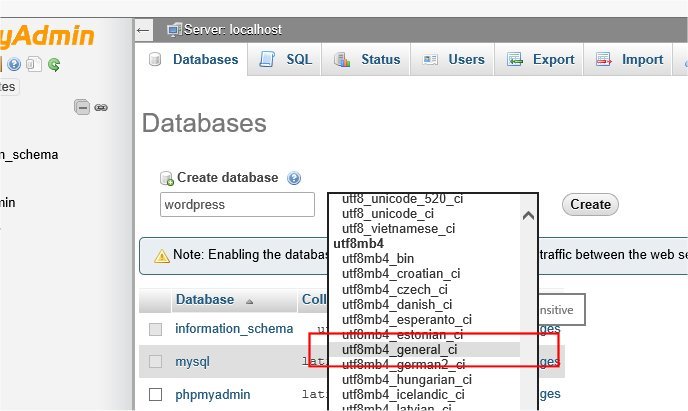
Step 1: If the user is not able to find the database related to WordPress or it does not exist in the Database dropdown while checking, then one has to create the new, follow the instructions to create the new:
- The user has the right to select the name for the WordPress database as ‘WordPress would be good, other names can also be considered, but in real-time, most of the hosting services mainly shared hosting, do require the name of the database beginning with your username and an underscore. If the user is working on his/ her own computer, It has been recommended that the user should check the hosting service requirements so that the user can follow them on his own web server, and the database would be easily transferred without doing any modification. The user needs to enter the selected database name in the Create database field and need to select the best collation for using language and encoding. In most cases, it’s recommended to select in the “utf8_” series and, if the user is not able to find their language, the user can select “utf8mb4_general_ci.”
Step 2: The user has to click on the phpMyAdmin icon in the upper left to return to the main page, then click the Users tab. If a user list is not having users related to WordPress, then one has to create a new user:
- Click on the Add user.
- The user has to select the username for WordPress (whichever is comfortable) and enter it in the User name field.
- The user has to put the secure password, and which should be a strong password containing characters like alphanumeric, digits, and words, and put it in the Password field. Re-enter the password in the Re-type field.
- The user has to enter the username and password that has been selected.
- The user can ignore all options under Global privileges at their defaults.
- After that, click on Go.
- The user will return to the Users screen and click the Edit privileges icon on the user that is just created for WordPress.
- The user has to select the Database-specific privileges section that is being just created for WordPress under the Add privileges to the following database drop-down and then click on Go.
- The user will get the page refreshed with privileges for that database. The user has to select all the privileges and then click on Go.
- The user should note the hostname listed after the server at the top of the page on the resulting page.

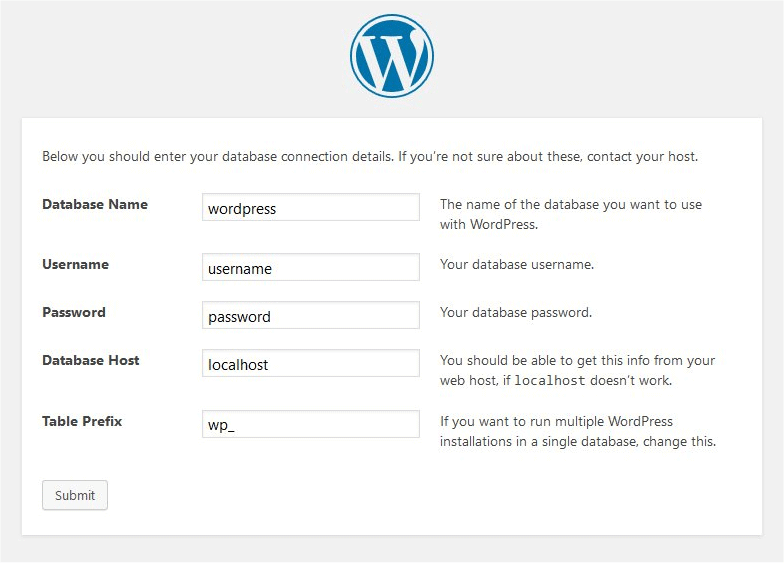
Step 3: Set up wp-config.php
The user can create or edit the wp-config.php file for his/her own system, or the user can ignore this step. WordPress will try to do this step when the user runs the installation script for WordPress. You have to provide details like DB_name, DB_Host, DB_User, DB_password, DB_Charset, DB_Collate.
Step 4: Upload the WordPress Files
The user has to upload the WordPress files where the user has selected the domain on which the user’s WordPress site would appear, whether it is in the root directory or in a subdirectory.
Step 5: Need to Run the Installation Script
If the user wants to place the WordPress files in the root directory, the user should visit http://example.com/wp-admin/install.php. If the user wants to place the WordPress files in a subdirectory called a blog, the user should visit http://example.com/blog/wp-admin/install.php.
Step 6: To Setup Configuration File
If the user has to create the config file, follow the instructions.
Step 7: Finishing the Installation
In the following screenshot, you have to put the required user name and password.
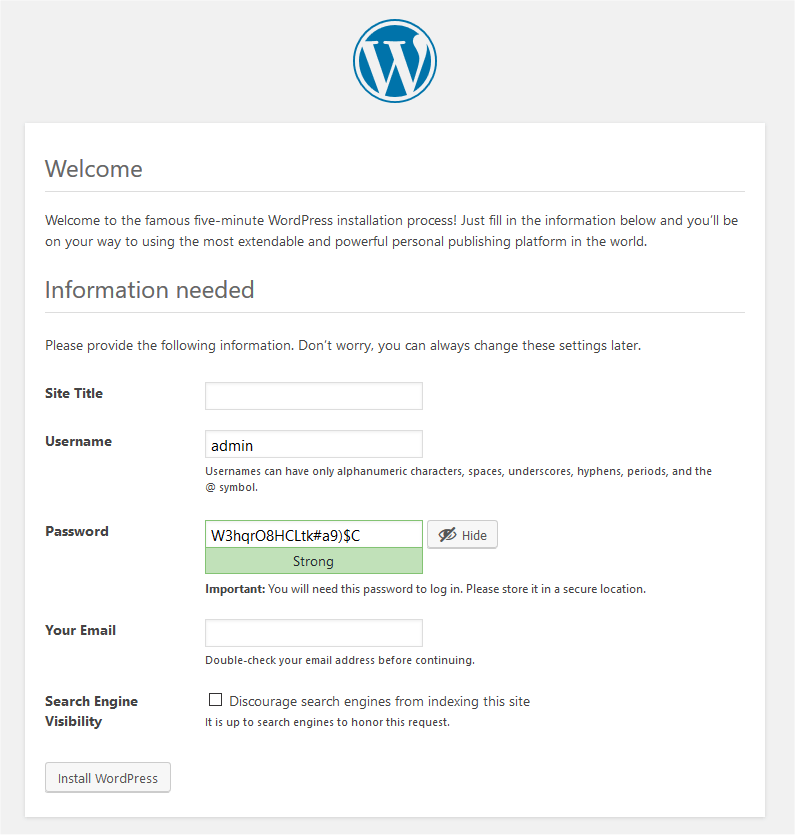
If you successfully installed WordPress, the login will prompt.
Recommended Articles
This has been a guide to how to install WordPress. Here we have discussed the basic instructions and step by step to install WordPress. You may also look at the following article to learn more –

