Updated June 27, 2023

Introduction to CSS Navigation Bar
The element layout uses the navigation bar to provide navigation links that aid in moving within or outside the documents, such as creating lists, menus, indexes, etc. A navigation bar consists of links using HTML basic tags like <ul>, <li>, etc. This navigation bar is the most important component of the website; The user employs this feature to navigate different parts of the website. In this article, we can see how to create a navigation bar. To enhance the user-friendliness of the website, it utilizes a horizontal and vertical navigation bar, which facilitates easy navigation for users. In this topic, we are going to learn about CSS Navigation Bar.
Working on Navigation Bar with Examples
In CSS, the navigation bar property sets the navigational links for moving from one link to another, either within or outside the documents. The Navigation bar needs an HTML base. Let us see an example of building a navigation bar from the standard HTML list first, and then we can see the CSS program where there are no bullets for each link as in the HTML program.
Example #1
Code:
<!DOCTYPE html>
<html>
<head>
<title> Educba Training </title>
<body>
<h2> The HTML tag </h2>
<ul>
<li><a href="#Courses">Courses</a></li>
<li><a href="#news">Home</a></li>
<li><a href="#contact">Contact</a></li>
<li><a href="#about">About</a></li>
</ul>
<p>When using this navigation bar in web site this links would be URLs.</p>
</body>
</html>
Output:
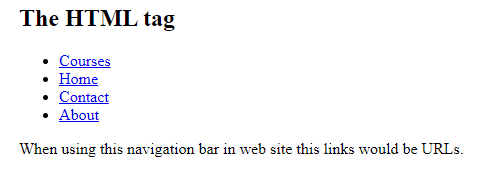
In the above program, we can see this is an HTML program that consists of <ul> and <li> tags used for displaying the links and bullets display, and to remove these bullets in CSS, we use the list-style-type property. You can see this in the CSS program below.
Example #2
Code:
<!DOCTYPE html>
<html>
<head>
<title> Educba Training </title>
<style>
ul {
list-style-type: none;
margin: 2;
padding: 2;
}
</style>
</head>
<body>
<h2> The CSS navigation Bar </h2>
<p>In this example, we can see we are creating the list using HTML base list tags.</p>
<ul>
<li><a href="#Courses">Courses</a></li>
<li><a href="#Home">Home</a></li>
<li><a href="#contact">Contact</a></li>
<li><a href="#about">About</a></li>
</ul>
</body>
</html>
Output:

In the above program, we can see we are using HTML tags like <ul> and <li> tags which are used to create a list of links like “course”, “home”, “contact” and “about” links. In this example, we see “list-style-type: none” which helps to remove bullets, and the navigation bar does not need any list makers, as we can see in the above HTML program. It also sets the margin and padding value as 2.
Now let us see the vertical and horizontal navigation bars below the content:
1. CSS Vertical navigation bar
We can use the <a> element inside the created list to build a vertical navigation bar. This can be demonstrated in the below program.
Example #1
Code:
<!DOCTYPE html>
<html>
<head>
<title> Educba Training </title>
<style>
ul {
list-style-type: none;
margin: 3;
padding: 4;
}
li a {
display: block;
width: 80px;
background-color: pink;
}
</style>
</head>
<body>
<ul>
<li><a href="#Courses">Courses</a></li>
<li><a href="Home">Home</a></li>
<li><a href="#Contact">Contact</a></li>
<li><a href="#About">About</a></li>
</ul>
<p>A background color is added to the links to show the link area.</p>
<p>The whole link area is clickable and its not just the text.</p>
</body>
</html>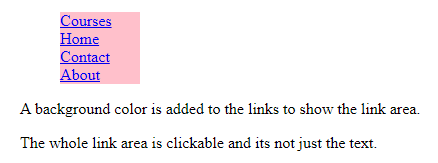
In the above program, we can see that the “display” property with value as a block makes the whole link area clickable, and we are setting its width as “80 px” with a background color like “pink,” which makes the area clickable.
In the below program, we can create the vertical navigational bar text alignment and border property styling to the links. This can be shown in the below program.
Example #2
Code:
<!DOCTYPE html>
<html>
<head>
<title> Educba Training </title>
<style>
ul {
list-style-type: none;
margin: 0;
padding: 0;
width: 300px;
background-color: pink;
border: 3px solid black;
}
li a {
display: block;
color: #000;
padding: 8px 16px;
text-decoration: none;
}
li {
text-align: center;
border-bottom: 3px solid black;
}
li:last-child {
border-bottom: none;
}
li a.active {
background-color: #4CAF50;
color: white;
}
li a:hover:not(.active) {
background-color: grey;
color: white;
}
</style>
</head>
<body>
<h2>Vertical Navigation Bar</h2>
<p>In this example, we use center alignment navigation links and add a border to the navigation bar.</p>
<ul>
<li><a class="active" href="#Courses">Courses</a></li>
<li><a href="#Home">Home</a></li>
<li><a href="#Contact">Contact</a></li>
<li><a href="#About">About</a></li>
</ul>
</body>
</html>
Output:

In the above program, we use an active link to inform the user on which page or link the user is. We are also setting the border to the link block and using the hover property so that whenever we move the cursor to other links, it changes its color to grey.
2. CSS Horizontal navigational bar
This horizontal bar is created using inline or floating list items. Let us see the examples below.
Example #1:
We use <li> elements as inline to create a horizontal bar.
Code:
<!DOCTYPE html>
<html>
<head>
<style>
ul {
list-style-type: none;
margin: 3;
padding: 3;
}
li {
display: inline;
}
</style>
</head>
<body>
<ul>
<li><a href="#Courses">Courses</a></li>
<li><a href="#Home">Home</a></li>
<li><a href="#Contact">Contact</a></li>
<li><a href="#About">About</a></li>
</ul>
</body>
</html>
Output:
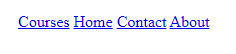
The above program shows the display property as an inline value where the line breaks are removed.
Now we will see how the floating items are declared in the below example.
Example #2
Code:
<!DOCTYPE html>
<html>
<head>
<style>
ul {
list-style-type: none;
margin: 0;
padding: 0;
overflow: hidden;
}
li {
float: left;
}
li a {
display: block;
padding: 5px;
background-color: pink;
}
</style>
</head>
<body>
<ul>
<li><a href="#Courses">Courses</a></li>
<li><a href="#Home">Home</a></li>
<li><a href="#Contact">Contact</a></li>
<li><a href="#About">About</a></li>
</ul>
<p>A background color is added to the links to show the link area. The whole link area is clickable, not just the text.</p>
</body>
</html>
Output:

Conclusion
In this article, we have concluded that the navigation bar in CSS allows users to navigate from one link to another, either within or outside the documents. This navigation bar takes HTML as its base tags to create lists, indexes, etc. The navigation bar is nothing but lists the display of any items. This can be done using <li> or <ul> tags. This article also saw how to create a horizontal navigation bar with inline and floating items. In a vertical navigation bar, we have created the items vertically. This navigation bar can also use other CSS styling properties like border, active elements, etc.
Recommended Articles
We hope that this EDUCBA information on the “CSS Navigation Bar” was beneficial to you. You can view EDUCBA’s recommended articles for more information.

