Updated June 21, 2023

Introduction to CSS Cursor
The mouse cursor is very important for anybody working on a system. One gets the sense of re-direction with the help of a virtual cursor. There are various symbols or icons of the cursor, which universally define the system’s status. Cascading Style sheets offer cursor property using which one can create and customize the cursors of their choice. This way, they can pre-decide the cursor’s behavior while an end-user navigates through their page. This property offers numerous variants of the cursor, which can be used as needed by the content type or elements on the page.
Syntax
The syntax for creating a cursor in CSS is as follows:
cursor: value| initial| inherit;Explanation: Here, the value represents the type of cursor needed. In CSS, a developer gets multiple choices for creating a cursor. Some are copy, progress, cross-hair, grab, grabbing, help, move, not-allowed, no-drop, text, vertical text, cell, wait, zoom-in, zoom-out, context-menu, etc. It is upon the developer to decide which cursor to use and when. In addition, URLs can be used as a value and import any specific cursor design available online. One is always free to try all the options in CSS.
Examples to Implement CSS Cursor
Let us look at some of the uses of Cursors and how we can implement them through external, internal, and inline CSS.
1. External CSS Cursor
- This example is an external CSS code, so we will first start coding the CSS file.
- We will define different classes to demonstrate different kinds of a cursor, which will call for different cursor values. The code for the CSS file should be similar to the following code snippet:
Code:
.cursor1{
cursor: grab;
background-color: palegreen;
}
.cursor2{
cursor: not-allowed;
font-size: 16px;
background-color: peachpuff;
}
.cursor3{
cursor: zoom-in;
font-size: 18px;
background-color: peru;
}
.cursor4{
cursor: zoom-out;
}
.cursor5{
cursor: e-resize;
}
.cursor6{
cursor: n-resize;
}
.cursor7{
cursor: s-resize;
}
.cursor8{
cursor: w-resize;
}
.cursor9{
cursor: alias;
}
.cursor10{
cursor: all-scroll;
}
.cursor11{
cursor: copy;
}
.cursor12{
cursor: help;
}
.cursor13{
cursor: move;
}
.cursor14{
cursor: none;
}
.cursor15{
cursor: wait;
}
.cursor16{
cursor: context-menu;
}
.cursor17{
cursor: pointer;
}- Now that the CSS code is final, we will create the HTML page for the same. Since it’s external CSS, please note that we will have to call the css file in the header section of the html code.
- In the body section, we will use several paragraph elements to use all the classes defined in the CSS file. The final HTML code should be similar to this code:
Code:
<html>
<head>
<title>Cursor Demo</title>
<link rel = "stylesheet" href = "cursor.css">
</head>
<body>
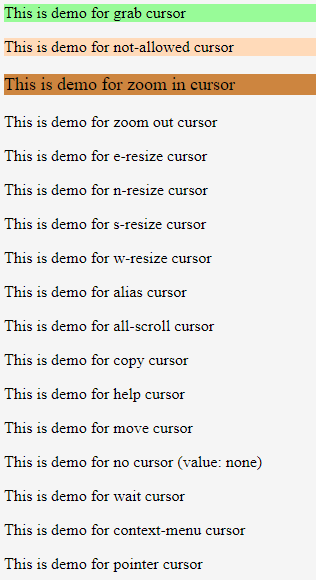
<p class="cursor1">This is demo for grab cursor</p>
<p class="cursor2">This is demo for not-allowed cursor</p>
<p class="cursor3">This is demo for zoom in cursor</p>
<p class="cursor4">This is demo for zoom out cursor</p>
<p class="cursor5">This is demo for e-resize cursor</p>
<p class="cursor6">This is demo for n-resize cursor</p>
<p class="cursor7">This is demo for s-resize cursor</p>
<p class="cursor8">This is demo for w-resize cursor</p>
<p class="cursor9">This is demo for alias cursor</p>
<p class="cursor10">This is demo for all-scroll cursor</p>
<p class="cursor11">This is demo for copy cursor</p>
<p class="cursor12">This is demo for help cursor</p>
<p class="cursor13">This is demo for move cursor</p>
<p class="cursor14">This is demo for no cursor (value: none)</p>
<p class="cursor15">This is demo for wait cursor</p>
<p class="cursor16">This is demo for context-menu cursor</p>
<p class="cursor17">This is demo for pointer cursor</p>
</body>
</html>Output: When this html code is saved and opened through a browser, it will give the following output.
2. Internal CSS Cursor
- This example uses internal CSS, so we will directly code for the HTML page.
- Since this is internal CSS, we will define the styling in the header section within the <style /> tag. For this example, we will style the paragraph tag. The code will be as follows:
Code:
<style>
p{
background-color: cornflowerblue;
border: darkorchid dotted;
cursor: not-allowed;
font-style: italic;
margin: 100px;
padding: initial;
text-decoration: underline;
}
</style>- We will code for the body section such that there is the utilization of paragraph tag <p>. This way, the demonstration of the no-drop cursor can be ensured. The HTML code for the same will be similar to the following code:
Code:
<html>
<head>
<title>Cursor through Internal CSS</title>
<style>
p{
background-color: cornflowerblue;
border: darkorchid dotted;
cursor: not-allowed;
font-style: italic;
margin: 100px;
padding: initial;
text-decoration: underline;
}
</style>
</head>
<body>
<p>This paragraph demonstrates the internal Styling done for the element. This also has the demo for not-allowed cursor, which will project once the text is hovered over.</p>
</body>
</html>
Output: Saving this code and running or opening the file through a browser will fetch the following result.

- Like the previous example, once the code is compiled and run, the cursor can be seen while hovering over the highlighted paragraph.
- This is a very basic use of a cursor for demo purposes. Depending on the requirement, a developer can use as many types of cursor as needed.
3. Inline CSS Cursor
- This example uses the inline style of CSS to demonstrate the Cursor property the language offers.
- We will code the HTML page directly and style the element within the element tag using the style parameter. The final HTML code should be similar to the following code:
Code:
<html>
<head>
<title>Cursors using Inline CSS</title>
</head>
<body>
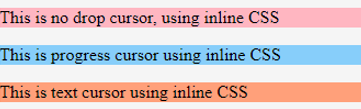
<p style="cursor: no-drop; background-color: lightpink;">This is no drop cursor, using inline CSS</p>
<p style="cursor: progress; background-color: lightskyblue;">This is progress cursor using inline CSS</p>
<p style="cursor:text; background-color: lightsalmon;">This is text cursor using inline CSS</p>
</body>
</html>Output: To view the output of the code above, save the file and open it through any browser. The result should be like this.
- Like previous examples, one can see different cursors while hovering over each paragraph in the browser.
- Inline style CSS works handy for cursor property as a developer can style the cursor on the go instead of deciding on it previously. This way, while coding for the content, the developer will have a fair idea of which cursor to use in which part of the content.
Conclusion
In the above few examples, we learned how to use the Cursors offered by CSS. In addition to the values offered by CSS, one can always use a customized cursor by using the URL value for the cursor. Cursors are important as they signify the current status of the content. If the cursors are decided appropriately for a page, the navigation throughout becomes smooth for the end-user. The examples depict very basic uses of a cursor. Developers can try and experiment through more exploration.
Recommended Articles
We hope that this EDUCBA information on “CSS Cursor” was beneficial to you. You can view EDUCBA’s recommended articles for more information.

