Updated April 10, 2023

Introduction to Tkinter mainloop
Tkinter is defined as a module inside the Python standard library that helps to serve as an interface to an easy Toolkit Tk. This has a variety of GUI to build an interface like buttons and widgets. The method mainloop plays a vital role in Tkinter as it is a core application that waits for events and helps in updating the GUI or in simple terms, we can say it is event-driven programming. If no mainloop() is used then nothing will appear on the window Screen. This method takes all the objects that were created and have interactions response.
Syntax
To get started
from tkinter import Tk    // Tkinter Library
root = Tk()                        //Creates root master with the TK() constructor
app = App(root)
app.pack()
root.mainloop               //main event loop.
How the mainloop work in Tkinter?
Root. mainloop() is simply a method in the main window that executes what we wish to execute in an application (lets Tkinter to start running the application). As the name implies it will loop forever until the user exits the window or waits for any events from the user. The mainloop automatically receives events from the window system and deliver them to the application widgets. This gets quit when we click on the close button of the title bar. So, any code after this mainloop() method will not run.
When a GUI is gets started with the mainloop() a method call, Tkinter python automatically initiates an infinite loop named as an event loop. So, after this article, we will be able to use all the widgets to develop an application in Python. Different widgets are Combo box, button, label, Check button, Message Box, Images, and Icons.
Constructor
Well, a root window is created by calling Tkinter Constructor TK() as it creates a widget.
Root=tk.TK() // ConstructorThis line of code automatically creates a GUI window with a title bar, close button.
Creating window TK()
Window =TK()
………
Window.mainloop()
Methods
Tkinter provides the following methods to specify a widget to display on a window.
pack(): This method helps in Placing the widgets within its master. With options like side, fill, expand.
Widget.pack();grid(): This method helps to place a widget in a grid format or tabular form. We can specify in the method call with the number of rows and columns. It takes possible options like column, row, ipadx, and Y and sticky.
Widget.grid();Place(): This method arranges the widgets by placing them in specific positions instructed by the programmer. It organizes with respective to X and Y coordinates.
Widget.place();Grid Sample code
rom tkinter import *
master = Tk()
Label(master, text='Full Name').grid(row=1)
Label(master, text='Email-ID').grid(row=2)
A = Entry(master)
B = Entry(master)
A.grid(row=1, column=2)
B.grid(row=2, column=1)
mainloop()
Examples
Here are the following examples mention below
Example #1
Code:
import tkinter as tk
res = tk.Tk()
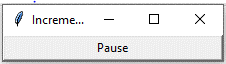
res.title('Incrementing the Process')
button = tk.Button(res, text='Pause', width=30, command=res.destroy)
button.pack()
res.mainloop()Explanation:
The above code is a simple application that creates a button widget, when we click on it we could see a tiny pop-up window with the text ‘Pause’. The output is shown in the below screenshot.
Output:
Example #2
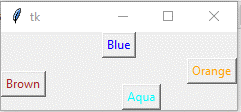
Using pack() method
Code:
import tkinter
from tkinter import *
parent = Tk()
blbtn= Button(parent, text = "Blue", fg = "Blue")
blbtn.pack( side = TOP)
Brbtn = Button(parent, text = "Brown", fg = "Brown")
Brbtn.pack( side = LEFT)
Aqbtn = Button(parent, text = "Aqua", fg = "Aqua")
Aqbtn .pack( side = BOTTOM )
orgbtn = Button(parent, text = "Orange", fg = "Orange")
orgbtn.pack( side = RIGHT)
parent.mainloop()
Explanation:
Here pack() method is used to organize the button in a good format. It specifies the side of a parent to place on a window.
Output:
Example #3
Using Label widgets on the GUI window.
Code:
import tkinter as tk
window = tk.Tk()
frame = tk.Frame(master=window, width=100, height=100)
frame.pack()
lab1 = tk.Label(master=frame, text="Points at (5, 5)", bg="Aqua")
lab1.place(x=5, y=5)
lab2 = tk.Label(master=frame, text="Points at (65, 65)", bg="Pink")
lab2.place(x=65, y=65)
window.mainloop()
Explanation:
Here the code produces a window like this. We have imported a Tkinter package and a window is defined. Next, a label is defined to show the output with the points on the window. The scale point is given for each label. Finally, the mainloop is executed to touch the event.
Output:

Example #4
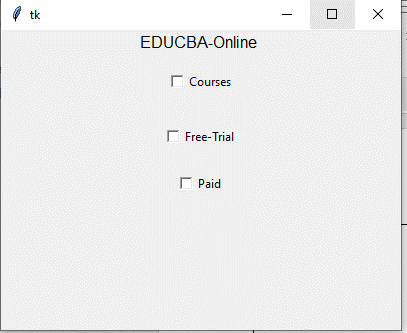
Using Check box -mainloop() is executed
Code:
from tkinter import *
root = Tk()
root.geometry("400x300")
aa = Label(root, text ='EDUCBA-Online ', font = "60")
aa.pack()
Chckbtn1 = IntVar()
Chckbtn2 = IntVar()
Chckbtn3 = IntVar()
Btn1 = Checkbutton(root, text = "Courses",
variable = Chckbtn1,
onvalue = 2,
offvalue = 0,
height = 3,
width = 12)Btn2 = Checkbutton(root, text = "Free-Trial",
variable = Chckbtn2,
onvalue = 3,
offvalue = 0,
height = 3,
width = 12)Btn3 = Checkbutton(root, text = "Paid",
variable = Chckbtn3,
onvalue = 1,
offvalue = 0,
height = 2,
width = 10)Btn1.pack()
Btn2.pack()
Btn3.pack()
mainloop()
Explanation:
When we execute the above code, we could see a window pop-up with a title and some label and button clicks. We have used a Class Tk to create the main window and a pack() method is used to position inside the parent window. And the command keyword is used here to specify the function in handling the click events and here it is a check box.
Output:
Example #5
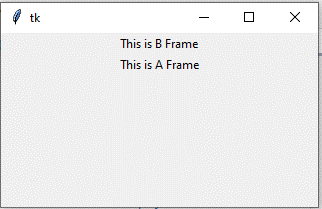
Code:
import tkinter as tk
window = tk.Tk()
frA = tk.Frame()
labA = tk.Label(master=frA, text="This is A Frame")
labA.pack()
frb = tk.Frame()
labB = tk.Label(master=frb, text="This is B Frame")
labB.pack()
frb.pack()
frA.pack()
window.mainloop()
Output:
Example #6
Message box-Pop up
Code:
import tkinter
import tkinter.messagebox
import datetimedef displaydate():now = datetime.datetime.now()
disp = 'Today date is: {}'.format(now)
tkinter.messagebox.showinfo("Information", disp)root = tkinter.Tk()
root.title('Pop up MessageBox')
butn = tkinter.Button(root, text="Display Dat", padx=7, pady=7, width=12,
command=displaydate)
butn.pack(pady=11)
root.geometry('400x400+400+350')
root.mainloop()
Explanation:
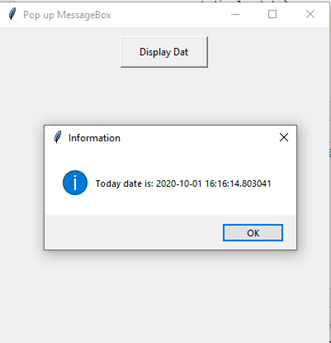
The above code shows the information on the message box. The message is displayed when we click on the display date button to show the current date and time as well.
Output:
Example #7
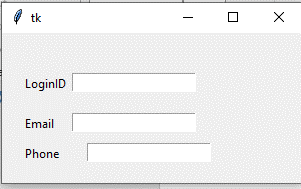
Using place() method
Code:
from tkinter import *
top = Tk()
top.geometry("300x150")
LoginID = Label(top, text = "LoginID").place(x = 20,y = 40)
email = Label(top, text = "Email").place(x = 20, y = 80)
Phone = Label(top, text = "Phone").place(x = 20, y = 110)
a1 = Entry(top).place(x = 70, y = 40)
a2 = Entry(top).place(x = 70, y = 80)
a3 = Entry(top).place(x = 85, y = 110)
top.mainloop()
Output:
Conclusion – Tkinter mainloop
Tkinter being an open-source GUI available in python has made a popular toolkit for User Interface Design. So, therefore, in this article, we have seen simple programming examples with simplicity to show how the mainloop works and different methods used to build a widget. This mainloop helps to respond to events like a mouse and keyboard events.
Recommended Articles
This is a guide to Tkinter mainloop. Here we discuss How the mainloop works in Tkinter and Examples along with the codes and outputs. You may also have a look at the following articles to learn more –
