Updated April 15, 2023
Introduction to Tkinter background image
In Tkinter, a background image is an image that is set in the background in a Tkinter window, or we can say a root or parent or master window. Therefore, we can define the background image setting to the Tkinter window as setting an image to the parent window using an attribute such as background or bg to set the background images or colors. In general, the Tkinter provides a method for adding or setting a background image using the PhotoImage() function by passing the image’s file name or the source path of the image. This method can be used for setting the background image of any widget, and there is no need for any extra module to be imported.
How to set a background image in Tkinter?
In this article, we are discussing how we can set a background image as this is also the most required property for creating an attractive GUI in which these images are used from designing the website logo, animations, background and foreground images, etc. In Tkinter, there is a function used to set the background image for a window or button or any widget. In Tkinter, there is a separate module for setting background image known as Python image library (PIL) as in for setting fonts, and the function is PhotoImage(); this function uses the image file name or the source path of the image to be set as a background image as an argument.
In this article, we will see how to set a background image. But we should note that to set a background image to the entire window; we cannot just use this function to set the image to the whole background but not only the photo area, which can be done using a canvas widget. In this article, we will see the use of the PhotoImage() function in the program for setting background images which is much easier than using the module Python image library (PIL).
There is also another way of setting an image in the background using a canvas widget which is mainly recommended as it is used for drawing graphs, creation of graphics, etc. which provides a method create_image(), but this cannot be used directly so when we are using canvas we have to use PhotoImage() object and this method support only ppm or PGM files of image.
Now let us see the syntax of the PhotoImage() function with the parameters that this function takes in as input in the below section.
Syntax:
PhotoImage(Filename or source path of where the file is saved)Parameter:
Filename: This parameter is a required argument that is used for specifying the file name or path location of the file.
This function returns only the images which have been passed as the argument to display it on widgets such as buttons, windows, etc.
This function is used for setting the background images; also, now let us see an example to demonstrate it. This function can support only PPM/PGM/GIF, etc. format images, but if we want our application to support all types of formats of images, then there is a Python library for such images where we have to import Python image library (PIL) which can convert the other formats of images to the image object. As discussed earlier, we can also use a canvas widget for setting background images.
Examples of Tkinter background image
Given below are the examples of Tkinter background image
Example #1
In this example, we will see how we can set a background image without using any image modules nor canvas but only using PhotoImage() function.
Code:
from Tkinter import *
import Tkinter as tk
master = tk.Tk()
bgimg= tk.PhotoImage(file = "Tulips.ppm")
#Specify the file name present in the same directory or else
#specify the proper path for retrieving the image to set it as background image.
limg= Label(master, i=bgimg)
limg.pack()
master.mainloop()
Output:

In the above program, we can see we have taken a normal sample image, “Tulips.ppm,” which is saved in the same directory of Python software, and this image is passed as an argument to the PhotoImage() function. In the above program, we are trying to set an image as a background image to the parent window, and the output is as seen in the above screenshot. In this screenshot, the image is fitted to the entire window with the label widget, which is completely covered by this image.
Example #2
Now let us see how to set the background image on the button and the text for the button in the below program.
Code:
from Tkinter import *
import ttk
master = Tk()
master.geometry("500x300")
Label(master, text = 'Educba', font =(
'Courier', 15)).pack(side = BOTTOM)
img = PhotoImage(file = "circle.ppm")
Button(master, text = 'Click me', image = img,compound = LEFT).pack(side = TOP)
master.mainloop()
Output:
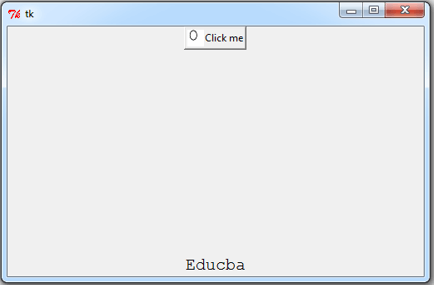
In the above program, we can see we are using the ttk module for defining the Label widget, and we are also importing Tkinter, and we are importing everything as it has both the Button widget and also PhotoImage() function. Therefore in the above program, we can see when we are defining or declaring the button, we can set the button’s background image by using the image option in the button widget.
The output can be seen in the above screenshot. In the above program, we can see that the text to be displayed on the parent window is declared at the bottom as in the label widget we have declared the text option side value as “BOTTOM” we also saw the image that is displayed on the button also takes option compound value as “LEFT” therefore we can see the circle image at the left side of the button which is before the text written on the button.
Conclusion
This article concludes that to set the background image in Tkinter, this module provides a function called PhotoImage(), which takes an image filename or source path as an argument and returns the image object. In this article, we saw how to use this image and set the background image in the first example, and then we also saw how to set the background image on the buttons with examples and respective outputs. In this article, we have also discussed how we can use the PIL module, canvas’s create_image() function, also for setting background images.
Recommended Articles
This is a guide to the Tkinter background image. Here we discuss the Working on How to set a background image in Tkinter with Examples. You may also have a look at the following articles to learn more –
