Updated March 30, 2023
What is Switch Statement in JavaScript?
A switch statement is one of the multiple conditional statements available in the JavaScript programming language. The code execution starts when the switch condition is satisfied and the input value matches one or more cases inside the switch condition. This condition has a ‘break’ after each case, in turn, to control the program’s execution flow. It should also have a ‘default’ block for the execution to flow smoothly whenever the given input doesn’t match with the case choices provided in the switch statement.
There are several conditional methods in JavaScript, such as the if-else method, if-else-if method, while method, do-while method, and several other methods too. Out of such different methods in JavaScript, one such method is the switch statement method. This method helps to run a particular set of instructions or code if the condition is satisfied. A switch statement generally contains several blocks of cases along with an optional default case. As per the condition, one or several cases may execute if the cases satisfy. If no switch statement block becomes true, the default case gets automatically executed if it is in the code.
Syntax of JavaScript Switch Statement
The basic syntax of JavaScript in a switch statement is as follows:
switch(an expression which needs to be checked) {
case x:
// block of code or instructions
break;
case y:
// block of code or instructions
break;
default:
// block of code or instructions for default condition
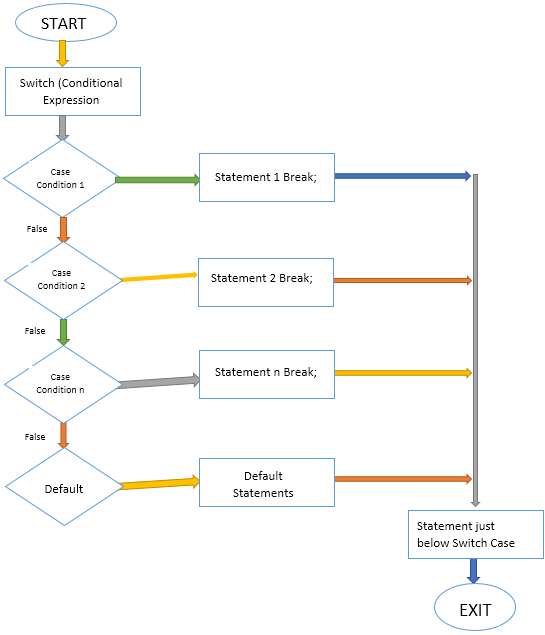
}Flow Diagram
Given below is the flowchart of the switch statement:
How does Switch Statement Work in JavaScript?
A switch statement generally contains three sub-sections which are:
- Expression to evaluate.
- Cases that execute for the expression.
- Default case, which executes if no cases get satisfied.
Now, let us understand how this block of the statement runs.
- An expression to evaluate – In this statement, we check the expression that needs evaluation. Based on the execution of an expression, the switch case satisfying will execute.
- Different cases – On the execution of an expression, the case which satisfies the expression will execute.
- Default case – If any switch cases are not satisfied, then the default case executes.
Examples
Different examples are mentioned below:-:
Example #1
Now, let us take an example that takes a number from the user in an input box; if the number is less than 10, then it shows the number entered by the user; else will display the message that the number entered is larger than 10.
Simply copy the following code and paste it into the HTML file to run it.
Code:
<!DOCTYPE html>
<html>
<body>
<h2>JavaScript switch statement</h2>
<label>Enter the number in textbox</label>
<input type="number" id="inputBox"/>
<input type="button" onClick="checkVal()" value="Check value">
<label id="labelVal"></label>
<script>
var text = '', labelVal = "";
function checkVal(){
text = document.getElementById("inputBox").value;
labelVal = '';
text = Number(text)
switch(text) {
case 1:
labelVal = "You entered 1";
break;
case 2:
labelVal = "You entered 2";
break;
case 3:
labelVal = "You entered 3";
break;
case 4:
labelVal = "You entered 4";
break;
case 5:
labelVal = "You entered 5";
break;
case 6:
labelVal = "You entered 6";
break;
case 7:
labelVal = "You entered 7";
break;
case 8:
labelVal = "You entered 8";
break;
case 9:
labelVal = "You entered 9";
break;
default:
labelVal = "Enter value less than 10";
}
document.getElementById("labelVal").innerText = labelVal;
}
</script>
</body>
</html>
Now let us see the example with the value entered:
Input value: 6
Output:

Example #2
Now let us see how we can execute multiple switch statements in JavaScript.
Executing Multiple Cases if Condition Satisfies.
Now, let us see how we can execute multiple cases. Copy the following code and paste it into an HTML file to execute it.
Code:
<!DOCTYPE html>
<html>
<body>
<h2>JavaScript switch statement</h2>
<label>Enter the number in textbox</label>
<input type="number" id="inputBox"/>
<input type="button" onClick="checkVal()" value="Check value">
<label id="labelVal"></label>
<script>
var text = '', labelVal = "";
function checkVal(){
text = document.getElementById("inputBox").value;
labelVal = '';
text = Number(text)
switch(text) {
case 1:
labelVal = labelVal + " You entered 1";
case 2:
labelVal = labelVal + " You entered 2";
case 3:
labelVal = labelVal+ " You entered 3";
break;
case 4:
labelVal = labelVal+ " You entered 4";
case 5:
labelVal = labelVal+ " You entered 5";
case 6:
labelVal = labelVal+ " You entered 6";
break;
default:
labelVal = "Enter value less than 10";
}
document.getElementById("labelVal").innerText = labelVal;
}
</script>
</body>
</html>
Output:

Final Thoughts
JavaScript is a programming language with many concepts that one needs to study. A switch statement is one of those. These conditional statements execute the code to check whether the expression satisfies the condition based on the expression evaluation; it returns the value. A conditional statement is widely used for various logical programming expressions in any programming language.
Frequently Asked Questions (FAQs)
Q1 Why use switch statements in place of if-else statements?
Answer: The Switch statements are comparatively faster and provide the best implementation method than the if-else statements. It makes it easier to maintain the program in switch statements as it doesn’t affect the execution even after removing a case.
Q2 What is the main difference between switch and loop statements?
Answer: In the Loop statement, the condition check happens several times before providing the necessary output. In contrast to this switch, the statement checks the condition only once.
Q3 What are the limitations of Switch Statement in JavaScript?
Answer: The expression in the switch statement should be of character or integer. The case value should only be present inside the switch statement, and the case value should also be of integer or character.
Recommended Articles
This EDUCBA guide to Switch Statement in JavaScript discusses the concept, syntax, working, and examples of a switch statement in JavaScript. EDUCBA also recommends going through these articles to learn more –

