Updated June 19, 2023
Introduction to Sqoop Import
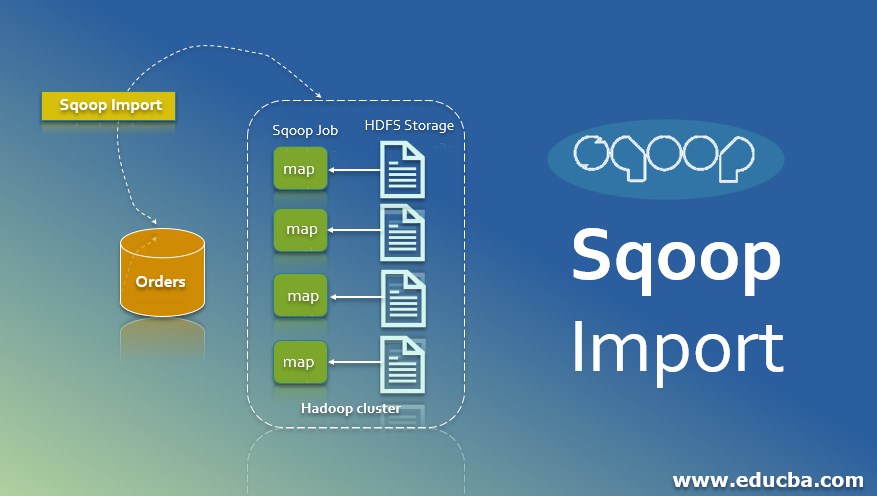
Sqoop is a combination of SQL and Hadoop. Sqoop bridges the two entities, i.e., RDBMS and HDFS. It is a tool for bulk data import from structured data sources such as RDBMS, Data Warehouses to HDFS. It can import all tables, a single table, or a portion of a table into HDFS. Sqoop can also export data from HDFS back to the database, and the process is called Exporting. Cloudera creates it and then is open-sourced. In this topic, we are going to learn about Sqoop Import.
It is a single-client program that interacts with the Hadoop file system to create one or more map-reduce programs. It uses the primary key column to divide source data across its mappers. By default, Sqoop will spawn 4 mappers. Sqoop works with anything that is JDBC-compliant. And for non-compliant databases, there are Sqoop connectors. The generic JDBC connector is the most basic non-compliant connector.
Syntax
To get into the Sqoop import command, we need a valid user login id (username) and password and the basic Sqoop import command to transfer the data from one place to another.
Syntax:
$ sqoop import \

--connect jdbc:mysql://localhost:3306/retail_db\

--username cloudera \

--password secretkey \

--table department \

--target-dir /sqoopdata/departments\

--where “department_id = 1000” \

--m 1
Here, you have to provide the database name along with the machine name and port no and again with the database name. After that, provide a valid username and password, which is confidential. Providing the password in the command line may be a security issue, so you can also store the password in the file and access a file using the password parameter.
Next is the table parameter from where you have to import the data or sqoop the data; here, we are using the department table for sqoop purposes. Another parameter is the target directory, by a default table name, and the same name is created, and you can specify on your own.
The “Where” parameter imports only a subset of data.
“m” is used to specify the map task. By default, Sqoop uses 4 mappers, but with the help of “m,” we can control the parallelism by specifying the mapper value along with the “m.”
Import command in Sqoop
Here we have discussed the commands in sqoop.
- Import is the insertion of any data from source to destination.
- Sqoop uses the import command to pass the data from RDBMS to Hadoop components like HDFS, Pig, Hive, etc.
- Sqoop mainly focuses on data that is secure and can able to transfer the data anywhere.
- When the client submits the Sqoop command, it works internally. The first step Sqoop goes ahead with is fetching the metadata, which means information about data, or you can say data about the data is called metadata.
- And then it submits or launches a maponly job, and it’s a no-reduction phase; why is no reduction? There is no aggregation because we are only loading and fetching the data. So, in short, there is no aggregation happening here.
- It creates, by default, 4 map tasks, distributes the data to the mapper equally for high performance, uses the JDBC connection, and transfers data to the HDFS.
Import is done in two stages.
- The first step is to introspect the database to gather the metadata (Primary Key Information)
- In the second stage, Sqoop divides the input dataset into splits and then uses individual map tasks to push the splits to the HDFS.
Example
$ sqoop import \

--connect jdbc:mysql://localhost:3306/retail_db\

--username cloudera \

--password secretkey \

--table department \

--target-dir /sqoopdata/departments\

--where “department_id = 1000” \

--m 1
Here, you have to provide the database name along with the machine name and port no and again with the database name. After that, provide a valid username and password, which is confidential. Providing the password in the command line may be a security issue, so you can also store the password in the file and access a file using the password parameter.
Next is the table parameter from where you have to import the data or sqoop the data; here, we are using the department table for sqoop purposes. Another parameter is the target directory, by a default table name, and the same name is created, and you can specify on your own.
The “Where” parameter imports only a subset of data.
“m” is used to specify the map task. By default, Sqoop uses 4 mappers, but with the help of “m,” we can control the parallelism by specifying the mapper value along with the “m.”
If you want to specify only the columns from a particular table, i.e., for example, department table-use below syntax:- –columns “dept_id,name.” If you want to import only matching rows from the department’s table so, apply the condition along with the “where” parameter, i.e., where “dept_id>= 1000”.Import all tables from the database using the syntax:-
Syntax:
$sqoop import-all-tables \

--connect jdbc:mysql://localhost:3306/retail_db \

--username cloudera –password secret \

Warehouse-dir /mydata
While importing all tables, ensure all tables have one primary key.
Advantages
It allows data transfer with structured data stores like Teradata, Petadata, etc.
- Sqoop can execute the data transfer in parallel.
- Since the data is transferred and get into the Hadoop cluster, sqoop allows offloading specific processing done in the ETL process into a fast, low-cost, and effective one.
- It handles the bundle of data.
Conclusion
Sqoop is more like a transport kind of thing with high security and within the budget, and we can use it efficiently and effectively everywhere. Because this technology processes quickly, everyone wants to implement it on their sites for better results.
Recommended Articles
This is a guide to Sqoop Import. Here we discuss the import command in Sqoop and its advantages, syntax, and examples. You may also have a look at the following articles to learn more –

