EDUCBA

EDUCBA

MENUMENU
  • Free Tutorials
  • Free Courses
  • Certification Courses
  • 280+ Courses All in One Bundle
  • Login
Home Design Design Tutorials Design Basic Tutorial SketchUp resize component
Secondary Sidebar
Design Basic Tutorial
  • SketchUp
    • SketchUp Keyboard Shortcuts
    • SketchUp geolocation
    • SketchUp animation
    • SketchUp Change Dimensions
    • SketchUp Import
    • SketchUp 2D
    • SketchUp rendering
    • Sketch software
    • Figma Shortcuts
    • SketchUp Layers
    • SketchUp landscape design
    • SketchUp group
    • SketchUp intersect faces
    • SketchUp Rotate
    • SketchUp Architecture
    • SketchUp 3D Models
    • SketchUp Vray
    • SketchUp Units
    • SketchUp garden design
    • SketchUp Layout
    • SketchUp Mirror
    • SketchUp Extensions
    • SketchUp Unhide
    • SketchUp kitchen
    • SketchUp background
    • SketchUp library
    • SketchUp dynamic components
    • SketchUp CutList
    • SketchUp Array
    • SketchUp Woodworking
    • SketchUp resize component
    • SketchUp Ungroup
    • SketchUp Deck Design
  • Basics and Advanced
    • Pro Tools Version
    • What is Autodesk BIM?
    • Animation Character
    • Autodesk Pixlr
    • Sketch plugins
    • Graphic designer requirements
    • Online Gaming Platforms
    • InDesign eyedropper tool
    • InDesign rounded corners
    • InDesign align
    • InDesign resize image
    • InDesign scripts
    • InDesign export to word
    • InDesign newsletter templates
    • InDesign Magazine
    • InDesign Missing Fonts
    • InDesign line spacing
    • InDesign Fonts
    • InDesign Preview Shortcut
    • InDesign Extension
    • InDesign columns
    • InDesign overset text
    • InDesign data merge
    • InDesign grid template
    • InDesign layers
    • InDesign reset preferences
    • InDesign master pages
    • InDesign layout
    • InDesign portfolio template
    • InDesign invoice template
    • InDesign word count
    • InDesign underline
    • InDesign superscript
    • InDesign presentation templates
    • InDesign drop cap
    • InDesign how to add page numbers
    • InDesign resume template
    • InDesign import pdf
    • InDesign table of contents
    • InDesign change page size
    • InDesign book templates
    • InDesign link text boxes
    • InDesign vertical text
    • InDesign Bullet Points
    • InDesign center text vertically
    • InDesign newspaper template
    • InDesign shortcuts
    • InDesign gap tool
    • InDesign paragraph styles
    • InDesign Grid
    • InDesign margins
    • InDesign highlight text
    • InDesign Wrap Text
    • ZBrush ZRemesher
    • Animation Software
    • Principles of Animation
    • 3d Animation Software
    • 3D Modeling Software
    • 3D Software Design
    • 2D Animation Software
    • 10 Quick Tips For Adobe InDesign Users
    • ADOBE FLASH CS6
    • Affinity Photo Brushes
    • Adobe Lightroom For Free
    • Lightroom Background Color
    • Lightroom?Shortcuts
    • Lightroom XMP
    • Lightroom editing
    • Masking Layers in Adobe After Effects
    • Adobe Premiere Pro Plugins
    • Adobe Speedgrade
    • Install Adobe Creative Cloud
    • Install Adobe Premiere Pro
    • What is Adobe Creative Cloud
    • What is Adobe Illustrator
    • Adobe InDesign Templates
    • What is Adobe InDesign
    • Adobe Indesign Uses
    • InDesign Background Color
    • What is Adobe Lightroom
    • What is Adobe Muse
    • What is Adobe Prelude
    • What is Adobe Premiere Pro
    • Careers in 3D
    • Careers in 3D Modeling
    • Careers in 3D Printing
    • Best Editing Software
    • Video Editing Application
    • Video Editing Tools
    • Career In Designing
    • Careers in Game Development
    • 3D Printing Models
    • Adobe Editing Softwares
    • Types of Adobe
    • Types of Illustration
    • What is Graphic Design
    • Best Graphic Design Software
    • Best Photo Editors
    • Game Testing Interview Questions
    • VFX Softwares
    • Unity Scripting
    • Unity Principle of Design
    • Unity JSON
    • Unity webGL
    • Unity 2D
    • Unity 3D Games
    • VFX Companies
    • How To Use Indesign
    • New Features InDesign CS6
    • What is Houdini?
    • Advantages of 3D Printing
    • What is Autodesk
    • Autodesk Character Generator
    • Autodesk Vault
    • Autodesk Viewer
    • Autodesk Navisworks
    • Autodesk Desktop Connector
    • Designers and Architects
    • 2D and 3D Shapes
    • Keyboard Shortcuts for Premiere Pro
    • Unreal Engine Tutorial
    • Best Audio Editors
    • Digital Image Processing
    • What is Motion Graphics
    • What is Digital Design
    • Design Pattern Interview Questions
    • Graphic Design Interview Questions
    • UX designer Interview Questions
    • Is Unreal Engine Free
    • What Is Design Pattern
    • What is VFX
    • What is Audacity
    • What is Unreal Engine
    • What is CATIA
    • What is Blueprint
    • Sony Vegas Pro for Free
    • 3D Graphics Software
    • Best Online Photo Editor
    • Photo Editing App
    • Vector Graphics Editor
    • ArchiCAD
    • ArchiCAD Shortcuts
    • Audacity Keyboard Shortcut
    • Davinci Resolve Shortcuts
    • What is pixel art?
    • Picmonkey Alternatives
    • Adobe Flash Player Alternative
    • Pro tools shortcuts
    • Pro Tools Plugins
    • Architectural Design Software
    • Architectural Design Principles
    • Architecture Design Types
    • Architectural design tools
    • Application of Digital Image Processing
    • Digital Image Processing Fundamentals
    • OpenGL Versions
    • Revit Keyboard Shortcuts
    • Revit plugins
    • Indesign version
    • What is DirectX?
    • DirectX Versions
    • Cinema 4D Plugins
    • Cinema 4d shortcuts
    • Godot Engine
    • Godot tilemap
    • Krita Animation
    • Krita Software
    • Krita Shortcuts
    • Krita eraser
    • Krita brushes
    • Krita Pixel Art
    • Krita Plugins
    • Skencil
    • Fusion 360 Keyboard Shortcuts
    • Anim8or
    • Affinity photo plugins
    • What is Affinity Photo?
    • FL Studio Plugins
    • Vectorworks
    • Architectural Design Elements
  • Inkscape
    • What is Inkscape?
    • Inkscape layers
    • Inkscape Crop
    • Inkscape text
    • Inkscape G-code
    • Inkscape mirror
    • Inkscape rounded rectangle
    • Inkscape EPS
    • Inkscape image to vector
    • Inkscape unlock
    • Inkscape Curved Text
    • Inkscape laser cutting
    • Inkscape background color
    • Inkscape arrow
    • Inkscape vector
    • Inkscape animation
    • Inkscape 3D
    • Inkscape SVG
    • Inkscape Dark Theme
    • Inkscape trace bitmap
    • Inkscape gradient
    • Inkscape Greek Letters
    • Inkscape shadow
    • Inkscape snap to grid
    • Inkscape Fonts
    • Inkscape extensions
    • Inkscape PNG to SVG
    • Inkscape Art
    • Inkscape transparent background
    • Inkscape Alternatives
    • Inkscape Remove Background
    • Inkscape text to path
    • Inkscape logo
  • Figma
    • Figma Libraries
    • Figma fonts
    • Figma Plugins
    • Figma grid
    • Figma Alternatives
  • GIMP
    • What is GIMP
    • GIMP Versions
    • GIMP brushes
    • GIMP line tool
    • GIMP blend tool
    • GIMP clone tool
    • GIMP magic wand tool
    • GIMP 3D Text
    • GIMP healing tool
    • GIMP Layers
    • GIMP Fonts
    • GIMP Toolbox
    • Blur Effect in GIMP
    • GIMP Change Background Color
    • GIMP Floating Selection
    • GIMP?batch processing
    • GIMP Crop
    • GIMP Filters
    • GIMP GMIC
    • GIMP?opacity
    • Animation in GIMP
    • GIMP import image
    • GIMP replace color
    • GIMP text outline
    • GIMP video editing
    • GIMP Alternatives
    • GIMP vector graphics
    • GIMP text shadow
    • GIMP resize image
    • GIMP pixel art
    • GIMP invert colors
    • GIMP GIF
    • GIMP move selection
    • GIMP normal map
    • GIMP remove background
    • GIMP rotate
    • GIMP grid
    • GIMP text effects
    • GIMP erase to transparent
    • GIMP resize layer
    • GIMP Patterns
    • GIMP extensions
    • GIMP blur background

Related Courses

Maya Course

Photoshop course

After Effects Course

SketchUp resize component

SketchUp resize component

Introduction to SketchUp Resize Component

SketchUp Resize Component is a process through which you can change the size of any component in this software, but during resizing in this software, you have to keep some points in your mind because there are some techniques for resizing components and part of any model. We know that for working in this software, we have to make a group and component to separate parts of any object. So after making them components or grouped them, we have to keep command on some terms so that we can resize that object easily without affecting another one. So let us have a good discussion on this topic.

All in One Design Bundle(280+ Courses, 100+ projects)
AutoCADHoudiniAdobe Premiere ProPhotoshop
SolidworksVFX Visual EffectsCorelDrawUnreal Engine
Price
View Courses
280+ Online Courses | 100+ projects | 2000+ Hours | Verifiable Certificates | Lifetime Access
4.6 (64,570 ratings)

How to Resize Component in SketchUp?

It is a very important feature of this software that we have to perform while working on different projects to create small and large models. So let me tell you how you can do this for your own work.

Start Your Free Design Course

3D animation, modelling, simulation, game development & others

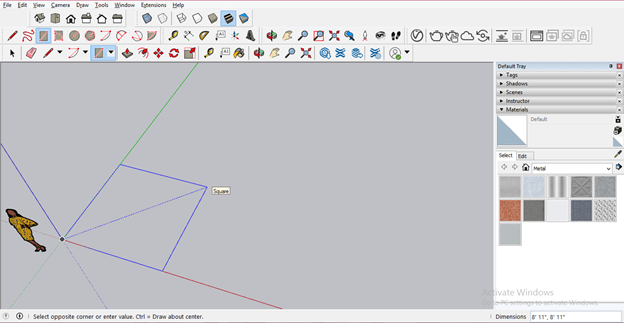
Take the Rectangle tool from the tool panel, or use its shortcut key, the R button of the keyboard. I will draw a square like this. I am not using any specific dimensions for this.

SketchUp resize component output 1

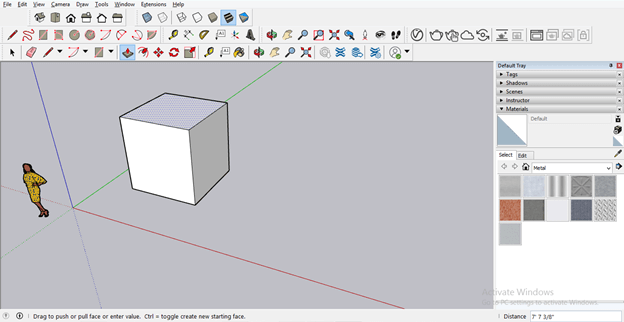
Now Take the Push/Pull tool from the tool panel, and by using the Push/Pull tool, I will add some height to this square.

SketchUp resize component output 2

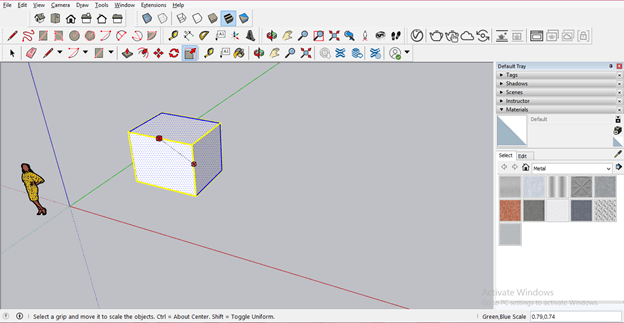
Now the first way through which you can resize any component is to scale them, and for this, we will use the Scale tool, but the scale can give you dimensions in ratio. So take the Scale tool from the tool panel after selecting this object. I have not grouped or made this object a component, so I will drag the mouse cursor from right to left to select the whole object.

SketchUp resize component output 3

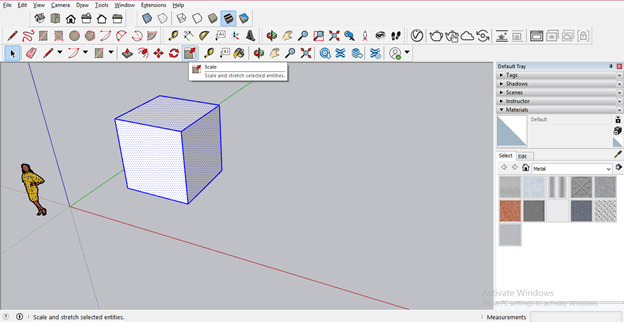
Once you take the Scale tool from the tool panel, there will be scale anchor points on the edges as well as on the faces of this object.

SketchUp resize component output 4

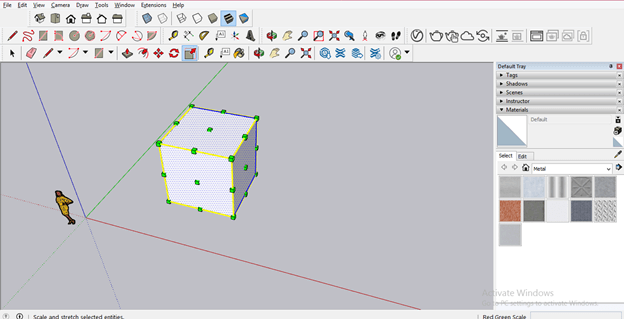
If you hold the corner point of this object and scale it up or down, then it will be scale proportionally like this. You can also enter a value for scaling it; for example, if I want to resize this object as its half dimension, then I will enter the scale value as 0.5.

SketchUp resize component output 5

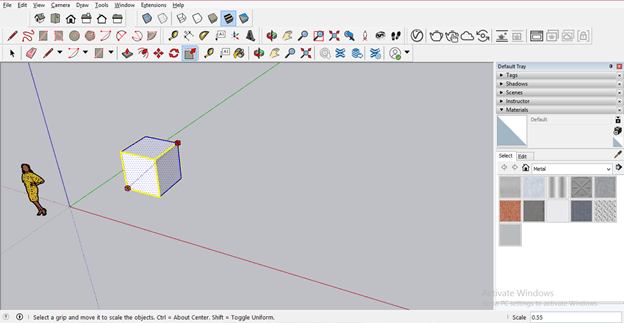
And if you scale it from the center point of any edge of this object, then you can change its dimension (in ratio) in width or height-wise directions.

SketchUp resize component output 6

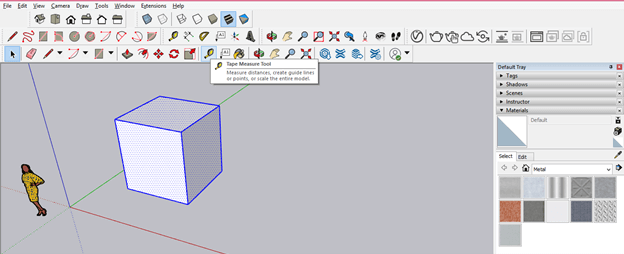
Now let us go through another way for resizing this object, and in this method, you can resize dimensions of it by entering their values. First, select the object and take the Tape Measurement tool from the tool panel for this method.

SketchUp resize component output 7

Now click on this point for assigning the first point to this tool. For example, assign the first point where you want to start measuring dimension and the last point where you want to end dimension.

SketchUp resize component output 8

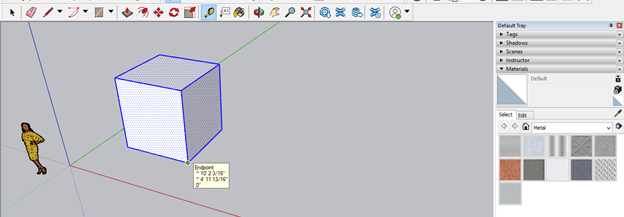
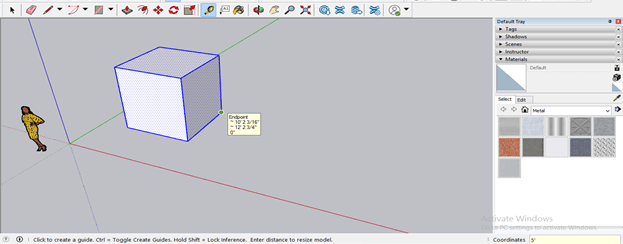
And click on the endpoint of this edge. You can see the dimension of this edge.

SketchUp resize component output 9

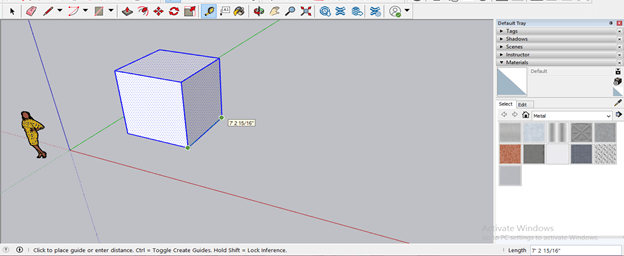
Now I went to change the dimension of this edge as 5’, so after making a click, I will enter 5’ in the measurement box, which is at the bottom left corner of the user screen of this software.

SketchUp resize component output 10

Once you enter the value, it shows you a confirmation dialog box for you want to resize or not. So click on the Yes button of this box. You can also see that there is one note also means if you have taken any model from an external source, then you cannot resize that by this method. You can go with other methods for resizing those imported models, and I will tell you those methods in later steps.

SketchUp resize component output 11

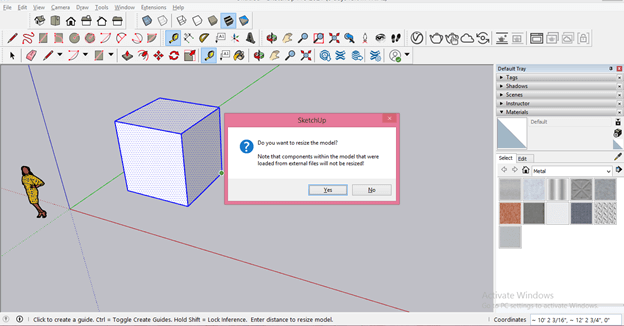
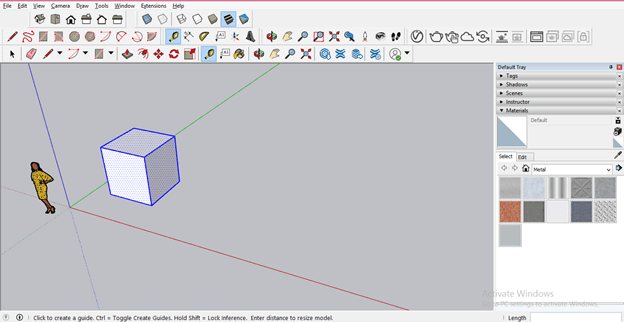
Once you click on the Yes button, it will apply your desired dimensions to this object.

output 12

Now let us make a copy of this object, and I will group the first one. First, select the whole object, make a right-click for grouping, and choose the Make group option from the scroll-down list. (Note: you can make three times click on any object to select whole edges as well as faces of that object.

output 13

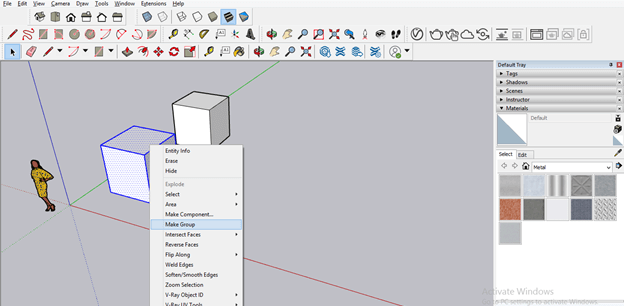
And I will make copied objects as a component. For making a copy-move any object with the move tool by holding the Ctrl button of the keyboard. Make right-click, and this time, choose the Make Component option from the scroll-down list for making this object component.

output 14

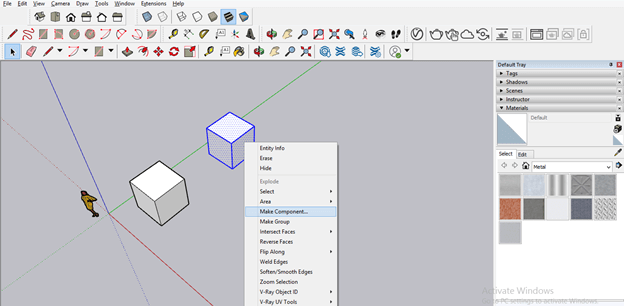
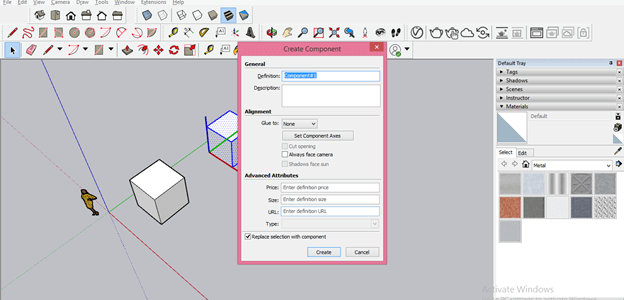
Once you click on the Make component, it will ask to name the selected component. Name it according to you so that if there is a number of the component in your project, then you can easily identify any particular component.

output 15

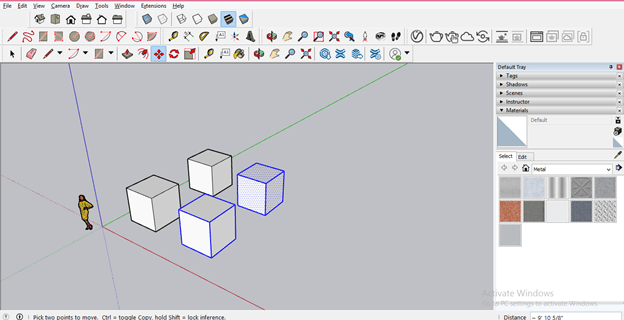
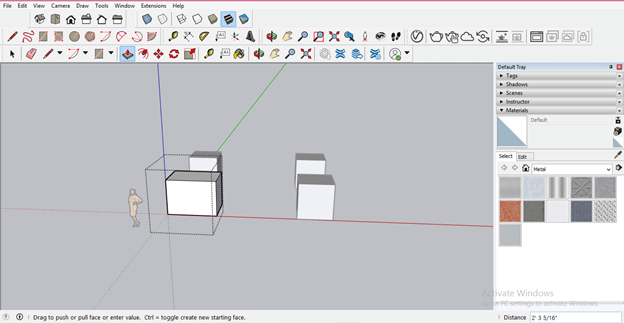
Now I will make a copy of both groped and component objects.

output 16

Now let us resize the first object in another way. As it is grouped object so we have to make double-click it for doing changes in it. I want to extrude the left face of this object, so I will use the push/pull tool and extrude it like this. So this way, you can resize any grouped object. I want to tell you one thing that you can notice the copied object of this grouped object is unaffected by changes we did in the source grouped object.

output 17

Now let us move to the Component object, and I will double click on it to resize it. Now I will do the same extrude process in this component object also, and in the same way, you can resize the component object, but the important thing is that copied component object is also affected by this resizing.

output 18

If you want to resize the only particular selected component object, then select that component object and make a right-click. Then, choose the ‘Make Unique’ option from the scroll-down list.

output 19

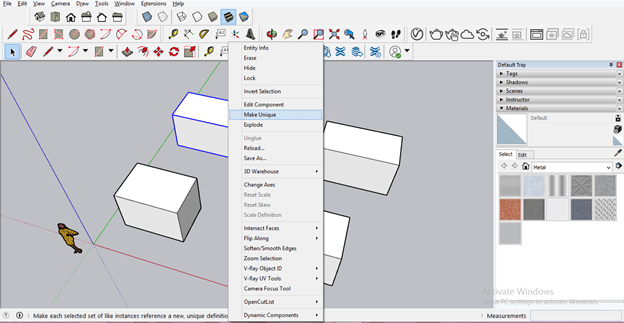
And now, when you resize it, then the copied component will be unaffected by this resizing.

output 20

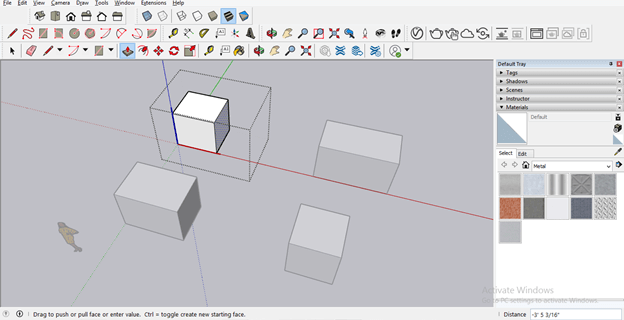
This way, you can resize components in SketchUp according to the requirement of what type of resizing needs by a particular object.

Conclusion

I am sure you have learned lots of things about resizing components, such as how to resize grouped objects, how to resize component objects and many more other things. Therefore, I will suggest you start working on all the above-discussed methods so that you can find out where you have to use which method.

Recommended Articles

This is a guide to SketchUp resize component. Here we discuss How to Resize Components in SketchUp and how to resize grouped objects. You may also look at the following articles to learn more –

  1. SketchUp Alternative
  2. SketchUp Rotate
  3. SketchUp AutoCAD
  4. Architecture Design Types
Popular Course in this category
Maya Training (10 Courses, 7+ Projects)
  10 Online Courses |  7 Hands-on Projects |  100+ Hours |  Verifiable Certificate of Completion
4.7
Price

View Course

Related Courses

Photoshop Training (10 Courses, 12+ Projects)4.9
After Effects Training (3 Courses, 3+ Projects)4.8
0 Shares
Share
Tweet
Share
Primary Sidebar
Footer
About Us
  • Blog
  • Who is EDUCBA?
  • Sign Up
  • Live Classes
  • Corporate Training
  • Certificate from Top Institutions
  • Contact Us
  • Verifiable Certificate
  • Reviews
  • Terms and Conditions
  • Privacy Policy
  •  
Apps
  • iPhone & iPad
  • Android
Resources
  • Free Courses
  • Photoshop Tutorial
  • 3ds Max Tutorial
  • All Tutorials
Certification Courses
  • All Courses
  • Design Course - All in One Bundle
  • Photoshop Course
  • Maya Course
  • Unreal Engine Course
  • Unity Course
  • DaVinci Resolve Course
  • Pro Tools Course

ISO 10004:2018 & ISO 9001:2015 Certified

© 2022 - EDUCBA. ALL RIGHTS RESERVED. THE CERTIFICATION NAMES ARE THE TRADEMARKS OF THEIR RESPECTIVE OWNERS.

EDUCBA
Free Design Course

Banner Creation, Object Selection, Sky Replacement, Advance Filters & others

*Please provide your correct email id. Login details for this Free course will be emailed to you

By signing up, you agree to our Terms of Use and Privacy Policy.

EDUCBA Login

Forgot Password?

By signing up, you agree to our Terms of Use and Privacy Policy.

EDUCBA
Free Design Course

3D animation, modelling, simulation, game development & others

*Please provide your correct email id. Login details for this Free course will be emailed to you

By signing up, you agree to our Terms of Use and Privacy Policy.

EDUCBA

*Please provide your correct email id. Login details for this Free course will be emailed to you

By signing up, you agree to our Terms of Use and Privacy Policy.

Let’s Get Started

By signing up, you agree to our Terms of Use and Privacy Policy.

This website or its third-party tools use cookies, which are necessary to its functioning and required to achieve the purposes illustrated in the cookie policy. By closing this banner, scrolling this page, clicking a link or continuing to browse otherwise, you agree to our Privacy Policy

Loading . . .
Quiz
Question:

Answer:

Quiz Result
Total QuestionsCorrect AnswersWrong AnswersPercentage

Explore 1000+ varieties of Mock tests View more