EDUCBA

EDUCBA

MENUMENU
  • Free Tutorials
  • Free Courses
  • Certification Courses
  • 280+ Courses All in One Bundle
  • Login
Home Design Design Tutorials Design Basic Tutorial SketchUp Layers
Secondary Sidebar
Design Basic Tutorial
  • SketchUp
    • SketchUp Keyboard Shortcuts
    • SketchUp geolocation
    • SketchUp animation
    • SketchUp Change Dimensions
    • SketchUp Import
    • SketchUp 2D
    • SketchUp rendering
    • Sketch software
    • Figma Shortcuts
    • SketchUp Layers
    • SketchUp landscape design
    • SketchUp group
    • SketchUp intersect faces
    • SketchUp Rotate
    • SketchUp Architecture
    • SketchUp 3D Models
    • SketchUp Vray
    • SketchUp Units
    • SketchUp garden design
    • SketchUp Layout
    • SketchUp Mirror
    • SketchUp Extensions
    • SketchUp Unhide
    • SketchUp kitchen
    • SketchUp background
    • SketchUp library
    • SketchUp dynamic components
    • SketchUp CutList
    • SketchUp Array
    • SketchUp Woodworking
    • SketchUp resize component
    • SketchUp Ungroup
    • SketchUp Deck Design
  • Basics and Advanced
    • Pro Tools Version
    • What is Autodesk BIM?
    • Animation Character
    • Autodesk Pixlr
    • Sketch plugins
    • Graphic designer requirements
    • Online Gaming Platforms
    • InDesign eyedropper tool
    • InDesign rounded corners
    • InDesign align
    • InDesign resize image
    • InDesign scripts
    • InDesign export to word
    • InDesign newsletter templates
    • InDesign Magazine
    • InDesign Missing Fonts
    • InDesign line spacing
    • InDesign Fonts
    • InDesign Preview Shortcut
    • InDesign Extension
    • InDesign columns
    • InDesign overset text
    • InDesign data merge
    • InDesign grid template
    • InDesign layers
    • InDesign reset preferences
    • InDesign master pages
    • InDesign layout
    • InDesign portfolio template
    • InDesign invoice template
    • InDesign word count
    • InDesign underline
    • InDesign superscript
    • InDesign presentation templates
    • InDesign drop cap
    • InDesign how to add page numbers
    • InDesign resume template
    • InDesign import pdf
    • InDesign table of contents
    • InDesign change page size
    • InDesign book templates
    • InDesign link text boxes
    • InDesign vertical text
    • InDesign Bullet Points
    • InDesign center text vertically
    • InDesign newspaper template
    • InDesign shortcuts
    • InDesign gap tool
    • InDesign paragraph styles
    • InDesign Grid
    • InDesign margins
    • InDesign highlight text
    • InDesign Wrap Text
    • ZBrush ZRemesher
    • Animation Software
    • Principles of Animation
    • 3d Animation Software
    • 3D Modeling Software
    • 3D Software Design
    • 2D Animation Software
    • 10 Quick Tips For Adobe InDesign Users
    • ADOBE FLASH CS6
    • Affinity Photo Brushes
    • Adobe Lightroom For Free
    • Lightroom Background Color
    • Lightroom?Shortcuts
    • Lightroom XMP
    • Lightroom editing
    • Masking Layers in Adobe After Effects
    • Adobe Premiere Pro Plugins
    • Adobe Speedgrade
    • Install Adobe Creative Cloud
    • Install Adobe Premiere Pro
    • What is Adobe Creative Cloud
    • What is Adobe Illustrator
    • Adobe InDesign Templates
    • What is Adobe InDesign
    • Adobe Indesign Uses
    • InDesign Background Color
    • What is Adobe Lightroom
    • What is Adobe Muse
    • What is Adobe Prelude
    • What is Adobe Premiere Pro
    • Careers in 3D
    • Careers in 3D Modeling
    • Careers in 3D Printing
    • Best Editing Software
    • Video Editing Application
    • Video Editing Tools
    • Career In Designing
    • Careers in Game Development
    • 3D Printing Models
    • Adobe Editing Softwares
    • Types of Adobe
    • Types of Illustration
    • What is Graphic Design
    • Best Graphic Design Software
    • Best Photo Editors
    • Game Testing Interview Questions
    • VFX Softwares
    • Unity Scripting
    • Unity Principle of Design
    • Unity JSON
    • Unity webGL
    • Unity 2D
    • Unity 3D Games
    • VFX Companies
    • How To Use Indesign
    • New Features InDesign CS6
    • What is Houdini?
    • Advantages of 3D Printing
    • What is Autodesk
    • Autodesk Character Generator
    • Autodesk Vault
    • Autodesk Viewer
    • Autodesk Navisworks
    • Autodesk Desktop Connector
    • Designers and Architects
    • 2D and 3D Shapes
    • Keyboard Shortcuts for Premiere Pro
    • Unreal Engine Tutorial
    • Best Audio Editors
    • Digital Image Processing
    • What is Motion Graphics
    • What is Digital Design
    • Design Pattern Interview Questions
    • Graphic Design Interview Questions
    • UX designer Interview Questions
    • Is Unreal Engine Free
    • What Is Design Pattern
    • What is VFX
    • What is Audacity
    • What is Unreal Engine
    • What is CATIA
    • What is Blueprint
    • Sony Vegas Pro for Free
    • 3D Graphics Software
    • Best Online Photo Editor
    • Photo Editing App
    • Vector Graphics Editor
    • ArchiCAD
    • ArchiCAD Shortcuts
    • Audacity Keyboard Shortcut
    • Davinci Resolve Shortcuts
    • What is pixel art?
    • Picmonkey Alternatives
    • Adobe Flash Player Alternative
    • Pro tools shortcuts
    • Pro Tools Plugins
    • Architectural Design Software
    • Architectural Design Principles
    • Architecture Design Types
    • Architectural design tools
    • Application of Digital Image Processing
    • Digital Image Processing Fundamentals
    • OpenGL Versions
    • Revit Keyboard Shortcuts
    • Revit plugins
    • Indesign version
    • What is DirectX?
    • DirectX Versions
    • Cinema 4D Plugins
    • Cinema 4d shortcuts
    • Godot Engine
    • Godot tilemap
    • Krita Animation
    • Krita Software
    • Krita Shortcuts
    • Krita eraser
    • Krita brushes
    • Krita Pixel Art
    • Krita Plugins
    • Skencil
    • Fusion 360 Keyboard Shortcuts
    • Anim8or
    • Affinity photo plugins
    • What is Affinity Photo?
    • FL Studio Plugins
    • Vectorworks
    • Architectural Design Elements
  • Inkscape
    • What is Inkscape?
    • Inkscape layers
    • Inkscape Crop
    • Inkscape text
    • Inkscape G-code
    • Inkscape mirror
    • Inkscape rounded rectangle
    • Inkscape EPS
    • Inkscape image to vector
    • Inkscape unlock
    • Inkscape Curved Text
    • Inkscape laser cutting
    • Inkscape background color
    • Inkscape arrow
    • Inkscape vector
    • Inkscape animation
    • Inkscape 3D
    • Inkscape SVG
    • Inkscape Dark Theme
    • Inkscape trace bitmap
    • Inkscape gradient
    • Inkscape Greek Letters
    • Inkscape shadow
    • Inkscape snap to grid
    • Inkscape Fonts
    • Inkscape extensions
    • Inkscape PNG to SVG
    • Inkscape Art
    • Inkscape transparent background
    • Inkscape Alternatives
    • Inkscape Remove Background
    • Inkscape text to path
    • Inkscape logo
  • Figma
    • Figma Libraries
    • Figma fonts
    • Figma Plugins
    • Figma grid
    • Figma Alternatives
  • GIMP
    • What is GIMP
    • GIMP Versions
    • GIMP brushes
    • GIMP line tool
    • GIMP blend tool
    • GIMP clone tool
    • GIMP magic wand tool
    • GIMP 3D Text
    • GIMP healing tool
    • GIMP Layers
    • GIMP Fonts
    • GIMP Toolbox
    • Blur Effect in GIMP
    • GIMP Change Background Color
    • GIMP Floating Selection
    • GIMP?batch processing
    • GIMP Crop
    • GIMP Filters
    • GIMP GMIC
    • GIMP?opacity
    • Animation in GIMP
    • GIMP import image
    • GIMP replace color
    • GIMP text outline
    • GIMP video editing
    • GIMP Alternatives
    • GIMP vector graphics
    • GIMP text shadow
    • GIMP resize image
    • GIMP pixel art
    • GIMP invert colors
    • GIMP GIF
    • GIMP move selection
    • GIMP normal map
    • GIMP remove background
    • GIMP rotate
    • GIMP grid
    • GIMP text effects
    • GIMP erase to transparent
    • GIMP resize layer
    • GIMP Patterns
    • GIMP extensions
    • GIMP blur background

Related Courses

Maya Course

Photoshop course

After Effects Course

SketchUp Layers

SketchUp Layers

Introduction to SketchUp Layers

SketchUp Layers is a very useful feature of this software through which we can organize different components of any model in each separated section which you can call layers/tags. There are many characteristics of layers panel in this software, and by using them, we can do good management of components of any model. In the latest version of this software, you can find layers with the name Tags, and it has some more features than the layers panel of previous versions. You know almost every designing software has layers panel but in SketchUp is works in different ways. So let us have a look at it working in this software.

How to Use Layers/Tags in SketchUp?

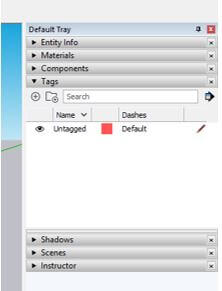
You can manage your work in more defined ways if you start working with layers panel or tags in this software. So you can find the Tags/ Layers panel in the Default Tray panel, which is on the right side of the working screen.

SketchUp Layers Output 1

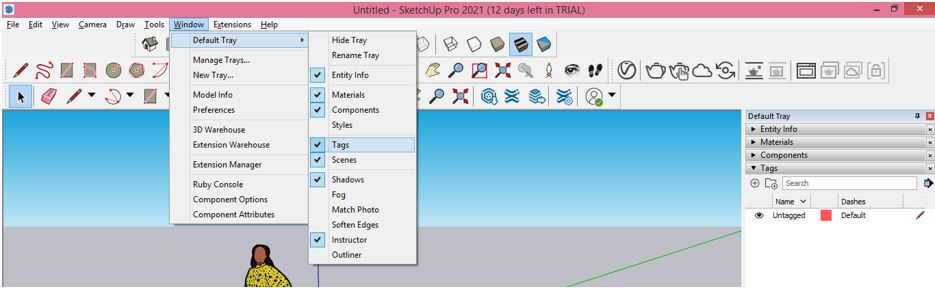
If there is no Default tray, then you can find it in the Dropdown list of the Window menu. Then, just enable it by clicking on it.

Start Your Free Design Course

3D animation, modelling, simulation, game development & others

SketchUp Layers Output 2

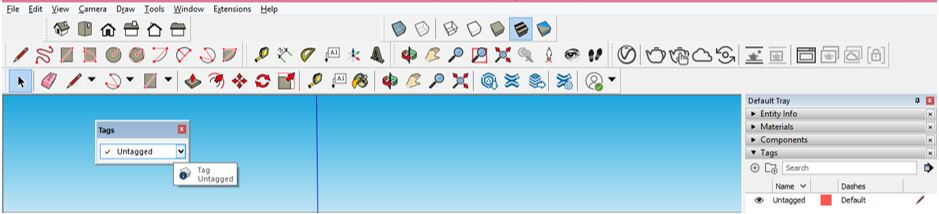
There is one more way through which you can have a movable panel of tags/layers and for that, click on the Toolbars option of the drop-down list of the View menu.

SketchUp Layers Output 3

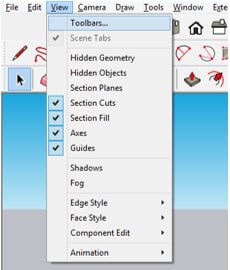
And enable check box of Tags option of a list of Toolbars dialog box.

All in One Design Bundle(280+ Courses, 100+ projects)
AutoCADHoudiniAdobe Premiere ProPhotoshop
SolidworksVFX Visual EffectsCorelDrawUnreal Engine
Price
View Courses
280+ Online Courses | 100+ projects | 2000+ Hours | Verifiable Certificates | Lifetime Access
4.6 (64,868 ratings)

SketchUp Layers Output 4

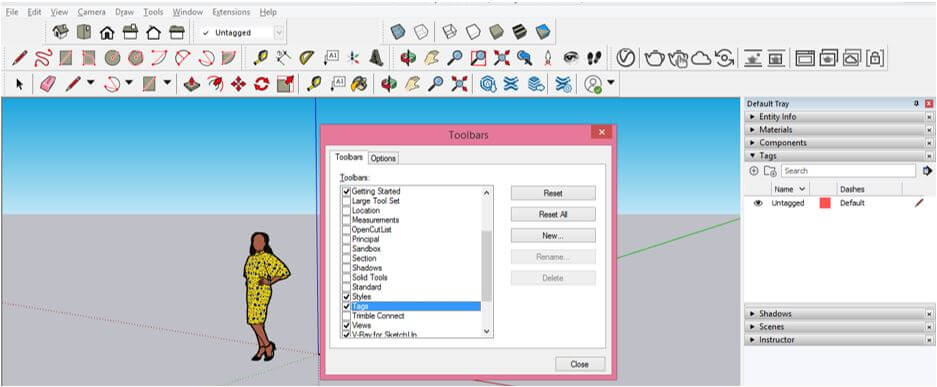
And you can move the panel of Tags/Layer anywhere on the working window screen.

SketchUp Layers Output 5

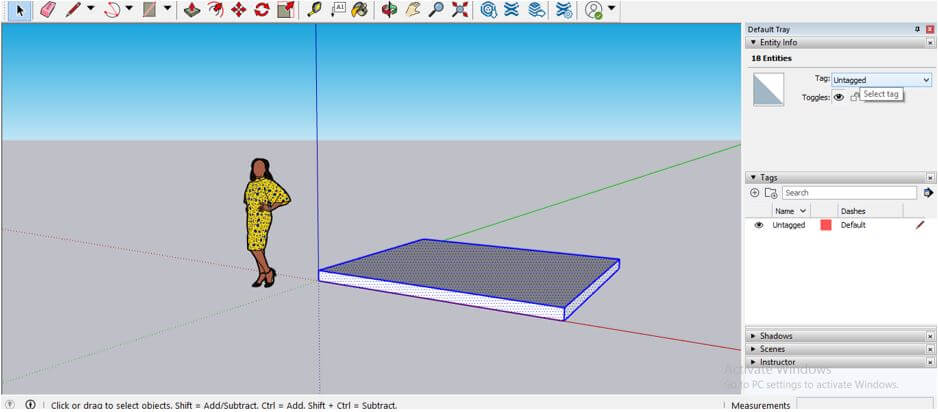
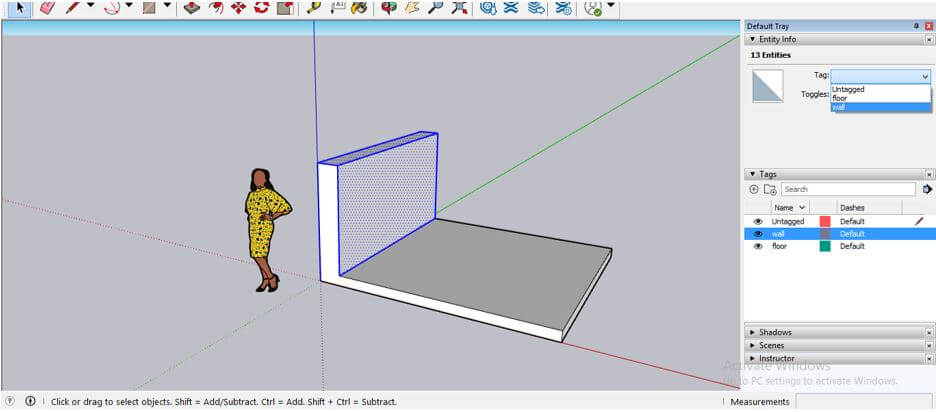
I have drawn this object. You can see in the Tags panel there is an Untagged tag/layer (in the previous layer panel, it was indicated by Layer 0), and all draw objects will be in the default tag/layer. You can see it in the Entity Info panel.

SketchUp Layers Output 6

Let us create a new tag/layer, and for that, click on the plus button of this panel.

SketchUp Layers Output 7

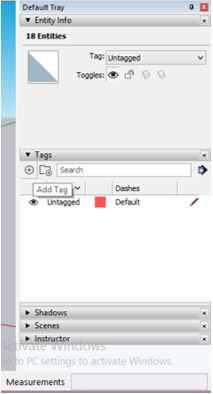
I will name it as floor. You can make double click on any tag/layer for renaming it.

SketchUp Layers Output 8

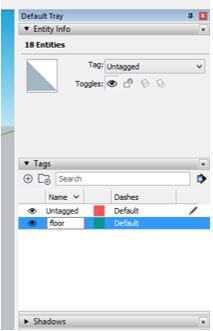
You have to remember that you have to assign the layer to any component from the Entity Info so that the component will move from the Untagged layer to the assigned layer. So I will select this component and go to the Entity Info panel, then select floor tag from the Tag option of this panel.

SketchUp Layers Output 9

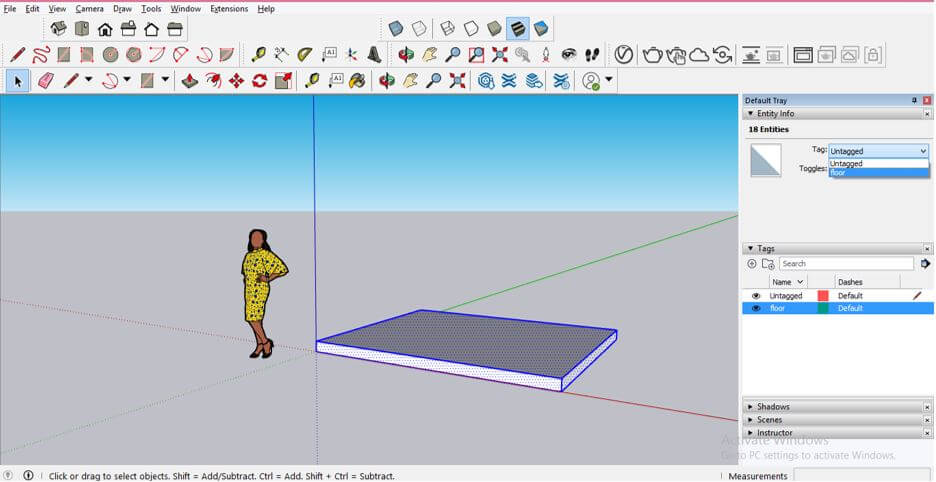
You can see this component now assign to the Floor tag/layer.

SketchUp Layers Output 10

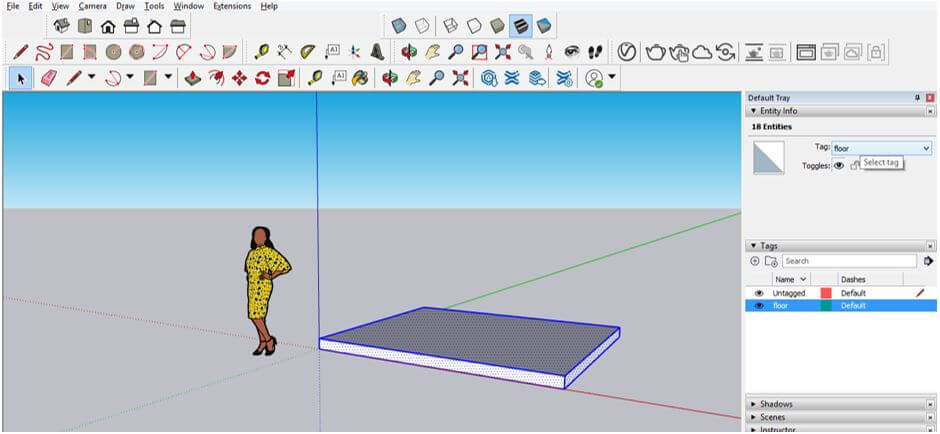
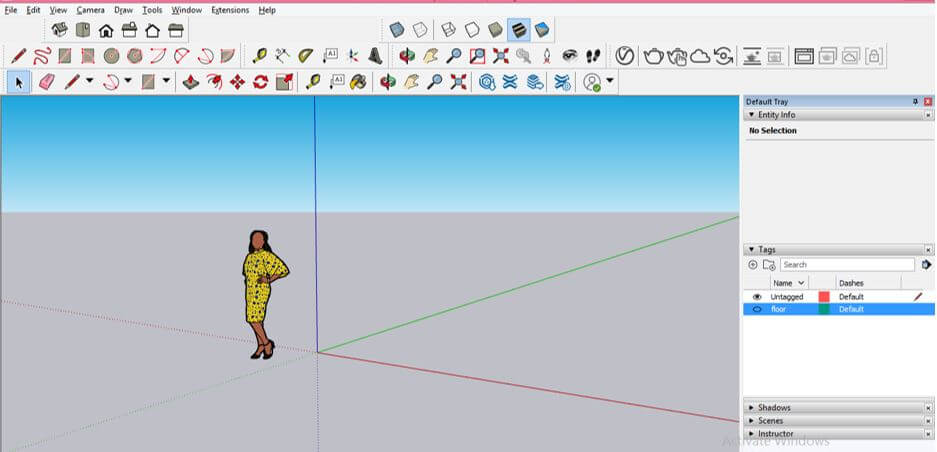
And if i click on the eye button of it for hiding this layer, then this component will also hide.

SketchUp Layers Output 11

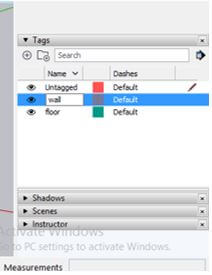
Now i will add one more tag/layer and name it as Wall.

SketchUp Layers Output 12

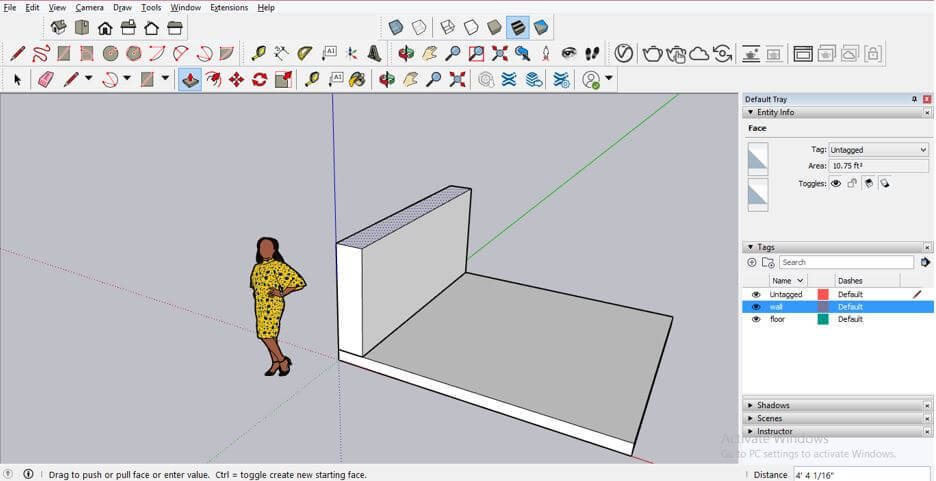
Now i will draw a wall like this. After drawing it, I will assign it to the wall tag/layer from the Entity Info panel.

SketchUp Layers Output 13

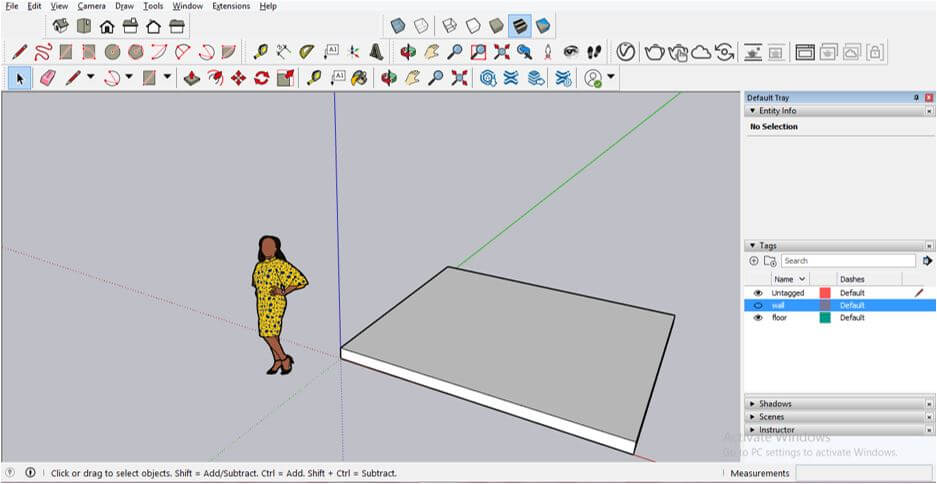
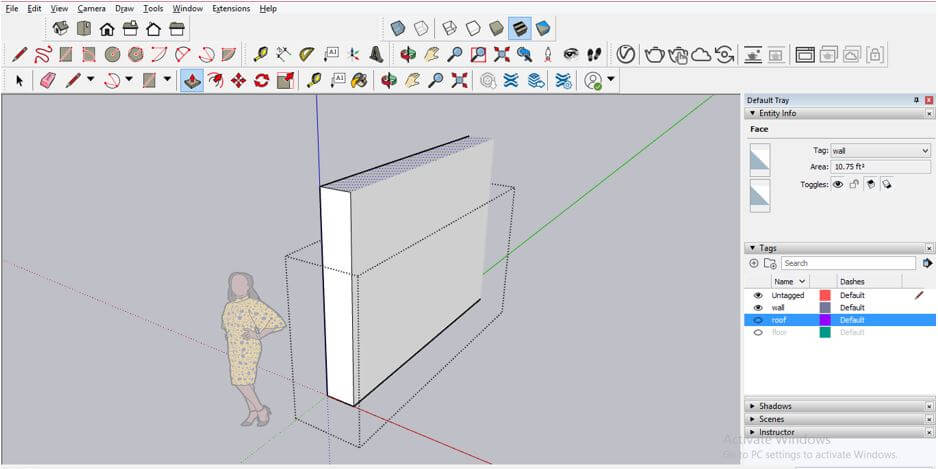
Now I will hide the wall tag/layer by clicking on the eye button of it. You can see some parts that are not hidden and also affect the floor layer component.

SketchUp Layers Output 14

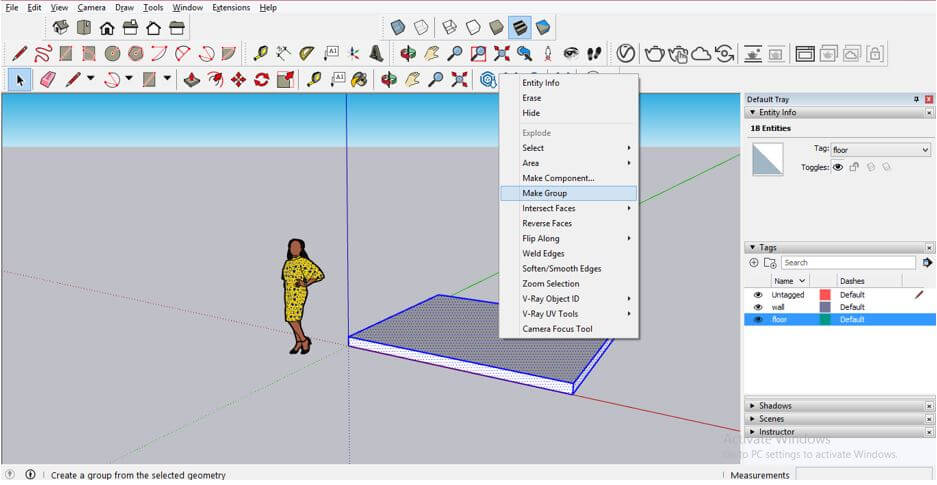
So being working with tags/layers or working on SketchUp, you have to group any component so that other components will not affect it if you make any change in one component. So I will select the floor component first and make a right-click on it, then click on the Make group option for making I as one component.

SketchUp Layers Output 15

Now i will again draw this wall in wall layer in the same way as i did in previous.

SketchUp Layers Output 16

Now, this time if you hide this wall layer, then the component of this tag will hide without affecting other layer components.

SketchUp Layers Output 17

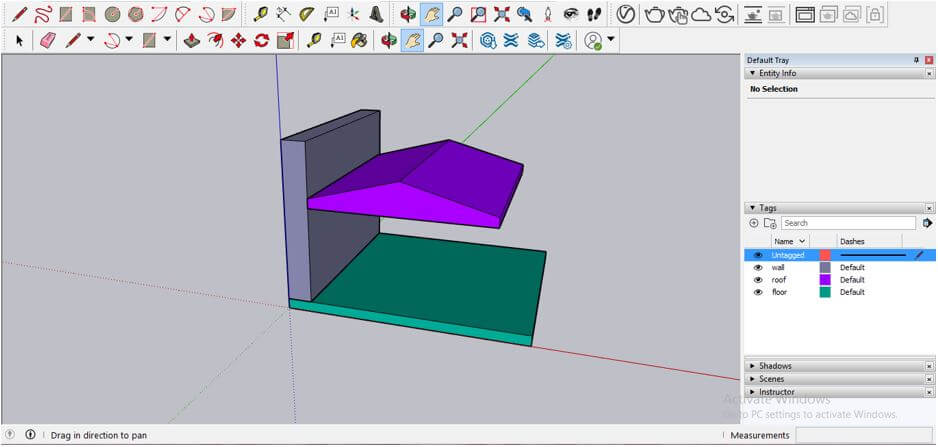
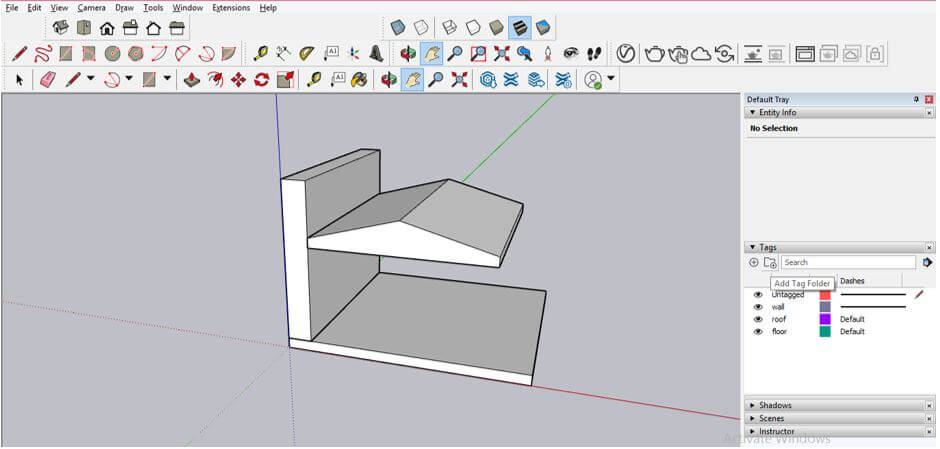
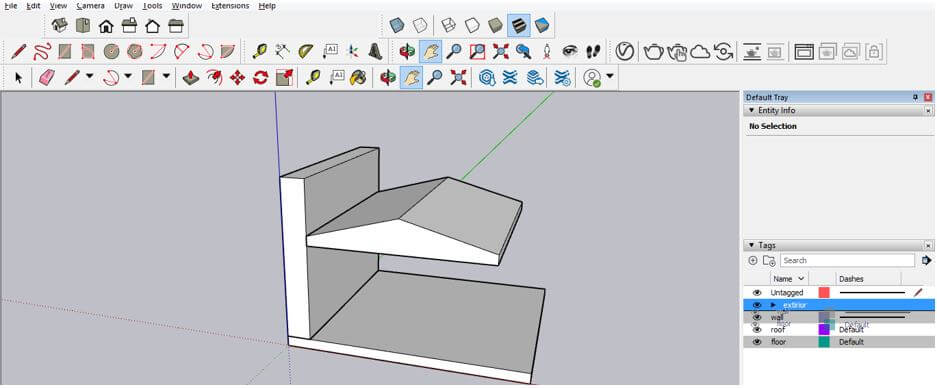
Now i will make a roof component and assign it to a new tag/layer, which is a roof tag.

Roof tag Output 18

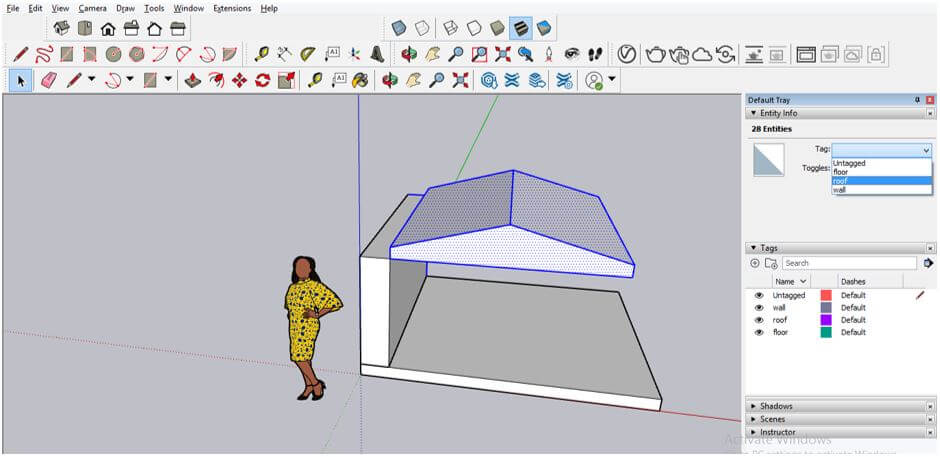
You can make visible only that layer on which you want to do changes and hide more than one layer by clicking on the eye button of those layers. I would like to tell you that you have to make double click for editing any component because we have grouped them separately for making one component.

SketchUp Layers Output 19

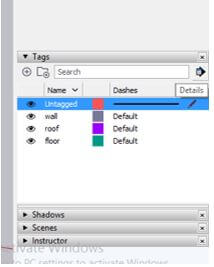
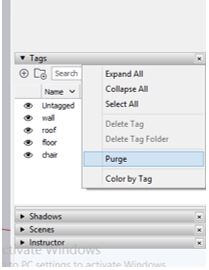
There is one button which is the Details button so click on it.

SketchUp Layers Output 20

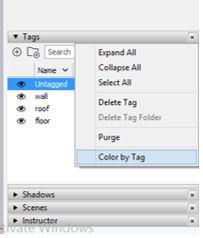
Now click on the ‘Color by Tag’ option of the open list.

Color by Tag Output 21

And each component will convert into colored objects according to the assigned color to their tag/layer.

SketchUp Layers Output 22

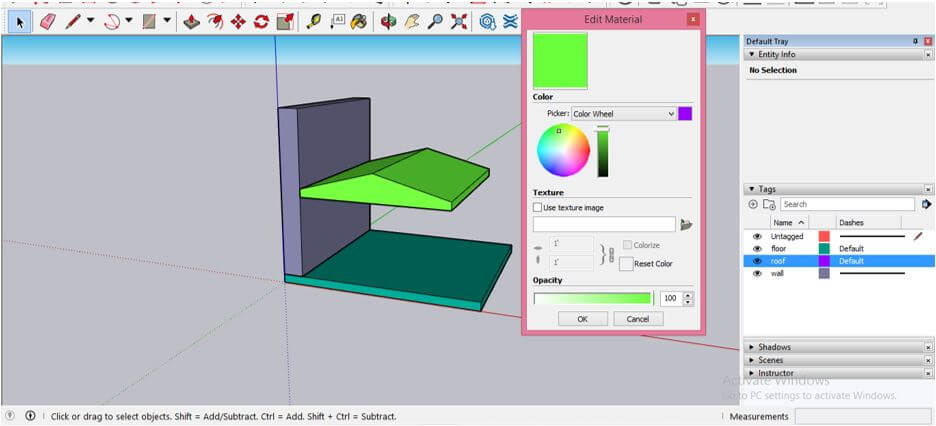
You can also change the color of any layer by making clicking on the color box of a particular layer, and once you click on it, an Edit material dialog box will be open from where you can choose your desired color.

Color option Output 23

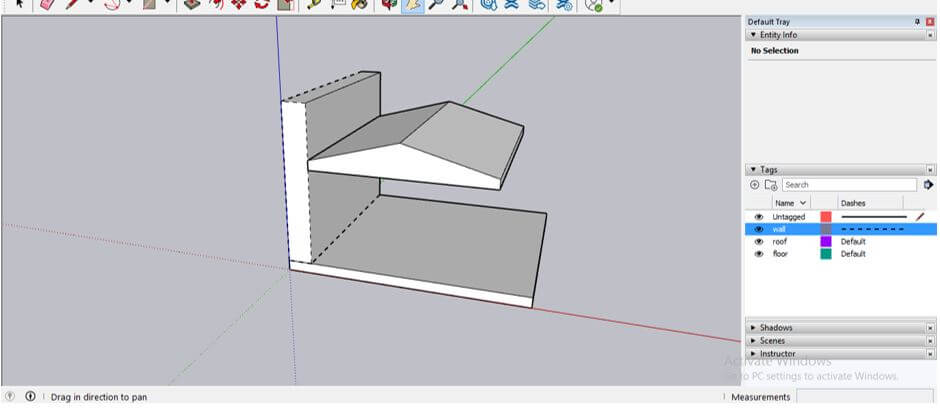
You can also change lines of components into dashed lines for identifying each component separately. For that, click on the Default option of the Dashes button of this panel and choose your desired line type.

SketchUp Layers Output 24

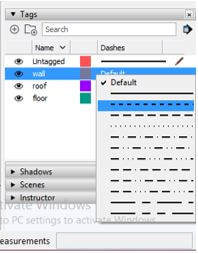
And component will have your assigned line type like this.

SketchUp Layers Output 25

Let me add an empty layer, and i will name it a chair.

Add empty layer Output 26

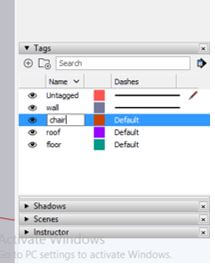
Now click on the details button and click on the Purge option of the drop-down list. Once you click on the Purge button, it will delete all empty layers automatically.

Purge option Output 27

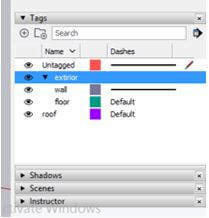
You can also create a folder the same as we have created the tag. So for creating a folder clicking on the ‘Add Folder’ button of this panel.

Add Folder button Output 28

I will name it as Exterior.

Exterior Output 29

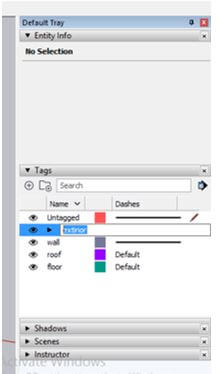
You can move your desired tags/layer into any folder so that all layers of any object will be in one folder, and their management becomes easy.

SketchUp Layers Output 30

I have moved two layers here in this folder, and when i will click on the drop-down arrow it, we can see tags available in this folder.

Tags Available Output 31

You can delete unwanted layers also. So for that, select that layer and go to the details panel, then click on the Delete Tag option.

SketchUp Layers Output 32

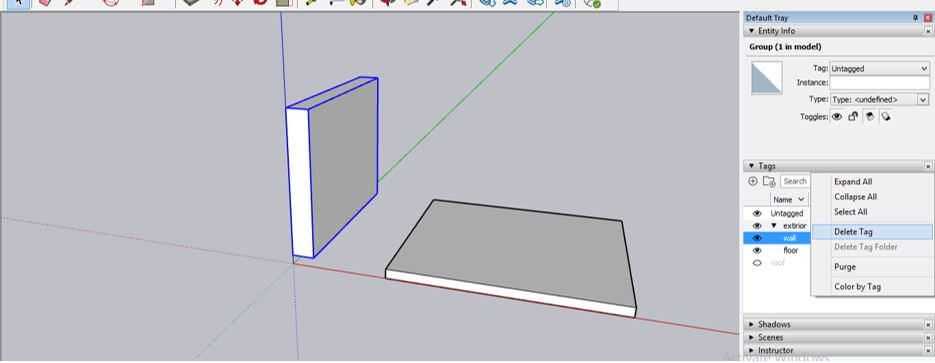
Once you click on the Delete option, it will ask you whether you want to shift components of the deleted layer to any other layer. You can choose a layer from this list in which you want to move that component.

Assign another tag Output 33

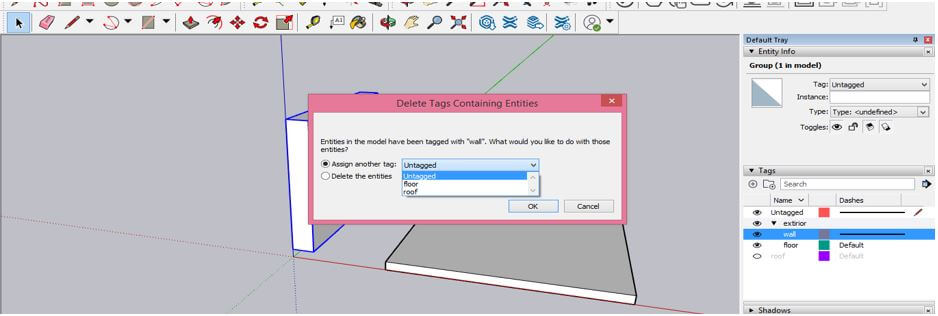
You can delete that layer and its component also by choosing the ‘Delete the entities’ option.

Delete the entities Output 34

Conclusion

So I think you can understand what layers are in this software, and now in the new version of SketchUp, we have known it as Tags, and I told you about additional features of the Tags panel which were not in the previous layer panel. So you can use this panel for better management of your work.

Recommended Articles

This is a guide to SketchUp Layers. Here we have discussed the use of layers in SketchUp with additional features of the Tags panel. You may also look at the following articles to learn more –

  1. SketchUp Alternative
  2. SketchUp Rotate
  3. SketchUp AutoCAD
  4. CorelDRAW Logo Design
Popular Course in this category
Maya Training (10 Courses, 7+ Projects)
  10 Online Courses |  7 Hands-on Projects |  100+ Hours |  Verifiable Certificate of Completion
4.7
Price

View Course

Related Courses

Photoshop Training (10 Courses, 12+ Projects)4.9
After Effects Training (3 Courses, 3+ Projects)4.8
0 Shares
Share
Tweet
Share
Primary Sidebar
Footer
About Us
  • Blog
  • Who is EDUCBA?
  • Sign Up
  • Live Classes
  • Corporate Training
  • Certificate from Top Institutions
  • Contact Us
  • Verifiable Certificate
  • Reviews
  • Terms and Conditions
  • Privacy Policy
  •  
Apps
  • iPhone & iPad
  • Android
Resources
  • Free Courses
  • Photoshop Tutorial
  • 3ds Max Tutorial
  • All Tutorials
Certification Courses
  • All Courses
  • Design Course - All in One Bundle
  • Photoshop Course
  • Maya Course
  • Unreal Engine Course
  • Unity Course
  • DaVinci Resolve Course
  • Pro Tools Course

ISO 10004:2018 & ISO 9001:2015 Certified

© 2022 - EDUCBA. ALL RIGHTS RESERVED. THE CERTIFICATION NAMES ARE THE TRADEMARKS OF THEIR RESPECTIVE OWNERS.

EDUCBA
Free Design Course

Banner Creation, Object Selection, Sky Replacement, Advance Filters & others

*Please provide your correct email id. Login details for this Free course will be emailed to you

By signing up, you agree to our Terms of Use and Privacy Policy.

EDUCBA Login

Forgot Password?

By signing up, you agree to our Terms of Use and Privacy Policy.

EDUCBA
Free Design Course

3D animation, modelling, simulation, game development & others

*Please provide your correct email id. Login details for this Free course will be emailed to you

By signing up, you agree to our Terms of Use and Privacy Policy.

EDUCBA

*Please provide your correct email id. Login details for this Free course will be emailed to you

By signing up, you agree to our Terms of Use and Privacy Policy.

Let’s Get Started

By signing up, you agree to our Terms of Use and Privacy Policy.

This website or its third-party tools use cookies, which are necessary to its functioning and required to achieve the purposes illustrated in the cookie policy. By closing this banner, scrolling this page, clicking a link or continuing to browse otherwise, you agree to our Privacy Policy

Loading . . .
Quiz
Question:

Answer:

Quiz Result
Total QuestionsCorrect AnswersWrong AnswersPercentage

Explore 1000+ varieties of Mock tests View more