Updated June 2, 2023
Share Excel Workbook
The share Excel Workbook option is available under the Review menu tab under the Changes section, which is used to share the worksheet with any organization recipient if they are connected using MS Outlook. It allows the other recipient to review the document or file and make the changes. We can also highlight the changes done by other users and accept or reject those changes if they do not match the criteria.
How to Share Excel Workbook?
In this section, we will see how to Share Excel Workbook.
Follow the below steps to explore this cool option.
Step 1: Open the Excel Workbook you want to save.
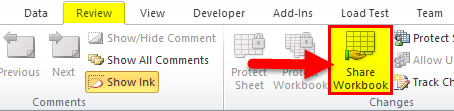
Step 2: Go to the Review tab and find the Share Workbook option.
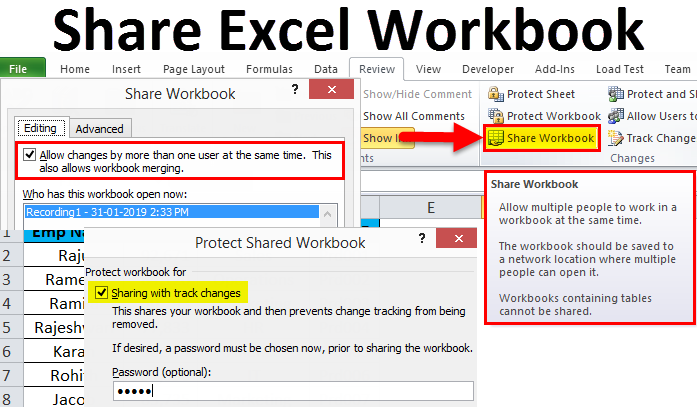
Step 3: After clicking on the Share Workbook, it will show you the new dialog box. Under the Editing option, select the checkbox “Allow changes by more than one user at the same time. This also allows workbook merging.”

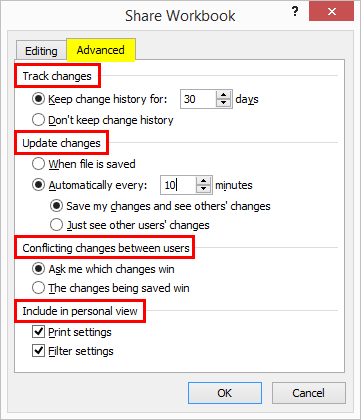
Step 4: Now select the Advanced tab under the same dialog box. This section shows the options Track changes, Update Changes, Conflicting changes between users, and Include in personal view under this section.
Step 5: Now save the workbook to the network location where the authorized person can access it and give them the link to the workbook folder, and you can also pass the link to your colleagues.
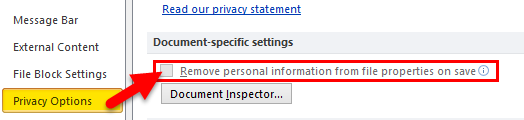
Change settings if your share workbook option is showing the below error:
If you click on Share Workbook and show the error message, you must change some settings.
- Go to File > Options.

- Trust Center > Trust Centre Settings.
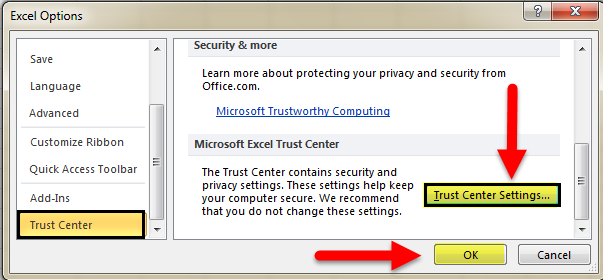
- Click on Privacy Options > Uncheck “Remove personal information from file properties on save “.
Concept of controlling history changes in the workbook:
You can protect and share the workbook if you want to share the Excel Workbook and control changes history. Find the below steps to apply this function.
Step 1: Go to the Review Tab.
Step 2: Click on Protect Shared Workbook.

Step 3: It will open the dialog box. Click on the dialog box and enter your password.
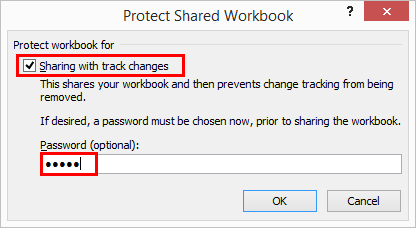
Step 4: Password is not mandatory, but it is always safe to protect and share to control the other person’s changes.
Protect Worksheet vs. Protect Shared Workbook
- Protecting the worksheet is nothing, but you do not authorize the user except for specific cells.
- Protect Shared Workbook means that you just turn off the option of tracking changes to the option of monitoring changes in the shared workbook.
- If many people or users change the workbook, you can work together and merge with Excel Compare & Merge.
- Finally, you receive all the shared workbooks and save all the workbooks in a single folder. After that, select the Compare & Merge Workbooks option and individually select the workbook you want to compare and merge.
Unshare & Remove Users From Shared Workbooks:
- You can do this if you want to unshare and remove users at any point.
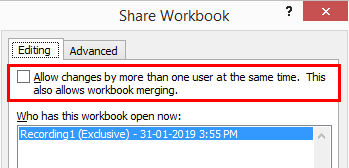
- To unshare the workbook, go to REVIEW and click on Share Workbook.

- Now uncheck the option of Allow Changes by more than one user simultaneously.
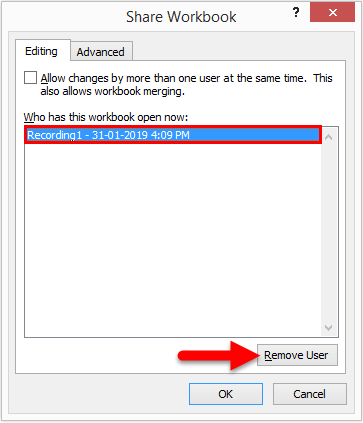
- To remove users in the same window, select the user you want to remove and click the remove user option.
Things to Remember
- While performing in the Share Excel Workbook, always protect the workbook from controlling the track changes option.
- Protect Worksheet and Protect Shared Workbooks are both different from each other.
- You can select which changes you want to apply or remove at any time.
- It is a feature that automatically adjusts the width or height of a cell. The easiest way to adjust a column is to use the Share Excel Workbook.
Recommended Articles
This has been a guide to Share Excel Workbook. Here we discuss how to use Share Excel Workbook, practical examples, and a downloadable Excel template. You can also go through our other suggested articles to learn more –
