Updated June 27, 2023
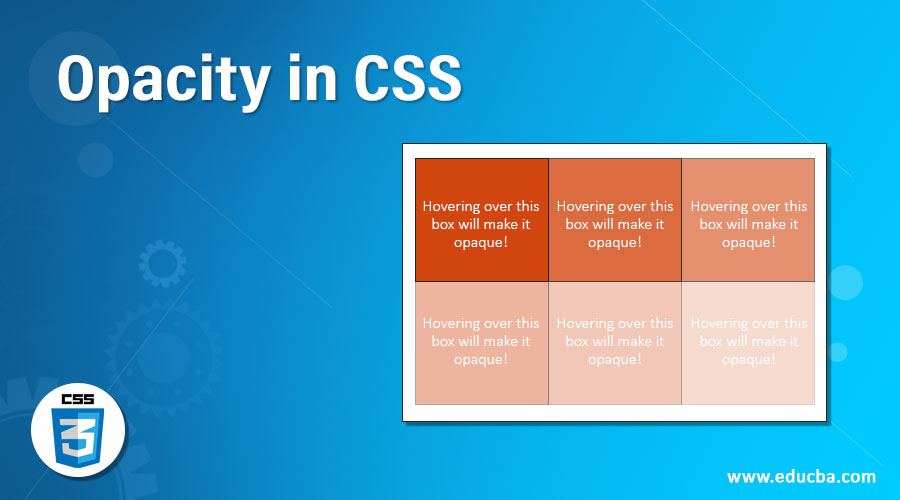
Introduction to Opacity in CSS
You name a feature or property, and the cascading style sheet has it. It is full of options that keep expanding as you explore more. Often, we come across an image that appears opaque or transparent. Sometimes, hovering over an object changes its opacity too. The CSS property, Opacity, handles all this. Using this property, a developer can select how opaque an element must look on their page. This feature is majorly used in overlay screens such that the main page’s content is visible and that of the overlay screen.
Syntax
The syntax for opacity is:
opacity:value (percentage/decimal)This property can be used in styling any element. Just like other features, it can be added along. The developers can add the opacity as and when required.
Examples to Implement Opacity in CSS
Let us take a look at some of the examples to understand better.
Example #1
Demonstration of opacity using external CSS and hover feature
For this example, we are using external CSS. Hence we will start by creating the CSS file first. We will write the styling for the paragraph element in the CSS file. To demonstrate the opacity feature, we will write a hover sub-class where the opacity feature will be used.
CSS coding should be as follows:
Code:
p{
background-color: blueviolet;
color: white;
font-family: Cambria, Cochin, Georgia, Times, 'Times New Roman', serif;
height: 150px;
width: 150px;
font-style: bold;
}
p:hover{
opacity: 50%;
}- Now, the HTML code for this example will be very basic. Firstly, we will call the external style sheet in the head section.
- Then, in the body section, we will use the paragraph element <p> to demonstrate the opacity feature. The code for the HTML file will be as follows:
<html>
<head>
<title>Opacity Demo</title>
<link rel = "stylesheet" href = "opacity.css">
</head>
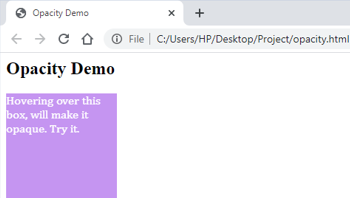
<body>
<h2>Opacity Demo</h2>
<p>Hovering over this box, will make it opaque. Try it.</p>
</body>
</html>- Once we save this file and open it through a browser, we will see the following output:

- Hovering over the box will make it opaque like this:
Example #2
Use of opacity in overlay screen through external CSS
For this example, we will use external CSS. Hence we will start by creating the CSS. We will first create an ID with styling for the overlay screen in the CSS file.
The code for the same will look like this:
Code:
#ID1{
position: fixed;
display: none;
height: 50%;
width: 50%;
background-color: lightblue;
opacity: 50%;
cursor: pointer;
}- We will also define a class with the styling property of the content on the overlay screen. The code will look like this:
.content{
font-family: 'Segoe UI', Tahoma, Geneva, Verdana, sans-serif;
color: darkblue;
margin: 100px;
}- Combining the ID and the class, the final CSS class will look like this:
#ID1{
position: fixed;
display: none;
height: 50%;
width: 50%;
background-color: lightblue;
opacity: 50%;
cursor: pointer;
}
.content{
font-family: 'Segoe UI', Tahoma, Geneva, Verdana, sans-serif;
color: darkblue;
margin: 100px;
}- Next, we will code for the HTML page. Since this example uses external CSS, we will call the external CSS file in the head section.
- Since we need the overlay screen, we will define some JavaScript functions. This will be coded in the body section within the script tag. The code for the same will look like this:
<script>
function up() {
document.getElementById("ID1").style.display = "block";
}
function down() {
document.getElementById("ID1").style.display = "none";
}
</script>- Now, using these functions and the CSS script, we will code for the <div> element in the body section as follows:
<div id="ID1" onclick="down()">
<div class="content">OVERLAY SCREEN TEXT</div>
</div>
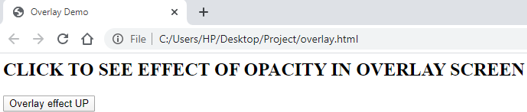
<h2>CLICK TO SEE EFFECT OF OPACITY IN OVERLAY SCREEN</h2>
<button onclick="up()">Overlay effect UP</button>- Hence, the final HTML code should look like this:
<html>
<head>
<title>Overlay Demo</title>
<link rel = "stylesheet" href = "overlay.css">
</head>
<body>
<script>
function up() {
document.getElementById("ID1").style.display = "block";
}
function down() {
document.getElementById("ID1").style.display = "none";
}
</script>
<div id="ID1" onclick="down()">
<div class="content">OVERLAY SCREEN TEXT</div>
</div>
<h2>CLICK TO SEE EFFECT OF OPACITY IN OVERLAY SCREEN</h2>
<button onclick="up()">Overlay effect UP</button>
</body>
</html>- Saving this file and opening it through a browser will give this output:
- Clicking on the button will make the overlay screen pop up and give this output:
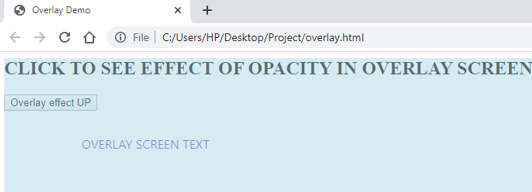
Clicking anywhere on the overlay screen will make it vanish.
Example #3
Opacity using internal CSS
Since we are using internal CSS, we will directly code for the HTML page. In the head section, we will define the style with the <style> tag.
The code should be as follows:
Code:
<style>
p{
background-color: green;
color: white;
font-family: Cambria, Cochin, Georgia, Times, 'Times New Roman', serif;
height: 150px;
width: 150px;
font-style: bold;
}
p:hover{
opacity: 50%;
}
</style>- In the body section, we will call paragraph element <p> such that the opacity feature can be demonstrated.
- The final HTML code should look like this:
<html>
<head>
<title>Opacity Demo</title>
<style>
p{
background-color: green;
color: white;
font-family: Cambria, Cochin, Georgia, Times, 'Times New Roman', serif;
height: 150px;
width: 150px;
font-style: bold;
}
p:hover{
opacity: 50%;
}
</style>
</head>
<body>
<h2>Demo of Opacity</h2>
<p>Hovering over this box will make it opaque!</p>
</body>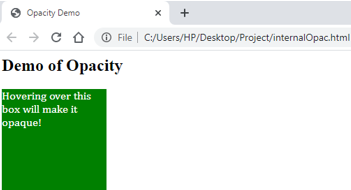
</html>- The output of the html page will look like this if opened through a browser:
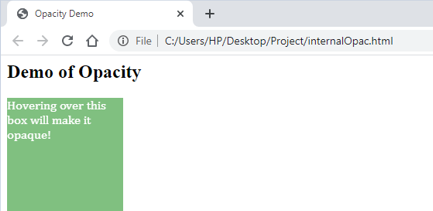
- Hovering over the green box will make it opaque, like in the below screenshot:
Explanation: The above example shows various ways and purposes for using the opacity property. However, it is not just limited to the above options. One can try experimenting with images and setting the desired opacity. This feature can be used depending on the user’s requirements. Using such features efficiently will add to a better end-user experience. Developers can check and play around with various CSS features in different combinations to obtain results accordingly.
Recommended Articles
We hope this EDUCBA information on “Opacity in CSS” benefited you. You can view EDUCBA’s recommended articles for more information.

