Updated June 21, 2023
Introduction to CSS Box Model
Cascading Style Sheet provides the styling HTML elements. But, for styling an element, we must know about HTML elements and their behavior as far as CSS is considered. One of the most important parts of designing a web page is deciding the layout. If the placements of elements on the page are properly planned, it can be made dynamic and responsive. The presentation of the page depends upon how the elements have been rendered. In plain HTML, if we use different elements, they are rendered one after the other in a queue form. However, CSS allows us to customize that part of the display, which this article will discuss in detail. This property of CSS is called the Box Model. Each element can be equated to a box, and CSS lets the developer decide various parameters of this box to customize each element’s rendering and create the page’s overall layout.
Box Model Elements and Syntax
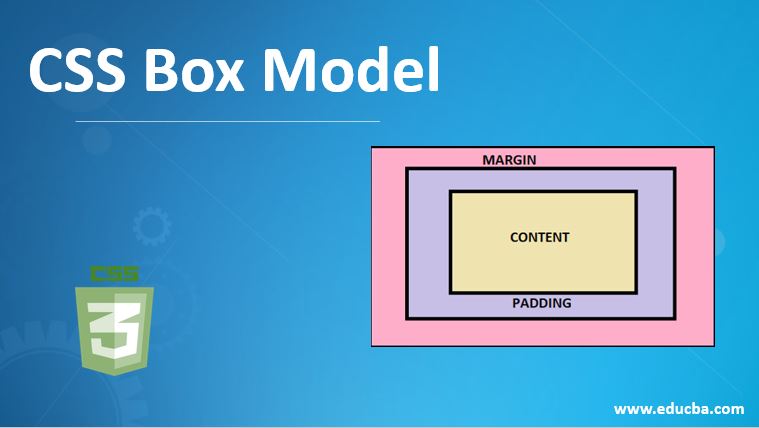
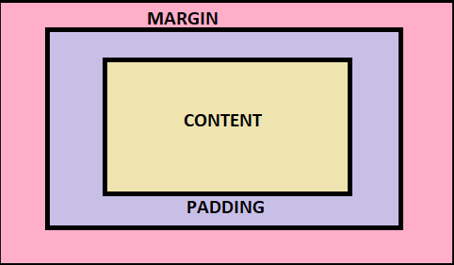
There are four elements in a box model on which the behavior of the box (element) relies. These are:
- Content: This is the main content of the element. It can be text, links, images, videos, or other content.
- Padding: This is the gap between the content and the content’s border (another element).
- Border: This can be visualized as a solid boundary of the element’s content.
- Margin: This is the space maintained between various boxes on a particular page, i.e., the space between two borders.
Syntax:
element_name{
height:<value>;
width:<value>;
border:<value>;
padding: <value>;
margin:<value>;
}
The diagrammatic representation of the box model is:
Examples to Implement in CSS Box Model
Let us now have a look at some basic examples to see how the box-model works in CSS:
1. Designing the Box Model for a single element.
- For this example, we will take the External CSS method of styling a page. So, first of all, we will create a CSS file.
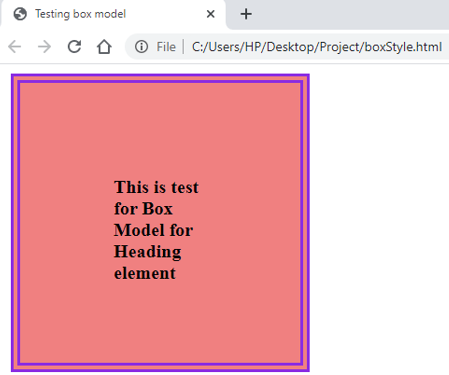
- We will write the box-model styling for the heading element, i.e., <h2>. We will define the elements such as padding, margin, and border. We can add additional features like background color, font-size, font style, etc, according to the requirement. The CSS file should look like this:
Code:
h2{
height: 100px;
width: 100px;
font-size: 20px;
padding: 100px;;
border: 10px double blueviolet;
margin: 10px;
background-color: lightcoral;
}- Next, we will create an HTML page. Since we use external CSS, we will primarily call the CSS file in the HTML page.
- We will use the heading element <h2> to demonstrate the layout that is styled in the CSS file. The HTML code should be something similar to this:
Code:
<html>
<head>
<title>Testing box model</title>
<link rel = "stylesheet" href = "box.css">
</head>
<body>
<h2>This is test for Box Model for Heading element</h2>
</body>
</html>- Saving the HTML file and opening it through a browser will give the output. It should be similar to the screenshot:
2. Designing layout for multiple elements on a page.
- We will be using the External CSS approach for this example as well. Hence we will create a CSS file.
- We will write the layout style for the heading element <h2>. We will fix the text properties also. The styling code for <h2> should be similar to this snippet of code:
Code:
h2{
width: 500px;
font-size: 20px;
padding: 20px 50px;
border: 10px double blueviolet;
margin: 10px 50px;
background-color: lightcoral;
text-align: center;
}- Next, we will write a similar layout style for paragraph elements, i.e., <p>. The Code should be:
Code:
p{
height: 50px;
width: 700px;
padding: 50px;
border: 15px dotted blueviolet;
margin: 10px 60px;
background-color: lightslategrey;
color: white;
font-family: Arial, Helvetica, sans-serif;
font-size: 20px;
}- Combing these two, the final CSS file should look similar to the following code. Knowing how to add additional features to these pages is crucial.
Code:
h2{
width: 500px;
font-size: 20px;
padding: 20px 50px;
border: 10px double blueviolet;
margin: 10px 50px;
background-color: lightcoral;
text-align: center;
}
p{
height: 50px;
width: 700px;
padding: 50px;
border: 15px dotted blueviolet;
margin: 10px 60px;
background-color: lightslategrey;
color: white;
font-family: Arial, Helvetica, sans-serif;
font-size: 20px;
}- Once the CSS file is complete, we will proceed with coding the HTML page. Like the previous example, we will first call the external style sheet on the HTML page.
- Now, we will write the page code using <h2> and <p>. The coding should be as follows:
Code:
<html>
<head>
<title>Testing box model</title>
<link rel = "stylesheet" href = "box.css">
</head>
<body>
<h2>This is test for Box Model for Heading element</h2>
<p>Box property test for the paragraph element. The styling is set accordingly.</p>
</body>
</html>- You can observe the final output by saving the HTML file and opening it through a browser. It should be similar to this:
Output:

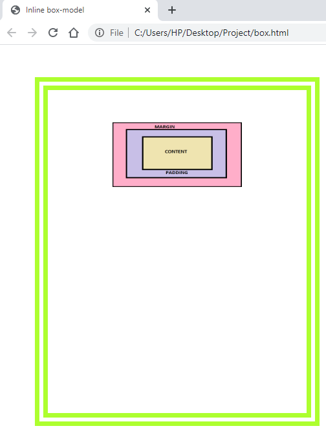
3. Using box-model as inline CSS with an image as the content.
- Since we use the inline style CSS for this example, we will style the layout for the paragraph element <p> in the HTML code. This inline styling code should be as follows:
Code:
<p style="height:400px; width: 200px; padding: 50px 100px; border: 20px double greenyellow; margin: 50px 50px;"></p>- Since we are supposed to use the image as content, we will place an image in the project folder and use the <img /> element to call the image within the <p /> tags like this:
Code:
<p style="height:400px; width: 200px; padding: 50px 100px; border: 20px double greenyellow; margin: 50px 50px;">
<img src='model.png' height="100px" width="200px">
</p>- The final HTML page should look like this:
Code:
<html>
<head>
<title>Inline box-model</title>
</head>
<body>
<p style="height:400px; width: 200px; padding: 50px 100px; border: 20px double greenyellow; margin: 50px 50px;">
<img src='model.png' height="100px" width="200px">
</p>
</body>
</html>
Output:
- The above examples give a basic idea of how the box-model works in CSS. You can use this to decide how various elements should be spread across the page. Customizing the features and trying out different parameter options will give a broader idea.
Recommended Articles
We hope that this EDUCBA information on the “CSS Box Model” was beneficial to you. You can view EDUCBA’s recommended articles for more information.

