Updated March 28, 2023

Definition of Nginx Auth_request
Nginx auth_request module is implementing the client authorization based result of subsequent queries. If the code subsequent will returns a response code which was 2xx then the access will be allowed. If the nginx auth_request will return a 403 or 401 it will show access denied by the subsequent code which was considered as an error. For the error of 404 clients will receive the authenticate header from the response.
Overview of nginx auth_request
The nginx request module is by default not built we can enable the same by using auth request configuration parameter module. The module of the access request is combined with modules of access like the access module and auth basic module. Nginx and the nginx plus will authenticate each request of our website with an external server and service. For performing an authentication nginx will make an http sub-request for a service that was external. If the subsequent code will return a 2xx response code then access will be allowed. This type of authentication is allowing to implement schemes of various authentication.
Using nginx auth_request
The nginx auth_request module is shipped with the nginx but it will require a compile nginx. At the time of downloading a source of nginx and compiling the code, we need to authenticate an auth_request module flag. The module of auth_request is sited between internet and backend which passes an nginx request any time when the request will come. It will first forward a request to the separate server for checking whether the user is authenticated and uses the HTTP response for deciding whether the request is allowed to continue the request from the backend.
Below example show how we can use the nginx auth_request in nginx configuration file are as follows.
Code –
location = /auth {
proxy_pass_request_body off;
proxy_set_header Content-Length “”;
proxy_set_header X-Original-URI $request_uri;
}

The nginx auth_request will enables the authorization based result on subsequent sets of URI on which subsequent request is sent. Below is the syntax of nginx auth_request is as follows.
Syntax –
auth_request $value_of_variable;
The nginx module of auth_request has the concept of users which is authenticating anyone for logging the users. The nginx auth_request is handling the request of http and returning http 401 and 200 depending on whether the user will be logged in. If suppose the user is not logged in then we need to know how we get them logged in and set the cookie session.
For accomplishing the same we need to use an open-source project as “vouch”. This will write in Go, so it is very easy to deploy. We can configure the same by using a single YAML file. Vouch is configured for authenticating the users by using a variety of OpenID and OAuth backend such as google or github.
For configuring the server block of the nginx server we will need to add auth request module into the nginx configuration file. The auth_request and vouch-validate will enable the flow. It will tell the auth_request module to send the request for URI before deciding whether it’s allowed to continue from the backend server. The vouch-validate will capture the URL and proxies from the vouch server which was listening from the port of 9090. We have no need to send the body of the post to the vouch because we care about the cookie policy.
Nginx auth_request configuration
The below steps shows nginx auth_request configuration as follows. First, we are installing the nginx on our system as follows.
- Install the nginx server.
apt-get install nginx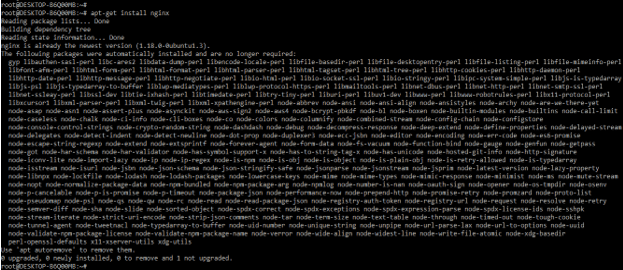
2. Check the version of nginx server.
nginx –V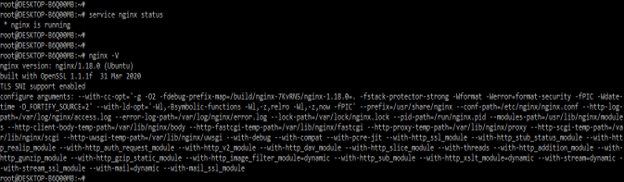
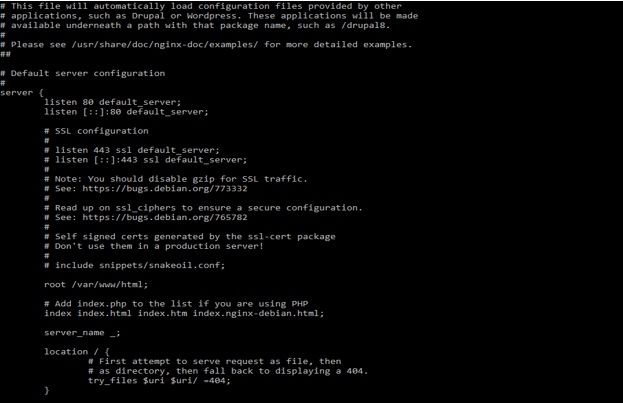
3. After installing the nginx server in this step we are opening the configuration file of nginx for changing the port number. We are opening the nginx configuration file using the vi commands as follows.
4. Now we are configuring the request authentication for specifying the directive of auth_request as follows.
Code –
location /private/ {

auth_request /auth;

}
5. After configuring the request authentication now we are specifying the proxy_pass directive which was inside the sub-request of proxy authentication.
Code –
location = /auth {

internal;

proxy_pass http://auth-server;

}
6. Now we are setting the variable value from the subsequent result with the directive of auth_request as follows.
Code –
location /private/ {

auth_request        /auth;

auth_request_set $auth_status $upstream_status;

}
7. Check the syntax of the configuration file if the syntax of the configuration file is ok then restart the nginx server, if the nginx configuration file contains the error then we need to check the configuration file.
nginx –t
service nginx restart

Nginx auth_request Example
Nginx auth_request will set the subsequent URI and auth_request_set will specify variable requests for specified values. The below example shows that nginx auth_request are as follows.
Below example will defining the structure which was we have defined the structure are as follows.
Code –
typedef struct {

ngx_str_t                 uri;

ngx_array_t              *vars;

} ngx_auth_request;
We need context structure to behold the state of things by using various callbacks by using the module. This structure will define the context.
Code –
typedef struct {

ngx_uint_t                done;

ngx_uint_t                status;

ngx_http_request_t       *subrequest;

} ngx_nginx_t;
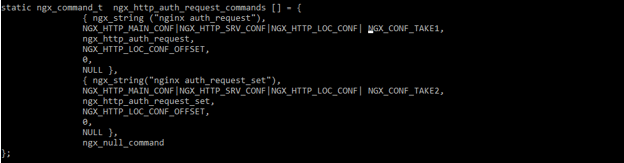
In the below example, we are using the custom callback for handling the variables we need to define the offset.
Code –
static ngx_command_t  ngx_http_auth_request_commands [] = {

{ ngx_string ("nginx auth_request"),

NGX_HTTP_MAIN_CONF|NGX_HTTP_SRV_CONF|NGX_HTTP_LOC_CONF|

NGX_CONF_TAKE1,

ngx_http_auth_request,

NGX_HTTP_LOC_CONF_OFFSET,

0,

NULL },

{ ngx_string("nginx auth_request_set"),

NGX_HTTP_MAIN_CONF|NGX_HTTP_SRV_CONF|NGX_HTTP_LOC_CONF|

NGX_CONF_TAKE2,

ngx_http_auth_request_set,

NGX_HTTP_LOC_CONF_OFFSET,

0,

NULL },

ngx_null_command

};
Conclusion
The nginx request module is by default not built we can enable the same by using auth request configuration parameter module. If the nginx auth_request will return a 403 or 401 it will show access denied by the subsequent code which was considered as an error.
Recommended Articles
This has been a guide to Nginx Auth_request. Here we discussed the Definition, Overviews, how to use, and examples with code implementation. You can also go through our other suggested articles to learn more –
