Updated February 21, 2023

Introduction to JMeter Command-Line Options
The command-line options in JMeter can use to generate an XML or CSV file, which comprises results in HTML format at the end of the load test. By default, JMeter provides a load test summary while it is functioning. The results in real-time at execution can be done using a backend listener. It is a common method to develop performance scripts in JMeter GUI. For executing the test, it is best to implement command line mode in JMeter.
JMeter Command-Line Options Overview
The basic command line parameter in JMeter is the script’s Jmeter –n –t name.JMX
Here,
- n gives the JMeter to execute in non-graphical user interface mode.
- t denotes the path to the source and makes the .jmx script execute.
In case the user wants to send additional parameters using a command line, he can add the parameters below,
- Jmeter –n –t name of the script.jmx = www.abc.com – Jusername = alpha
- The user can change the JMeter file and get all the parameters by using the inbuilt function in JMeter. it is called $ {_P variable name}
How to Run JMeter Command Line Options?
GUI in JMeter will offer a real-time execution and provide all the basic information like user errors, requests per second, and throughput values. However, other reasons like distributed testing, continuous delivery, continuous integration, and load make us use the command line mode in JMeter. If the user has to execute the test in the command line, the user needs to edit the script in terms of ramp-up, the number of users, and hostname, as much as possible. JMeter enables the user to pass the parameters in command line mode by using user-defined variables, which can be included in the test plan and config element.

There are two other methods to run the non-GUI mode. The user can add the result file or script file to the bin location of JMeter or can write the entire path in the command.
For example, JMeter –n –t name of the script.jmx –l results.jtl
And JMeter –n –t C: \Users \desktop \workup \name of the script.jmx –l
C: \users\desktop\work\results.jtl
Here – I is used to instructing to copy into the log file results.
Other methods to pass the additional parameters in non-GUI mode are as follows
R is used to list the remote servers and can be implemented at distributed testing
H: hostname of the proxy server
P is the port of the proxy server. The user can imply the properties in user-defined values with the support of the Jmeter _P function.
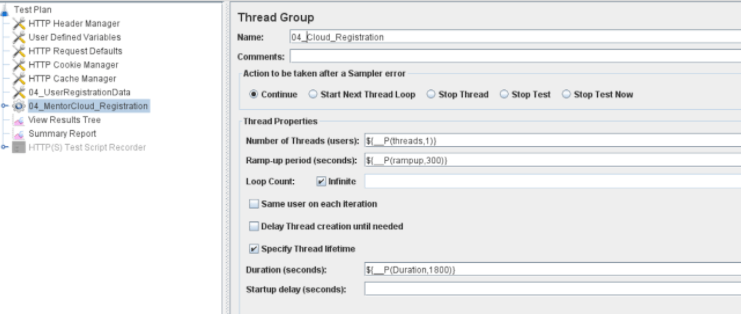
The number of threads – can be changed with -$ {_P (threads, 5)} which denotes the number of concurrent users to function, and here the default value is five.
Ramp up value is _$ {_P (ramp up, 300)} which gives the duration between peak load and test start. The default value here set is 300 seconds.
The test duration is -${_P (duration, 600)}, it gives the total duration of the test, and it is set to 600 seconds. It can be passed directly to the execution of non-GUI mode. So if there is any change in the environment, the user can change from script and CLI and doesn’t require any GUI.
Jmeter –jthreads –jduration –jrampup –n –t name of the script.jmx –I resultfile.jtl
If the user works for an organization and needs a complete secured network, he can depend on an internet connection or proxy server. However, it doesn’t allow the JMeter to associate and execute the performance test in the standard method. Instead, he has to provide the proxy port number, hostname, and firewall to the JMeter. he can execute the JMeter.sh file from the command line itself.
Jmeter –h name of the proxy server –p port number – u username –a password –n host.
Here h is the hostname or IP of the proxy server
P is the port of the proxy server
U is the username allotted for proxy authentication
a password for the proxy
n localhost to record the output.
JMeter HTTP Test Examples
If the organization expects huge traffic on a particular day, the performance tester must ensure all the company’s websites can handle a maximum number of concurrent users. However, it is aware that there are limitations. For example, the computer should have sufficient memory and CPU if the test is executed in the local machine’s graphical user interface mode. So, in this case, it is advised to configure command-line interface mode. So distribution mode is similar to a master-slave architecture where Java RMI supports JMeter communicating with slaves.
Some preparation should be made before implementing distributed testing. First, the user needs to connect slaves and masters for instant execution.
Navigate to the bin folder in Jmeter on the command prompt option.
Then run the following command.
: JMeter –n –t D: \staging _ rushtix _consolidated _100_new.jmx –R 172.1
Here the representation differs,
n is used to command the JMeter to execute the test in CLI mode
t gives the path of the .jmx file
I used to instruct and write the log files
r is remote server list or test slave list
g is also used at the end to generate reports if required.
The commands can be edited depending on the number of slaves and users involved in the test. The user can give the number of IPs in slave in the command line.
To generate the report, use the .jtl file and feed it into JMeter.

Conclusion
If the user needs to change any parameter like base URL, thread number, or thread count, he can do it in GUI, but it is not a good practice, so the CLI is used to pass parameters at the backend helps to make effective changes. Hence, using of CLI in JMeter is briefly discussed in this article.
Recommended Articles
This is a guide to JMeter Command-Line Options. Here we also discuss how to run JMeter Command-Line Options and the examples. You may also look at the following articles to learn more –
