Updated June 30, 2023

Introduction to Install Blender
Blender is a 3D modeling, animation, and rendering software. Most importantly, Blender is a free and open-source 3D computer graphics program. Blender is most commonly used to create animated films, art, 3D Printed models, visual effects, and video games. Blender was initially released in the year 1998 by Ton Roosendaal. The program is written in C, C++, and Python Languages.
Features of Blender
Some of the most essential features of Blender are below:
- UV unwrapping
- Texturing
- 3D modeling
- Rigging and skinning
- Particle simulation
- Soft body simulation
- Match moving
- Motion graphics
- Video editing
- Composting.
Blender is compatible with Microsoft Windows, Mac OS, and Linux operating systems. The program is available in 32- and 64-bits versions.
Blender supports an Internal render engine that helps in scanline rendering, ambient occlusion, and indirect lighting. These effects can be exported in many formats across various platforms. Blender also has a Path Tracer render engine called Cycles. This engine specializes in leveraging the Graphics Processing Unit for the rendering process. The Renderer Cycles also supports the Open Shading Language.
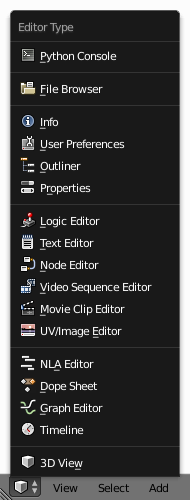
Blender integrates many different editors to view and modify various information techniques.
The program includes Keyframe animation toolsets. These tools specialize in Inverse Kinematics, curve, and lattice-based deformations, and shape animations. These tools also help the user to create non-linear animations. The program also incorporates a node-based compositor into the rendering process that operates with Open CL. The program uses Python scripting language for developing tools, game logic, task automation, and prototyping. Blender has Modifiers that help to perform constructive effects and Grease pencil tools for 2D animation in the 3D environment.
Blender has unlimited features in its bucket and is no less than other competing software in the 3D world. Moreover, being open-source and free software, it attracts many people from different fields of design.
Blender also simulates smoke, rain, dust, water, hair, and cloth. Blender uses the Lattice Boltzmann Method to simulate liquids and fluids that help the user to many extents.

System Requirement to Install Blender
The Following is the System Requirement to Install Blender:
1. We require the program to run on a minimum of a 32-bit dual-core 2GHz CPU with SSE2 support, but we mostly recommend a 64-bit quad-core CPU.
2. The software requires at least 2GB RAM. It is advised to use a RAM of about 8GB.
3. An Open GL 2.1 Graphics card is minimum requirement with 512 MB of Video RAM. We highly recommend using an Open GL 3.2 Graphics Card with 2GB of Video RAM at the same time.
4. A Display of 1280 x 768 pixels is the minimum requirement with a 24-bit color process.
5. To install Blender, you will also need the Visual C++ 2013 Redistributable Package.
Compatible File Formats
- Blender stores multiple scenes into a single file. This file is called a Blend File.
- The “. Blend” Files are platform-independent and compatible with different Blender versions.
- Blender arranges information as different types of “data blocks,” such as Objects, Meshes, Lamps, Scenes, Materials, and images.
- The users can also cooperate or modify the 3D Tools with the scripts that have Blender capabilities, and Blender supports that.
- Blender also assists many 3D file formats for the importing and exporting process. These formats are 3DS, FBX, DXF, SVG, VRML, STL, and X3D. These file formats are common formats of various 3D programs.
How to Install Blender on Windows Platform?
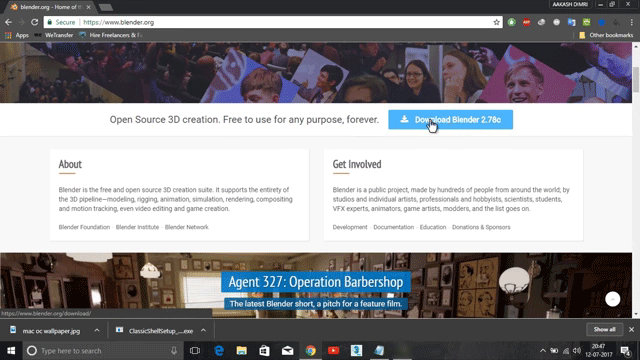
Step 1: Visit the Blender Website.
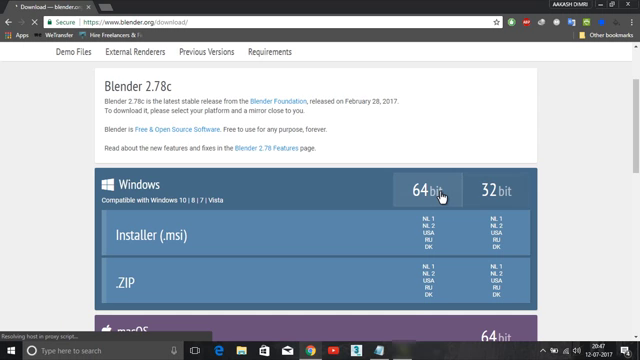
Step 2: Click on the link to access the Download page. Also, select the operating system to install the program.
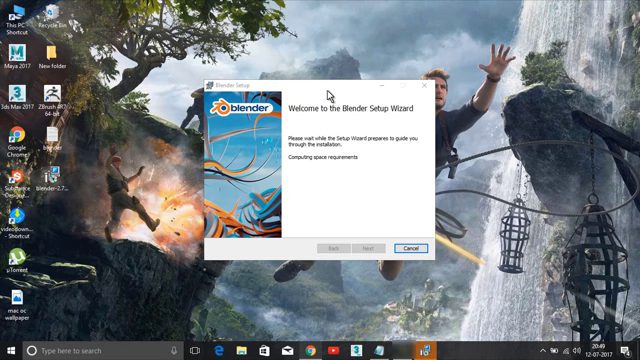
Step 3: Run the downloaded Installer, which will probably be available in the download folder.
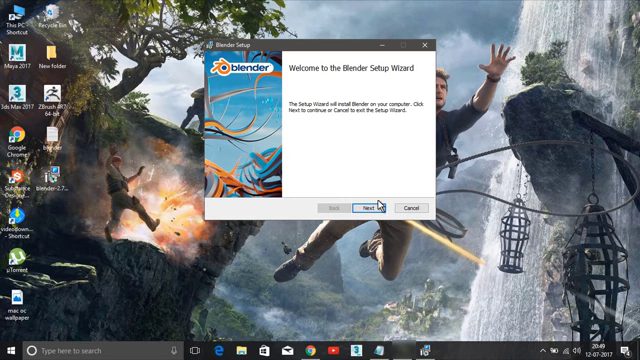
Step 4: Now, click on the Next Button to initiate the installation process.
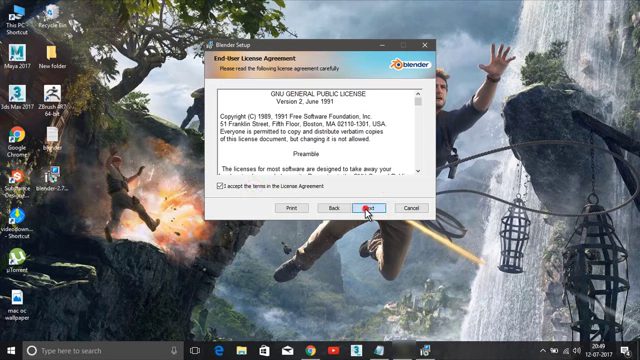
Step 5: Click on the Next Button when asked to move ahead in the process.
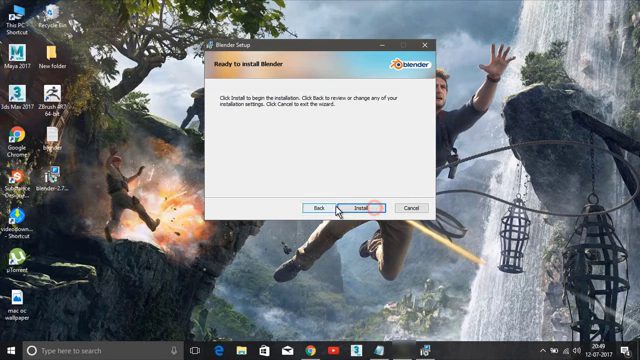
Step 6: In this step, the user can change the default location of the program. Click Install to Move ahead.
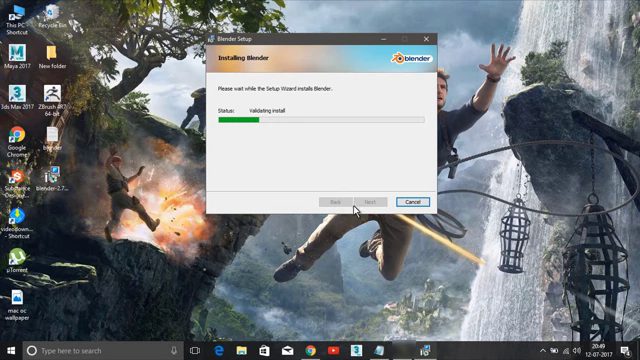
Step 7: Wait for the Program to Install Blender.
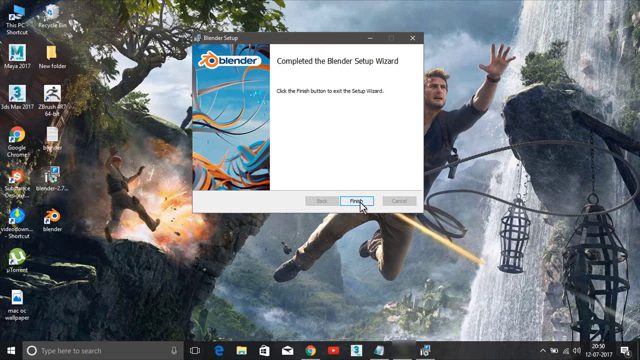
Step 8: Click on Finish and complete the Installation Blender process.
Step 9: After Installing the program, the Blender window will look like this. The interface of Blender is the same across all the operating systems.
Step 10: The software initiates with the default screen and divides into five main areas encompassing Editors in General. The Interface of Blender has
- Giant and wide 3D View
- There is a Timeline toolbar at the bottom of the UI
- The Properties Editor is located in the bottom right corner.
- At the Top Right, an Outliner is given.
- At the top of the UI, an Info Editor is seen.
Step 11: The User Interface of the Program is designed in such a way that helps the user understand each tool and feature easily.
Step 12: The User Interface presents a clear and organized layout, allowing users to view and work with all essential options and tools at a glance without the need to move or adjust the editors within the UI.
Step 13: The users can access the tools easily and effectively. They need not spend time selecting between the various tools. Blender also uses a lot of keyboard shortcuts to accelerate the work. Users can modify and update these keyboard shortcuts in the Keymap Editor.
Recommended Articles
This has been a guide to Install Blender. Here we discuss the Concept, Requirements & Step by Step process of Installing Blender on Windows. You can also go through our other Suggested Articles to learn more –
