What is a Family Tree in Excel?
A family tree in Excel is a digital drawing with photos and names of all family members, starting from grandparents, parents, aunts & uncles, siblings, cousins, and others, showing how each of them are related to one another. It can also show the family members’ gender, birth, and death dates, and the inheritance of certain traits or diseases.
To create a family tree in Excel, we can use 4 methods.
If you want to take your time and create a detailed and personalized family tree, choose these methods where we create a family tree from scratch:
Method #1: Using Shapes
Method #2: SmartArt
Or, if you want a quick and easy way to create a simple and standard family tree, you can follow these methods:
Method #3:Built-in Template
Method #4:Photo Family Tree
4 Methods to Create a Family Tree in Excel
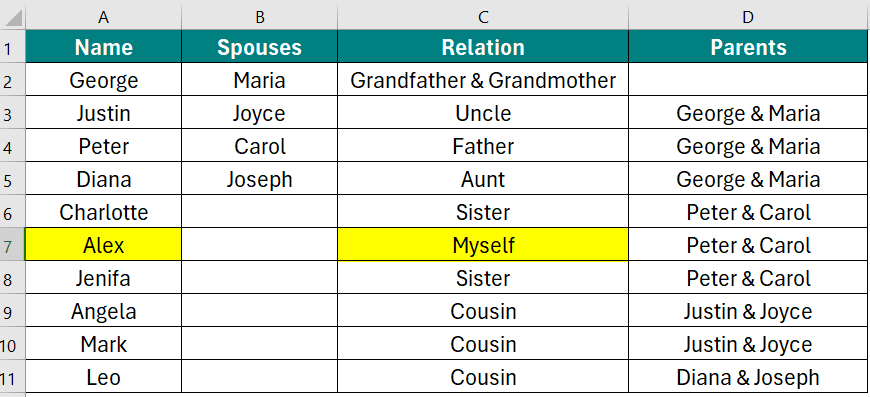
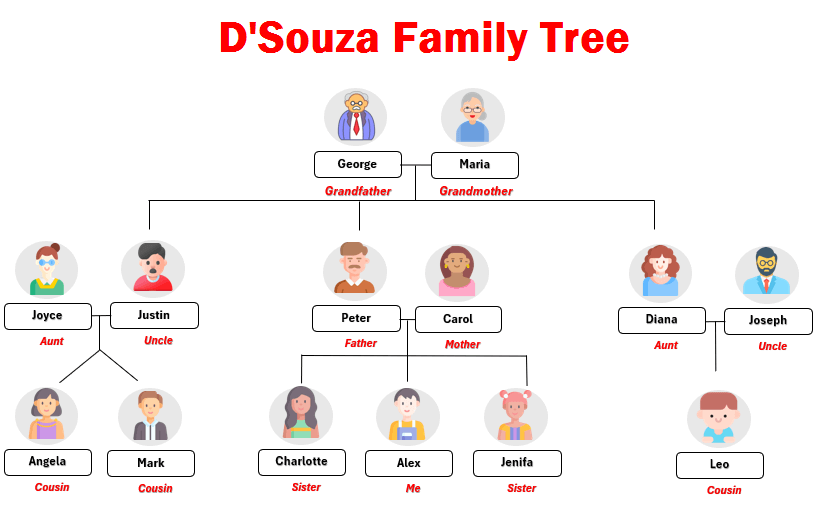
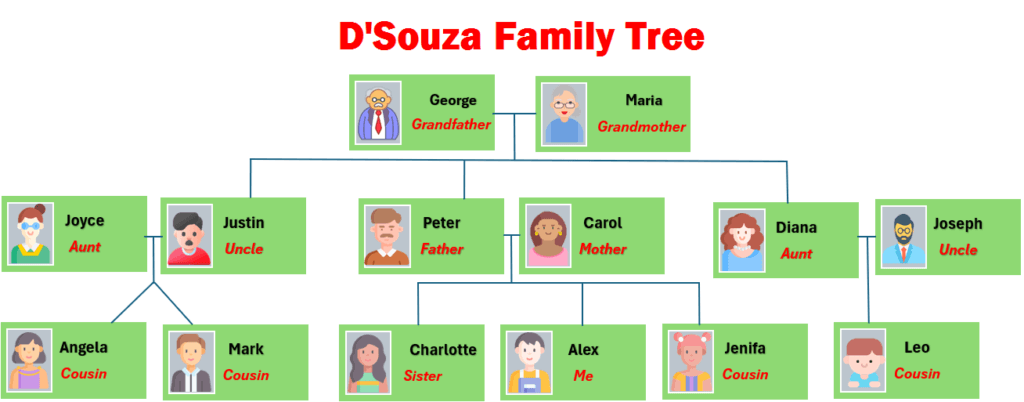
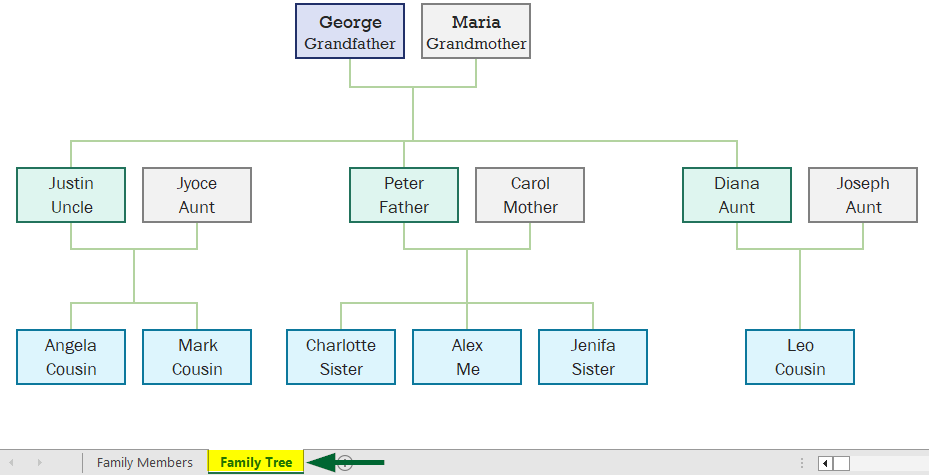
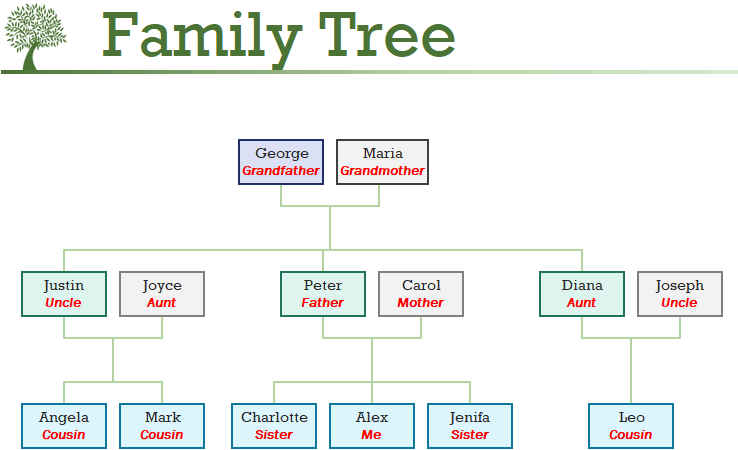
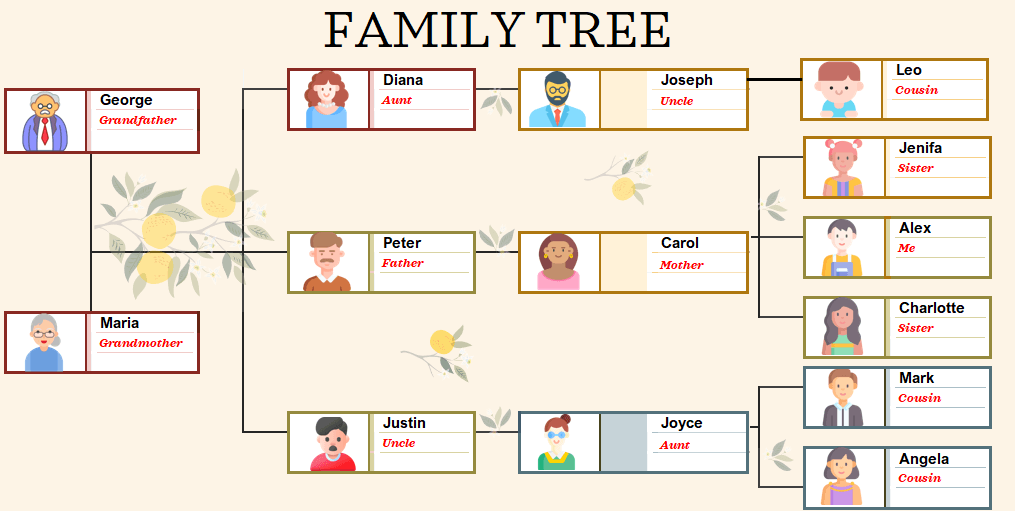
Let’s consider a scenario: Alex, a school student, has received an assignment from his teacher to create his family tree in Excel. In this assignment, he has to include details such as names, relationships, and photos of his family members.
Below are the details of Alex’s family. Let’s see how Alex creates a family tree in Excel using all 4 methods.
Method #1: Creating a Family Tree in Excel from Scratch Using Shapes
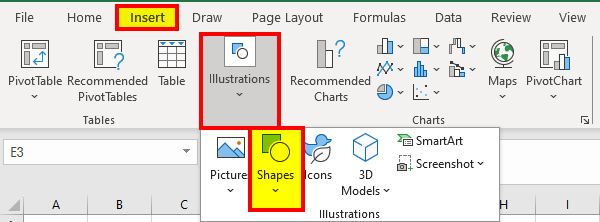
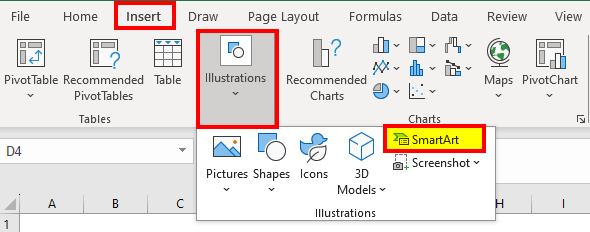
Step 1: Open a New Blank Excel Sheet, name it “My Family Tree”, and then:
- Click Insert Tab
- Find the Illustrations group
- Click on Shapes
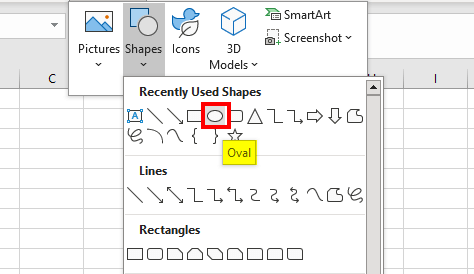
Step 2: Choose the shape of your choice to add the image of the first family member. The common shapes you can choose are square or oval.
Step 3: Once you choose the shape, a “+” sign will appear on your spreadsheet
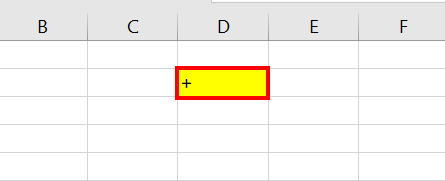
Step 4: Drag the sign in your spreadsheet to draw the shape.
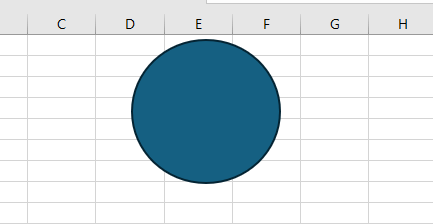
Step 5: Click on the shape, and a ShapeFormat Tab will appear.
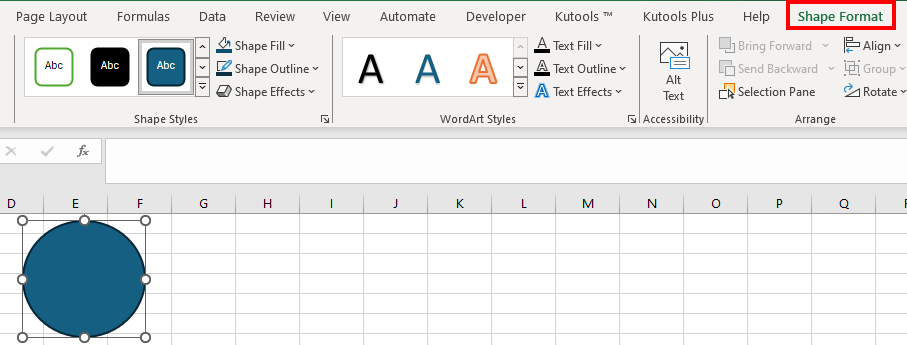
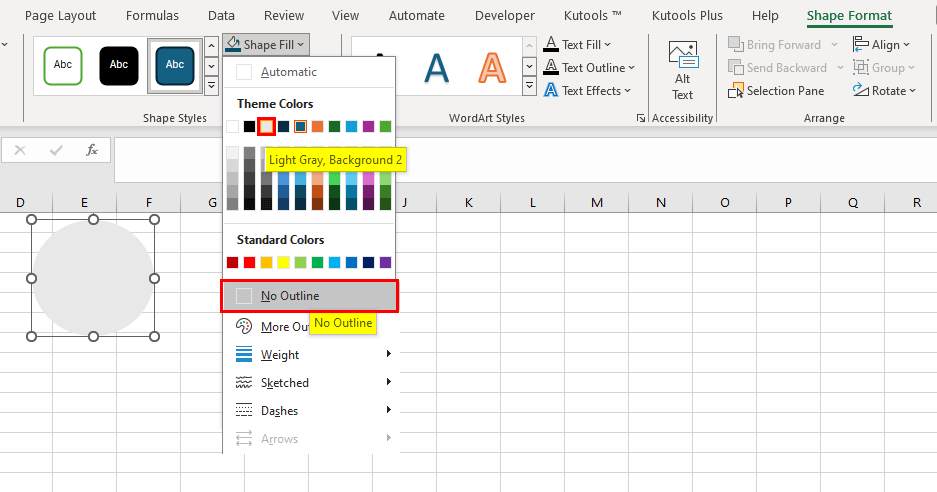
Step 6: In the Shape Format tab,
- Go to the Shape Styles group
- Select Shape Fill
- Click on the light Gray color
- Select No Outline from Shape Outline
Step 7: To add the name of the family member, we will create a box below the Circle shape. Go to Insert Tab> Illustrations> Shapes> Rectangle rounded corners.

Step 8: Shape Fill the rectangle with transparent fill and a black outline (check step 6).
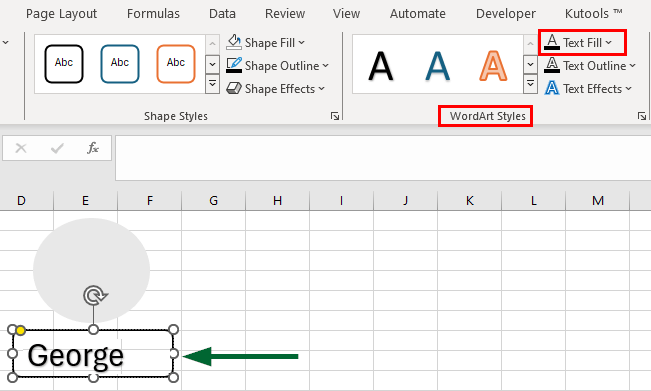
Step 9: Then to add a name in the rectangle,
- Select Text Fill from WordArt Style Group
- Type the name ‘George’
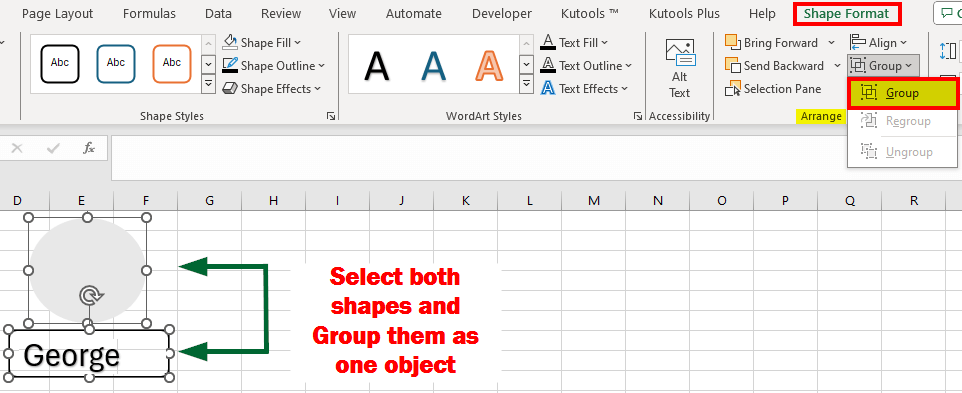
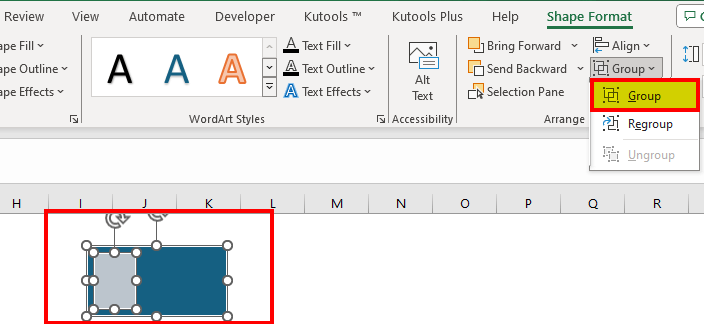
Step 10: To group both the circle and rectangle together,
- Select both the shapes
- Click on the Shape Format tab
- Find the Arrange Group
- Select the “Group” option
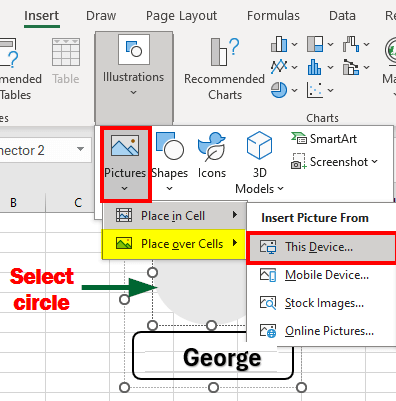
Step 11: Next, let us insert the image in the circle. For this, select the circle shape and click on the Insert Tab> Illustrations> Pictures> Place Over Cells> This Device.
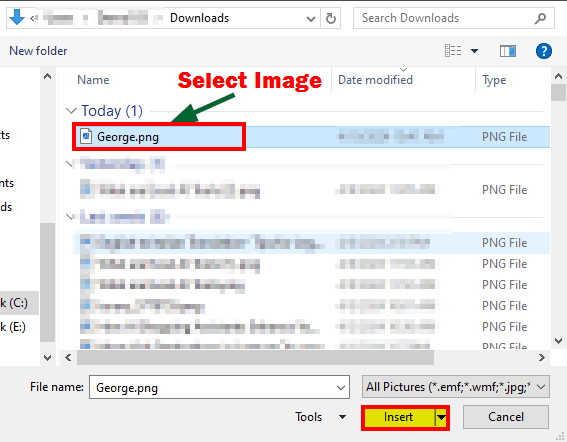
Step 12: If you choose the “This Device” option, a Downloads section will appear. Here, you must select the image you want and then click on Insert.
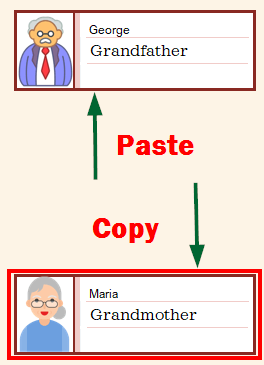
Step 13: As you click insert, the image is added to the Excel sheet. You will have to select and move the image over the circle. You can also group it with the shape (check step 10).

Step 14: Add Relation by creating a box below the name (Step 7), and add the relationship (Step 9) and group it (Step 10).

Step 15: To create other family members,
- Copy the grouped shapes: circle, rectangle, and the image
- Then paste these shapes wherever you want it
- Make changes to all names and replace their images
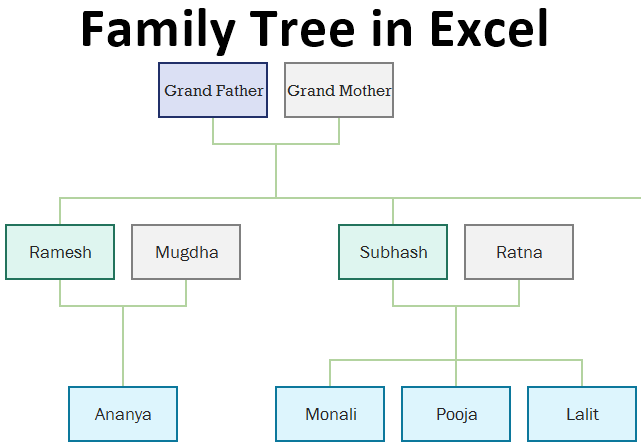
- Link them with a horizontal or vertical line (as we did for the grandmother below). To Insert a line, select Insert Tab> Illustrations> Shapes> Line.

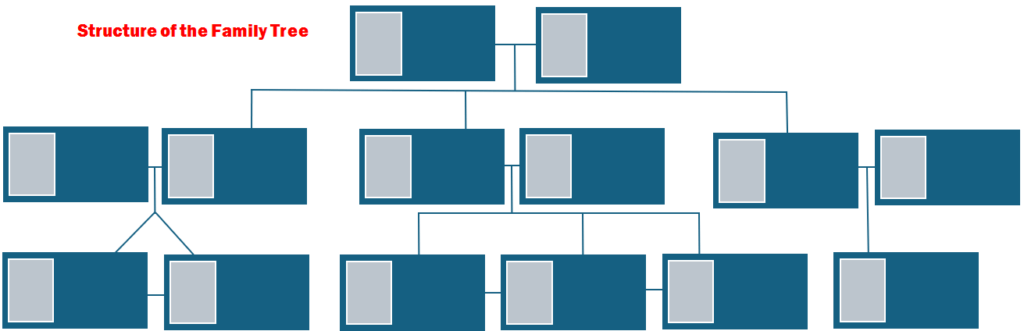
The grandparents have three children, Justin, Peter, and Diana, and all are married and have kids.
Method #2: SmartArt Method
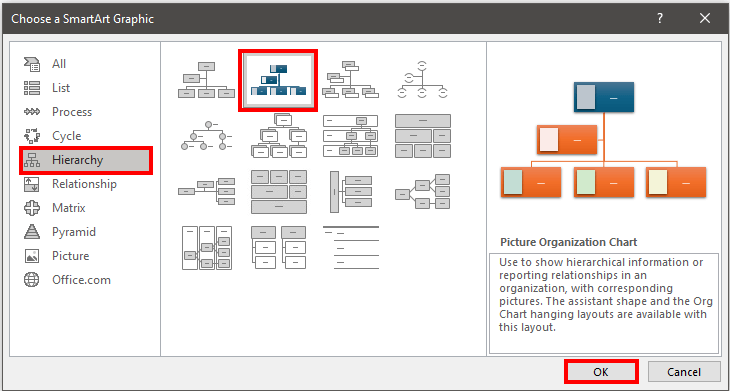
Step 1: Open a new blank Excel Sheet, click Insert Tab from the ribbon, and then click on SmartArt from the Illustrations Group. A dialog box will open.
Step 2: From the dialog box, choose any design from the Hierarchy listed in the SmartArt Graphic and click OK.
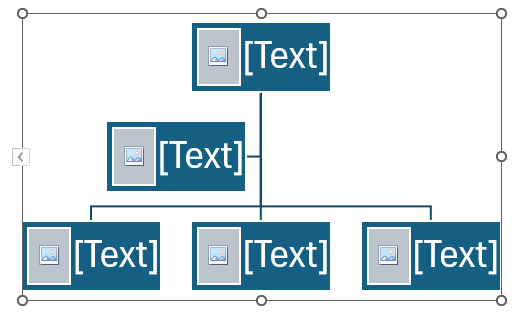
Step 3: The design will be inserted into the spreadsheet.
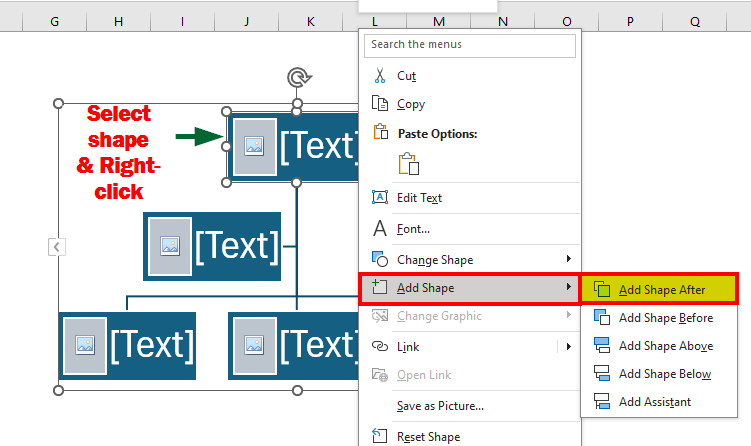
Step 4: Right now, we have 5 boxes to add details of family members, if you need more boxes,
- Select one of the boxes,
- Right-click and select Add Shape
- Click Add Shape After
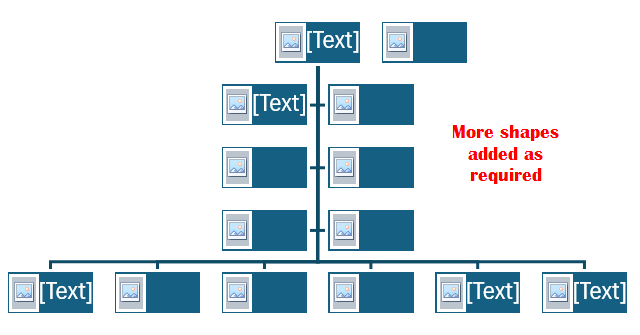
Step 5: After adding more boxes, the design will look as shown below.
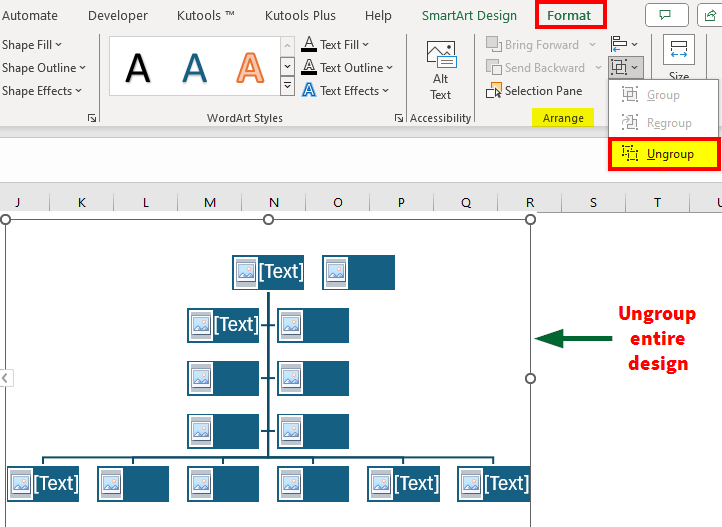
Step 6: Now, to start adding the details of your family, we first need to ungroup and group the overall design 4 times. Here’s why:
- First, we will ungroup the entire design to ungroup only the boxes and lines that are connected as one image.
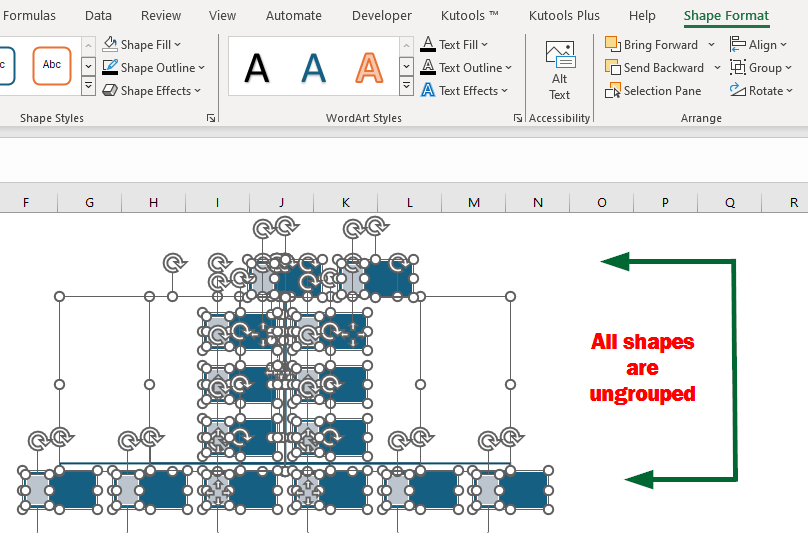
- We will again ungroup the whole design to ungroup each shape present in it. This will allow us to delete the lines and add images and text easily.
- Next, we will group the image box and the Text shape to move or resize the shape together.
- Finally, once we arrange the boxes as per the required order, we can again group the whole diagram together.
Method #3: Using In-Built Family Tree Template Generator
Excel offers ready-to-use templates to help you generate and customize a family tree in just a few minutes.
Here’s how you can do it:
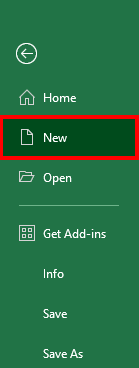
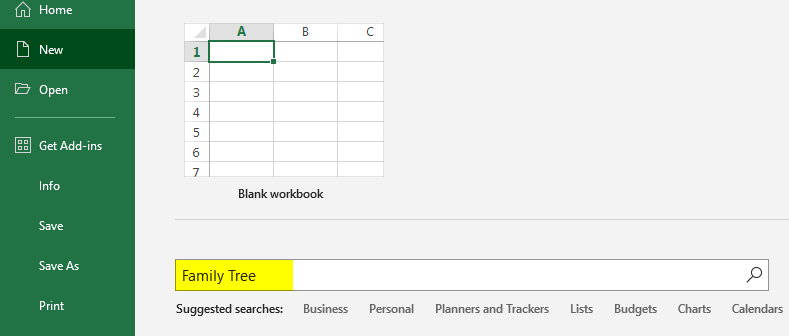
Step 1: Open an Excel spreadsheet. Go to the File menu and click New to create a new workbook.
Step 2: In the search bar, type Family Tree and press Enter.
Step 3: Excel will display several templates for family trees.
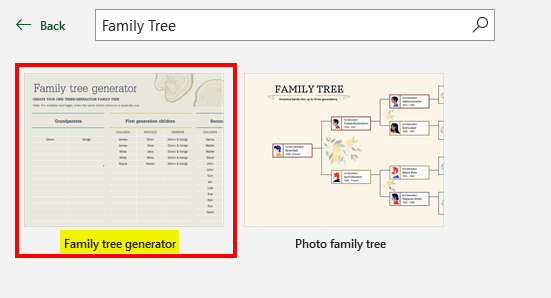
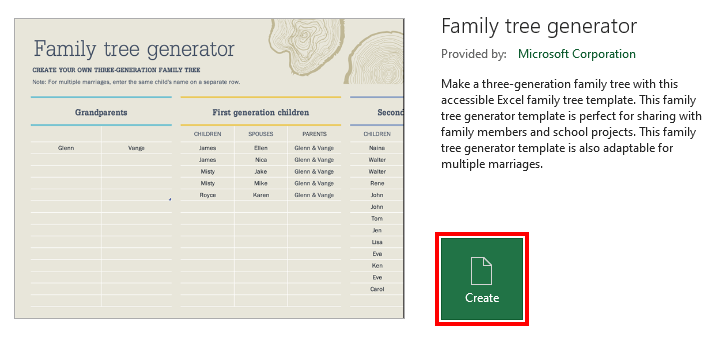
Step 4: Choose Family Tree Generator and click on Create to open it.
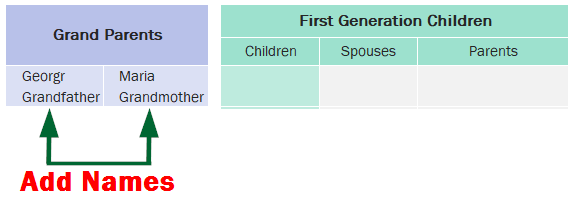
Step 5: Once the template opens, you will see placeholders to add your family members’ names, relationships, and other details.
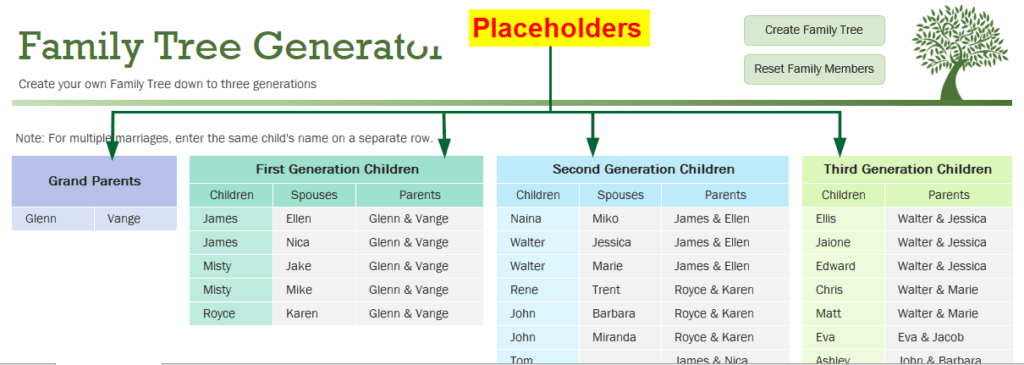
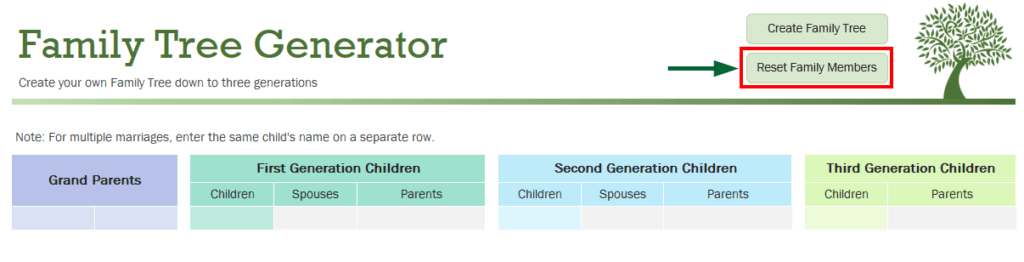
Step 6: But first, you need to remove all inbuilt details; for that, simply click on Reset Family Members.
Step 7: Start typing to add your family member’s information.
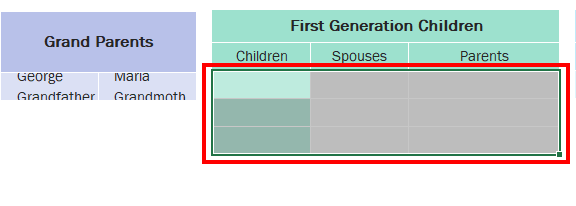
Step 8: To add more rows to any table, simply select the rows and columns and drag them down by clicking on the green square in the bottom right corner.
Step 9: Add all your Family members’ details.

Note: In the Parents Column, the in-build Excel Template already has a drop-down option where you can select parents’ names.
Step 10: Click on Create Family Tree, mentioned above the table in the right-hand corner.
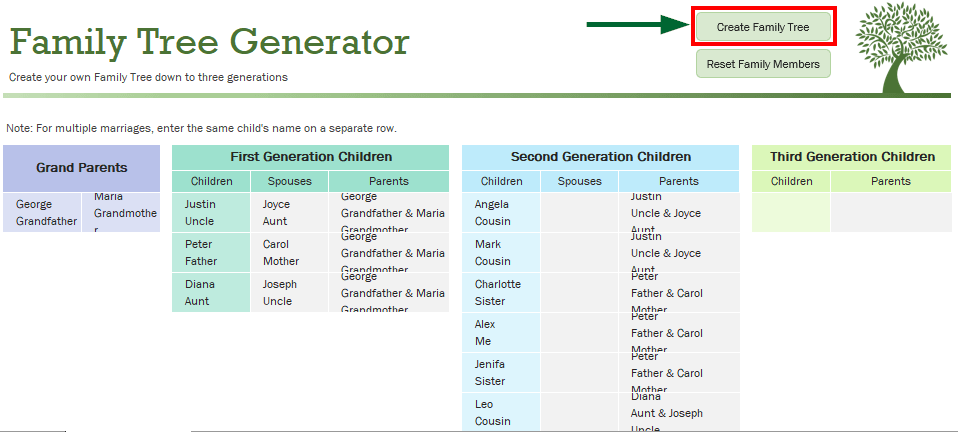
Step 11: The Family Tree will be created in the next tab.
Method #4: Photo Family Tree
Follow Steps 1 to Step 3 from the Method #3.
Step 4: Choose Photo Family Tree and click on Create to open it.

Step 5: A built-in Family Tree will open.
Step 6: To make changes to the family tree, you can delete or add new boxes by copying and pasting the cells. Once you are satisfied with the overall design, you can start adding the names and photos.
Step 7: We will use the cell border to add a line between the boxes (to show the relationship between the members).
Here is how we can do it:
- Select cells where you want the line. We have selected E14 to E20.
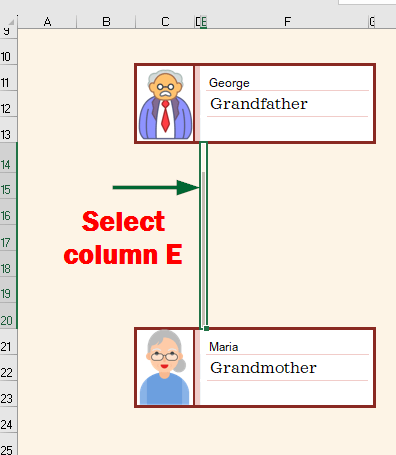
- Click on Home Tab> Font group > Borders dropdown > Right Border.
- A line will appear.
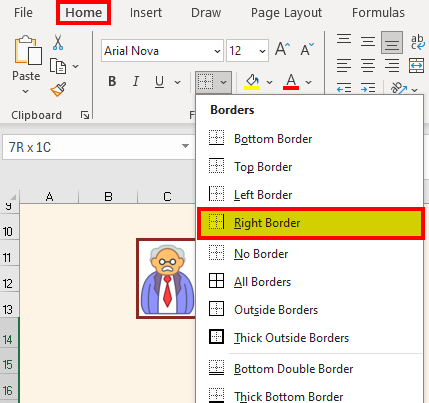
Step 8: Make the borderline thick,
- Select the cells (E14 to E20)
- Go to the Home tab
- Click on the Border box
- Scroll down to Draw Borders
- Click Line Style
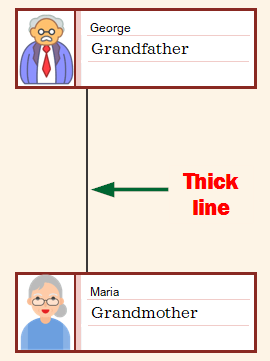
- Select the thick line.
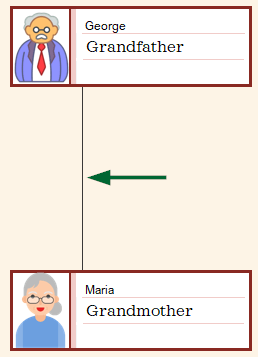
- A pencil will appear. Point the pencil on the line and scroll it down. This will make the borderline thick black.
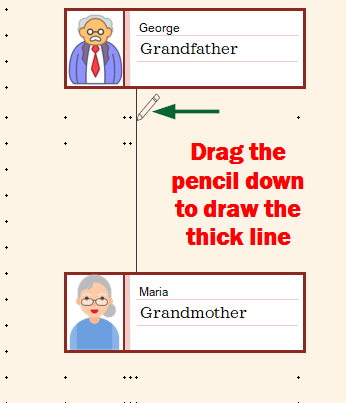
- The thick border line will be clearly visible.
Note: You can also change the line color, font color, and font style to format it according to your requirements.
Final Thoughts
Creating family trees is not just a project for school students but an important tool for professionals to organize a family’s medical history. Traditionally, we used to draw family trees on paper, but with modern tools like Excel, we can create and organize family trees digitally. Whatever the purpose, Excel is an amazing tool for creating family trees easily and effectively.
Recommended Articles
In this guide, we discussed how to create a Family Tree in Excel using 4 different methods. If you found this guide helpful, you can also explore some of the other useful articles:
