Updated May 23, 2023

Introduction to Django ImageField
The following article provides an outline for Django ImageField. There is a need to store and process images in web applications; the same necessity also stays with Django-based image applications. So, you can flexibly declare and process the image fields in Django. Declining the image-based fields and retrieving the images is comparatively straightforward in Django applications. The field declared as an image field needs to be associated with an URL location in the background, and the specific file will be brought back when a retrieval request is raised. This is how the image-level field storage and retrieval occur in the background. This null value will also be considered for whichever records the image is not uploaded.
Syntax of Django ImageField
Here is the syntax for declaring image fields in Django:
Foreignkey name = models.ImageField(null_argument,blank_argument ,uploadto_argument)Here the first argument represents a null argument. This means that the null value is used to indicate that no image has been uploaded for certain records. The null value will be considered for records where the image has not been uploaded. Additionally, the blank argument corresponds to the value when an empty or blank value is associated with the image field argument.
The last argument is the upload to the argument. This is a very critical argument. This argument determines the location of storage.We will consider the location where we must store the loaded documents here.So, we will consider the path of the documents given here, and we will store the reports at the mentioned location. This is how we carry out the document storage location.
Creation of Django ImageField
Given below shows the creation of Django ImageField:
1. Changes in Models.py file
As the syntax section mentions, the image field must be declared in the models.py file. We notice that the image field is declared the last field in the model.
models.py:
from django.db import models
from django.contrib.auth.models import User
# Model variables
# Create your models here.
class Bride(models.Model):
Example_name = models.CharField(max_length=200,null=True)
Example_age = models.IntegerField(null=True)
Example_thegai = models.CharField(max_length=200,null=True)
Example_State = models.CharField(max_length=50,null=True)
Example_District = models.CharField(max_length=50,null=True)
Example_Address = models.TextField(null=True)
Example_Phone = models.BigIntegerField(null=True)
Example_profession = models.CharField(max_length=200,null=True)
Example_salary = models.BigIntegerField(null=True)
Example_Under_Graduation_Degree = models.CharField(max_length=200,null=True)
Example_Under_Graduation_college = models.CharField(max_length=400,null=True)
Example_Post_Graduation_Degree = models.CharField(max_length=200,null=True)
Example_Post_Graduation_college = models.CharField(max_length=400,null=True)
Example_Rasi = models.CharField(max_length=200,null=True)
Example_Nakshatra = models.CharField(max_length=200,null=True)
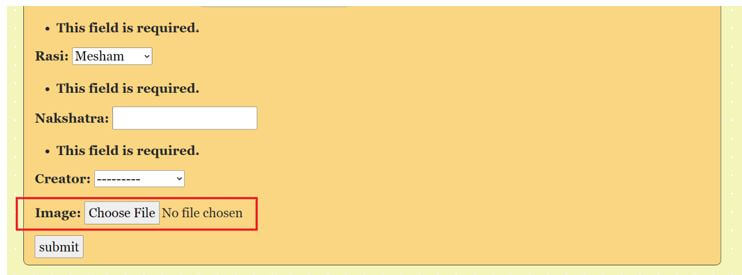
Image = models.ImageField(null=True,blank=True,upload_to="img/%y")
def __str__(self):
return self.name2. Changes in Settings.py file
The media root and URL files must be updated to the Settings.py file. In addition, the path of the media files needs to be mentioned here for these variables.
Settings.py:
MIDDLEWARE = [
    'django.middleware.security.SecurityMiddleware',
    'django.contrib.sessions.middleware.SessionMiddleware',
    'django.middleware.common.CommonMiddleware',
    'django.middleware.csrf.CsrfViewMiddleware',
    'django.contrib.auth.middleware.AuthenticationMiddleware',
    'django.contrib.messages.middleware.MessageMiddleware',
    'django.middleware.clickjacking.XFrameOptionsMiddleware',
]
ROOT_URLCONF = 'Matrimony.urls'
TEMPLATES = [
    {
        'BACKEND': 'django.template.backends.django.DjangoTemplates',
        'DIRS': [Template_DIR,],
        'APP_DIRS': True,
        'OPTIONS': {
            'context_processors': [
                'django.template.context_processors.debug',
                'django.template.context_processors.request',
                'django.contrib.auth.context_processors.auth',
                'django.contrib.messages.context_processors.messages',
            ],
        },
    },
]
DATABASES = {
    'default': {
        'ENGINE': 'django.db.backends.sqlite3',
        'NAME': BASE_DIR / 'db.sqlite3',
    }
}
STATIC_URL = '/static/'
MEDIA_URL = '/images/'
STATICFILES_DIRS = [os.path.join(BASE_DIR, 'static'), ]
print(STATICFILES_DIRS)
STATIC_ROOT = os.path.join(BASE_DIR, 'static')
MEDIA_ROOT = os.path.join(BASE_DIR, 'static/images')
print(STATIC_ROOT)
3. Changes in the url.py file
Instantiate the media root and document root variables inside the url.py file as shown below.
The changes for the url.py file are as follows:
url.py:
from django.contrib import admin
from django.urls import path
from django.conf.urls import url
from matrimony_pages import views
from django.conf import settings
from django.conf.urls.static import static
urlpatterns = [
    url(r'^$',views.Welcome_page,name='Welcome_page'),
    url(r'Mainpage/',views.Main_page,name='Main_page'),
    url(r'form/',views.form_view,name='form_view'),
    url(r"signup/", views.Sign_up_request, name="register"),
    url(r"login/", views.login_request, name="login"),
    path(r'profile//',views.profile_page,name='profile'),
    url(r'logout/',views.logout_request,name='logout'),
    url(r'reg/',views.profile_reg_user,name='reg'),
    path(r'update//',views.form_update,name='update'),
    path('admin/', admin.site.urls),
]+ static(settings.MEDIA_URL,document_root=settings.MEDIA_ROOT)
4. Create a view for the form
The image value, when submitted, has to be stored, and when retrieved, it has to be pulled from the database. This can be achieved using the object created for the model. The process of doing this is given in the below-given views.py section.
views.py:
@login_required
def profile_page(request,pk):
      context2 = {}
      Key_details = Bride.objects.get(id=pk)
      Profile_name =  Key_details.name
      Profile_Age =  Key_details.age
      Profile_Thegai =  Key_details.thegai
      Profile_state =  Key_details.State
      Profile_district =  Key_details.District
      Profile_Address =  Key_details.Address
      Profile_Phone =  Key_details.Phone
      Profile_Profession =  Key_details.profession
      Profile_Salary =  Key_details.salary
      Profile_UG =  Key_details.Under_Graduation_Degree
      Profile_UGC =  Key_details.Under_Graduation_college
      Profile_PG =  Key_details.Post_Graduation_Degree
      Profile_PGC =  Key_details.Post_Graduation_college
      Profile_UG =  Key_details.Under_Graduation_Degree
      Profile_UGC =  Key_details.Under_Graduation_college
      Profile_PG =  Key_details.Post_Graduation_Degree
      Profile_PGC =  Key_details.Post_Graduation_college
      Profile_Rasi =  Key_details.Rasi
      Profile_Nakshatra =  Key_details.Nakshatra
      Profile_Image =  Key_details.Image
      context2['Age'] = Profile_Age
      context2['name'] = Profile_name
      context2['thegai'] = Profile_Thegai
      context2['State'] = Profile_state
      context2['district'] = Profile_district
      context2['Address'] = Profile_Address
      context2['Phone'] = Profile_Phone
      context2['profession'] = Profile_Profession
      context2['Under_Graduation_Degree'] = Profile_UG
      context2['Under_Graduation_college'] = Profile_UGC
      context2['Post_Graduation_Degree'] = Profile_PG
      context2['Post_Graduation_college'] = Profile_PGC
      context2['Rasi'] = Profile_Rasi
      context2['Nakshatra'] = Profile_Nakshatra
      context2['Image'] = Profile_Image
      print(Key_details.Creator)
      print(context2)
      return  render(request,'Profilepage.html',context2)
5. Formulate an HTML file for displaying the form
You have to perform corresponding changes to the HTML pages.
Profilepage.html:
<!DOCTYPE html>
<html style="font-size: 16px;">
<head>
<title>Profile</title>
{% load static %}
<link rel="stylesheet" href="{% static 'admin/css/Formpage.css' %}" media="screen">
<meta name="viewport" content="width=device-width, initial-scale=1, maximum-scale=1, minimum-scale=1" />
<!-- Script -->
<script src="https://ajax.googleapis.com/ajax/libs/jquery/3.5.1/jquery.min.js"></script>
</head>
<body class="body">
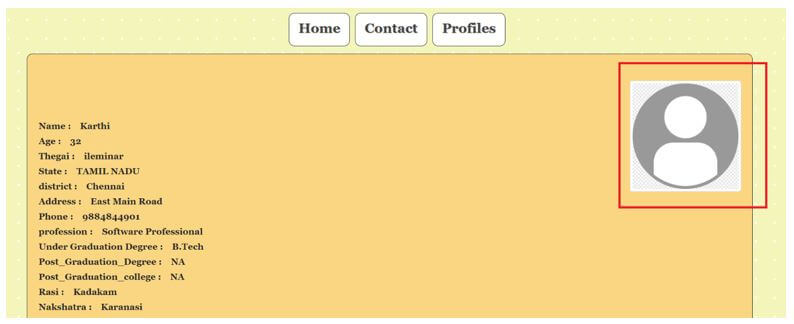
<nav class='navbar'>
<div class='navbar_div'>
<a class="navbar" onclick="redirect2()" >Home </a>
<a class="navbar" onclick="redirect2()" >Contact</a>
<a class="navbar" onclick="redirect1()" >Profiles</a>
</div>
</nav>
<div class="formarea">
<br>
{% block content %}
{% if Image %}
<img src="{{Image.url}}" align="right" alt="Image" class="img-thumbnail" style="max-height:200px">
{% else %}
<img src="{% static 'admin/img/default.png' %}" align="right" alt="Image" class="img-thumbnail" style="max-height:200px">
{% endif%}
<br></br>
<h6><strong>Name :    {{name}}</strong></h6>
<h6><strong>Age :    {{Age}}</strong></h6>
<h6><strong>Thegai :    {{thegai}}</strong></h6>
<h6><strong>State :    {{State}}</strong></h6>
<h6><strong>district :    {{district}}</strong></h6>
<h6><strong>Address :    {{Address}}</strong></h6>
<h6><strong>Phone :    {{Phone}}</strong></h6>
<h6><strong>profession :    {{profession}}</strong></h6>
<h6><strong>Under Graduation Degree :    {{Under_Graduation_Degree}}</strong></h6>
<h6><strong>Post_Graduation_Degree :    {{Post_Graduation_Degree}}</strong></h6>
<h6><strong>Post_Graduation_college :    {{Post_Graduation_college}}</strong></h6>
<h6><strong>Rasi :    {{Rasi}}</strong></h6>
<h6><strong>Nakshatra :    {{Nakshatra}}</strong></h6>
{% endblock content %}
</div>
<script>
function form1() {
window.location.href = "http://127.0.0.1:8000/form";
}
function redirect1() {
window.location.href = "http://127.0.0.1:8000/Mainpage";
}
function redirect2() {
window.location.href = "http://127.0.0.1:8000/";
}
function redirect3() {
window.location.href = "http://127.0.0.1:8000/profile";
}
</script>
</body>
</html>Output:
Conclusion
This article explains how to declare the Image field in a Django setup and render the changes to an HTML page, displaying the image at the desired position. The article also covers how to control the padding of the image using the HTML division on the page.
Recommended Articles
We hope that this EDUCBA information on “Django ImageField” was beneficial to you. You can view EDUCBA’s recommended articles for more information.

