Updated June 23, 2023

Introduction to CSS Link Color
The advantage of using Cascading Style Sheet is that it offers every kind of styling. The developer can control how the link will behave using various pseudo-classes. Also, one can assign different colors, and the link color will change according to its usage. This styling helps the end-user differentiate between various links based on their current state. Let us have a look at some of the properties offered by CSS to customize and animate the hyperlinks on a page.
Usage and Examples of CSS Link Color
There are various states of a hyperlink. CSS offers pseudo-classes for each of these states, which can be custom styles by developers according to the requirement of the web page. ‘Visited’ refers to a link that has been accessed. ‘Hover’ is the link state when the user hovers over the link. Let us look at the example, see how each state can be styled, and see its demonstration.
1. Demonstrating different colors for different link states using External CSS
- Since we use external CSS, we will create the CSS file first.
- In other terms, we will style <a> element, and each state will be defined as a class i.e. a: link, a: hover, a: visited, a: active.
- We will define the pseudo-class and define the styling for each. The coding for each class will look like this:
a:link{
font-style: normal;
color: blue;
font-family: Arial, Helvetica, sans-serif;
}- The final CSS code will look as below:
a:link{
font-style: normal;
color: blue;
font-family: Arial, Helvetica, sans-serif;
}
a:hover{
font-style: italic;
color: darkgreen;
}
a:visited{
font-style: normal;
color: darkred;
font-family: Arial, Helvetica, sans-serif;
}
a:active{
font-style: italic;
color: yellow;
}- Next, we will code for the HTML page. Since this is example uses external CSS, in the header section, we will call for the external CSS file.
- In the body section, we define the link using the element <a>. The final HTML code will look as follows:
<html>
<head>
<title>Hyperlink Styling</title>
<link rel="stylesheet" type="text/css" href="link.css">
</head>
<body>
<h2>This page demonstrates the various states of hyperlink</h2>
<b><a href="https://www.google.com">This is a hyperlink</a></b>
<ol>
<li>If the link is not used, it will appear Blue and normal</li>
<li>If the link is hovered upon, it will appear Green and Italic </li>
<li>If the link has been used, it will appear Red and normal</li>
<li>If the link is active, it will be Yellow and Italic</li>
</ol>
</body>
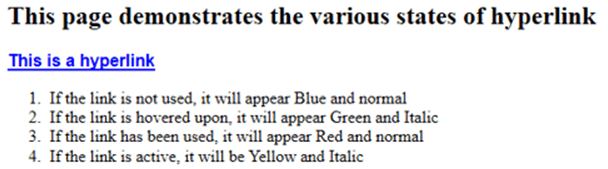
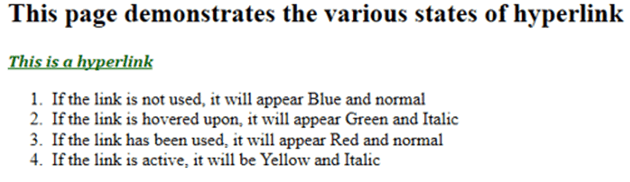
</html>- We can see the final outcome by saving this page and opening it through a browser.
- The link will initially appear to be blue, as in the first screenshot.
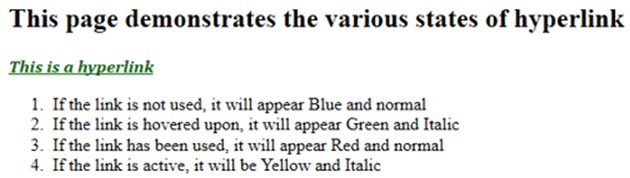
- It will change color to Green and italics when we hover over it.
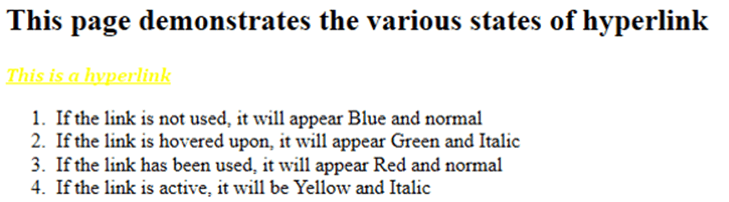
- You can observe the color change to yellow when the link is clicked.
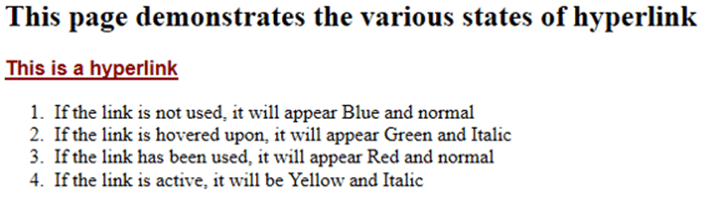
- And in the final screenshot, you can see that the link, once visited, turns into a dark red color.
2. Styling hyperlinks using Internal CSS
- In this example, we will demonstrate hyperlink styling using internal CSS.
- Since this example uses internal CSS, we will directly code for the HTML page.
- In the header section, we will define the styling for each state of the link (as a pseudo-class) within the <style> element.
<head>
<title>Hyperlink Styling</title>
<style>
a:link{
font-style: normal;
color: blue;
font-family: Arial, Helvetica, sans-serif;
}
a:hover{
font-style: italic;
color: darkgreen;
}
a:visited{
font-style: normal;
color: darkred;
font-family: Arial, Helvetica, sans-serif;
}
a:active{
font-style: italic;
color: yellow;
}
</style>
</head>- In the body section, similar to the above example, we will use the element <a> to demonstrate the usage of each state of the link that has been styled. The final HTML code will look as below:
<html>
<head>
<title>Hyperlink Styling</title>
<style>
a:link{
font-style: normal;
color: blue;
font-family: Arial, Helvetica, sans-serif;
}
a:hover{
font-style: italic;
color: darkgreen;
}
a:visited{
font-style: normal;
color: darkred;
font-family: Arial, Helvetica, sans-serif;
}
a:active{
font-style: italic;
color: yellow;
}
</style>
</head>
<body>
<h2>This page demonstrates the various states of hyperlink</h2>
<b><a href="https://www.google.com">This is a hyperlink</a></b>
<ol>
<li>If the link is not used, it will appear Blue and normal</li>
<li>If the link is hovered upon, it will appear Green and Italic </li>
<li>If the link has been used, it will appear Red and normal</li>
<li>If the link is active, it will be Yellow and Italic</li>
</ol>
</body>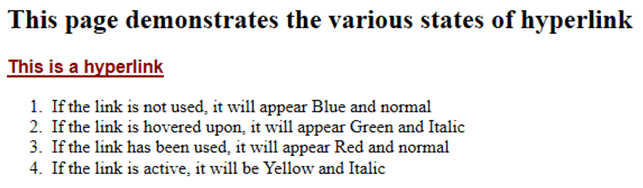
</html>- Saving this page and opening it through a browser will help us see the outcome similar to the screenshots below.
- The link will initially appear to be blue, as in the first screenshot.

- It will change color to Green and italics when we will hover over it.
- You can observe the color change to yellow when the link is clicked.

- And in the final screenshot, you can see that the link, once visited, turns into a dark red color.
Conclusion
The examples showcased how different colors and states can be used to style links, enhancing user-friendliness and facilitating easier navigation and interaction for end users on a webpage. The developers can use these states of the link as required by the page. Also, this is just one of the few options on how links can be stylized.
Recommended Articles
This is a guide to CSS Link Color. Here we also discuss the introduction and usage of css link color along with a different example and its code implementation. You may also have a look at the following articles to learn more –

